In this article, we’ll show how to manually patch a VMware host from the command line, and how to upgrade your ESXi version (in this example, we will upgrade a VMware ESXi 6.7 host to version 7.0).
You can manually update VMware ESXi from the esxcli console on standalone ESXi hosts (or free VMware vSphere Hypervisor), small installations, or test environments. To update a large VMware vSphere infrastructure with vCenter, it is better to use VMware Update Manager/VMware Lifecycle Manager.
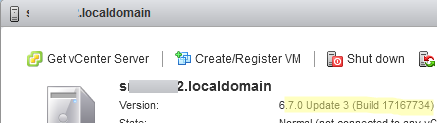
Check the current ESXi version installed on your server. You can do it in the vSphere Web Client:
Or from the ESXi console using the command:
vmware -v

In this example, VMware ESXi 6.7.0 build-1716773 is installed on the server.
How to Install Updates (Patches) on VMware ESXi with ESXCLI Command?
If you want to install security updates/bug fixes/patches on your ESXi host, download the latest patch release for your OS version.
To install the ESXi rollup update offline:
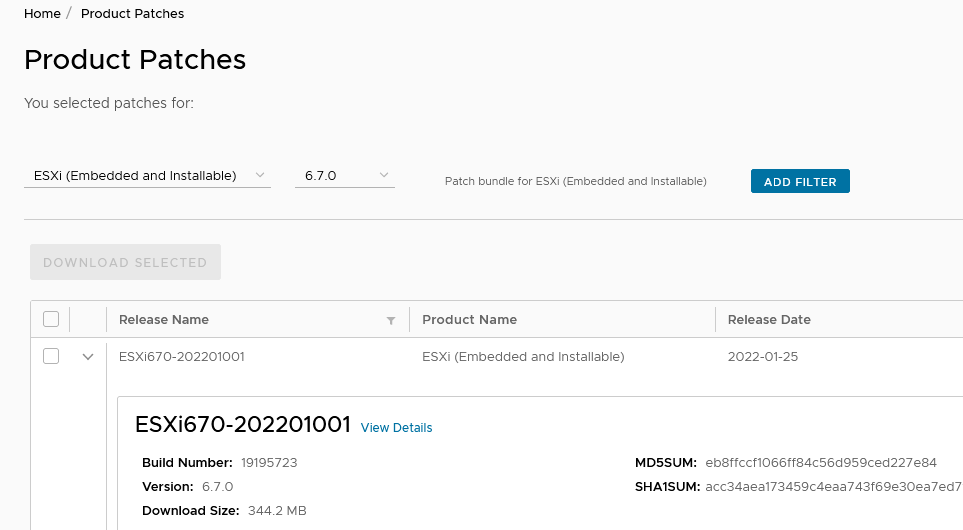
- Sign in to the VMware website (you can use a personal account) and go to https://my.vmware.com/group/vmware/patch;
- Select a product: ESXi (Embedded and Installable) and your ESXi build;
- The latest available update is
ESXi670-202201001 (Build Number: 19195723)with the release date 2022-01-25;
- Download a ZIP file with the update;
- Use the Datastore Browser to copy the archive to any datastore available to your host (it may be a local disk, an NFS folder, a VMFS LUN connected over iSCSI or Fiber Channel, or an external USB drive connected to your ESXi host). If there is not enough free space, expand the VMFS datastore;
- Connect to your ESXi host via SSH and put the host in the maintenance mode:
esxcli system maintenanceMode set --enable=true - To install the patch, run the command:
esxcli software vib update --depot /vmfs/volumes/87654321-12345678-7a20-000c12345678/update/ESXi670-202111001.zipMessage: The update completed successfully, but the system needs to be rebooted for the changes to be effective. Reboot Required: true
- Reboot your ESXi host:
reboot -f - Disable the maintenance mode:
esxcli system maintenanceMode set --enable=false - Make sure that the OS version has been updated:
vmware –v


Install-VMHostPatch -HostPath /vmfs/volumes/volume/esxi_patch.zip
Upgrading VMware ESXi Version Using ESXCLI
You can manually upgrade the ESXi version on your host. In this example, I will upgrade ESXi from v6.7 to v7.0.
- If you are going to upgrade your ESXi version, make sure that your server hardware is supported by the newer OS version. Use VMware Compatibility Guide and VMware Product Interoperability Matrix to do it.
- If the host is connected to a vCenter, do not upgrade the ESXi version before upgrading the vCSA version.
There are two ways to upgrade the ESXi version from the esxcli command line:
- An offline upgrade — you must manually download an ESXi installation image to the local datastore;
- An online upgrade — may be used if your ESXi can access the VMware repository via the Internet.
First of all, let’s look at how to perform an offline upgrade. Download an offline ESXi image:
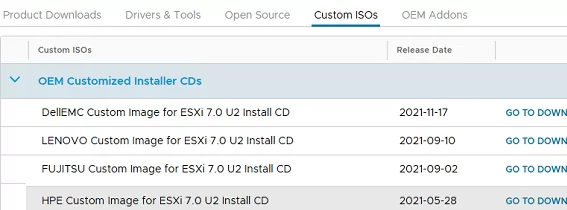
- Go to https://customerconnect.vmware.com/downloads/info/slug/datacenter_cloud_infrastructure/vmware_vsphere/7_0;
- Find the VMware ESXi version you want to upgrade to. If you are using a custom ESXi image from the vendor, go to the Custom ISOs tab. In my example, I will use the HPE — HPE Custom Image for ESXi 7.0 U2 Install CD image. Download HPE Custom Image for ESXi 7.0 U2 Offline Bundle.
- Copy the image to any datastore available from your ESXi host;
- Display the list of available profiles in the image:
esxcli software sources profile list -d /vmfs/volumes/datastore1/update/VMware-ESXi-7.0.2-17867351-HPE-702.0.0.10.7.0.52-May2021-depot.zip - In our example, there is only one profile: HPE-Custom-AddOn_702.0.0.10.7.0-52;
- Put the host into maintenance mod:
esxcli system maintenanceMode set --enable=true - Upgrade the ESXi version using the selected profile:
esxcli software profile update -d /vmfs/volumes/datastore1/update/VMware-ESXi-7.0.2-17867351-HPE-702.0.0.10.7.0.52-May2021-depot.zip -p HPE-Custom-AddOn_702.0.0.10.7.0-52If[Errno 28] No space left on deviceerror appears, follow this guide. - In my case, the command returned that the CPU model is not supported in the following versions:
[HardwareError]
Hardware precheck of profile HPE-Custom-AddOn_702.0.0.10.7.0-52 failed with warnings: <CPU_SUPPORT WARNING: The CPU in this host may not be supported in future ESXi releases. Please plan accordingly.>
- To ignore this warning, add the —no-hardware-warning option to the command:
esxcli software profile update -d /vmfs/volumes/datastore1/update/VMware-ESXi-7.0.2-17867351-HPE-702.0.0.10.7.0.52-May2021-depot.zip -p HPE-Custom-AddOn_702.0.0.10.7.0-52 --no-hardware-warningIf any dependency errors appear, you can ignore them using -f option. However, it may result in unexpected issues later when running ESXi. It is better to resolve dependencies and add a driver you need to the ESXi installation image.[DependencyError] VIB VMW_bootbank_vmkusb_0.1-4vmw.670.3.159.18828794 requires vmkapi_incompat_2_5_0_0, but the requirement cannot be satisfied within the ImageProfile.
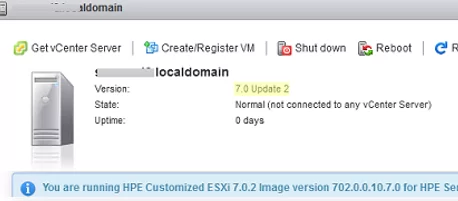
- Reboot the host after the upgrade is complete;
- Check that the server is now running the new ESXi 7.0 Update 2;
- Install the vSphere license and configure the inactivity timeout.

To upgrade an ESXi version online:
- Allow HTTP traffic in the ESXi firewall:
esxcli network firewall ruleset set -e true -r httpClient - View a list of available ESXi profiles in the VMware online depot:
esxcli software sources profile list -d https://hostupdate.vmware.com/software/VUM/PRODUCTION/main/vmw-depot-index.xml | grep -i ESXi-7.0 - Find the name of the profile you need and upgrade the ESXi version:
esxcli software profile update -p HPE-Custom-AddOn_702.0.0.10.7.0-52 -d https://hostupdate.vmware.com/software/VUM/PRODUCTION/main/vmw-depot-index.xml - Disable HTTP Internet access:
esxcli network firewall ruleset set -e false -r httpClient
In this article, we looked at how to install patches on a VMware ESXi host and update an OS version on your server from ESXi 6.7 to vSphere 7.0U2.
3 comments
A great write up. Downn to the point without any fuss.
Thank you very much!
how old is your HP Server? mine is G8 and I am bit hesitant to use V7
Great article. Very clear and to the point (and it worked for us!!)