In this article, we’ll look at how to increase the size of a VMFS datastore using the vSphere Web Client interface or VMware ESXi command prompt.
Suppose, when checking the free space on VMFS datastores, you found that one of them is running out of free space. You want to increase the size of your VMFS datastore by adding more storage space.
First of all, you need to extend the size of the LUN on your storage device. The way how to do it depends on the vendor of your storage. If you are using Windows Server iSCSI LUN, you can increase the vhdx through via Server Manager (File and Storage Services -> iSCSI -> select a disk -> Extend iSCSI Virtual Disk). In our example, we have extended the LUN size from 100GB to 105GB.
How to Increase VMFS Datastore Using vSphere Web Client?
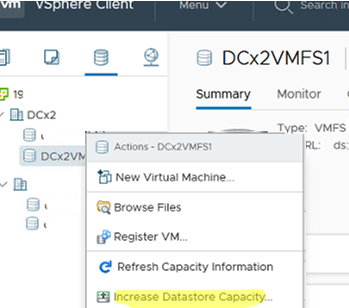
- Select Storage in the vSphere Client interface;
- Right-click the datastore and select Increase Datastore Capacity;

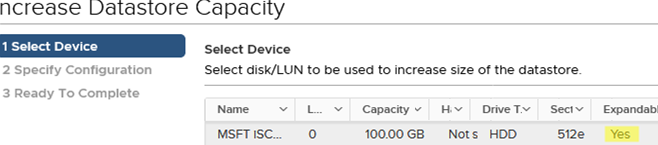
- Select a disk (LUN) you want to increase. Note its value in the
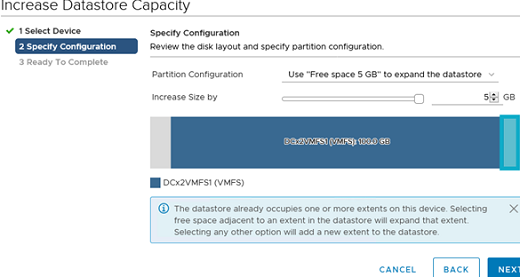
Expandablecolumn. It should say Yes. It means that this VMFS datastore can be extended.If it says No, you can only increase this device capacity using the VMFS Extent by expanding the VMFS datastore to two LUNs. - At the next step, you need to choose how much you want to increase the storage size. By default, the wizard offers to use all available space (
Use Free space 5Gb to expand the datastore). You will see a warning that you are expanding the current partition using free space;
The datastore already occupies one or more extents on this device. Selecting free space adjacent to an extent in the datastore will expand that extent. Selecting any other option will add a new extent to the datastore.
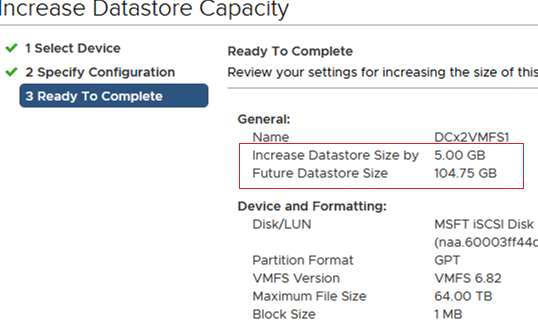
- If it suits you, click Next and you will see how much the VMFS datastore will grow (Increase Datastore Size by) and its new size (Future Datastore Size) in the Summary screen.
In some cases, you cannot expand the VMFS datastore from the vSphere Client graphical interface. Most often a problem is related to an inability to increase VMFS storage on a boot disk device. Then you see this error:
Failed to expand VMFS datastore VMFSstore - Cannot change the host configuration.
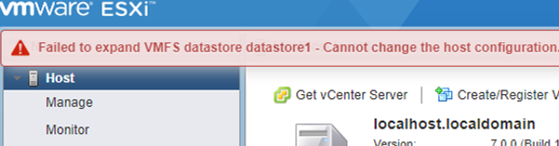
In this case, you will have to expand the datastore from the VMware ESXi command prompt.
Expanding VMFS Datastore on VMware ESXi from Command Line
- Connect to your ESXi host via SSH (on Windows you can use a built-in SSH client);
- Rescan storage adapters:
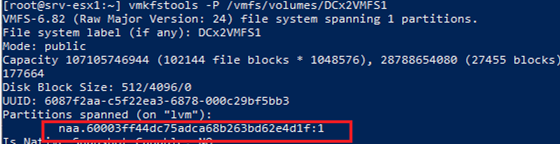
esxcli storage core adapter rescan --all - Then identify a disk (LUN) your VMFS datastore is located on:
vmkfstools -P /vmfs/volumes/DCx2VMFS1. In our case, the disk looks like /vmfs/devices/disks/naa.6000f3fdc1175dacd86b623db26e4d1f.:1 meaning that the VMFS datastore is located in the first partition of the disk;
- Check the partition table of the disk:
partedUtil get /vmfs/devices/disks/naa.6000f3fdc1175dacd86b623db26e4d1f13706 255 63 220200960 1 2048 209713152 0 0
In our case, the first partition sector is 2048 and the last one is 209713152.
- Then get the number of the last sector available for use. It is the sector the VMFS partition may be expanded to:
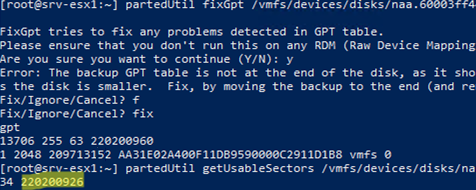
partedUtil getUsableSectors /vmfs/devices/disks/naa.6000f3fdc1175dacd86b623db26e4d1f - In my case the command has returned the following error:
Error: The backup GPT table is not at the end of the disk, as it should be. This might mean that another operating system believes the disk is smaller. Fix, by moving the backup to the end (and removing the old backup)?

Warning: Not all of the space available to /dev/disks/naa.6000f3fdc1175dacd86b623db26e4d1f appears to be used, you can fix the GPT to use all of the space (an extra 10485760 blocks) or continue with the current setting? This will also move the backup table at the end if is not at the end already. diskSize (220200960) AlternateLBA (209715199) LastUsableLBA (209715166) NewLastUsableLBA (220200926)
- To fix the error in the GPT table, run the command below:
partedUtil fixGpt /vmfs/devices/disks/naa.6000f3fdc1175dacd86b623db26e4d1fFixGpt tries to fix any problems detected in GPT table. Please ensure that you don't run this on any RDM (Raw Device Mapping) disk. Are you sure you want to continue (Y/N): Exiting ... gpt 13706 255 63 220200960 1 2048 209713152 AA31E02A400F11DB9590000C2911D1B8 vmfs 0
- Display the number of the last available sector (NewLastUsableLBA) again:
partedUtil getUsableSectors /vmfs/devices/disks/naa.6000f3fdc1175dacd86b623db26e4d1fIn this example, you can expand the partition to sector 220200926;
- So we have the numbers of the first (2048) and the last (220200926) sectors of the partition. Let’s extend it:
partedUtil resize /vmfs/devices/disks/naa.6000f3fdc1175dacd86b623db26e4d1f 1 2048 220200926 - Then grow the VMFS file system:
vmkfstools --growfs /vmfs/devices/disks/naa.6000f3fdc1175dacd86b623db26e4d1f:1 /vmfs/devices/disks/naa.6000f3fdc1175dacd86b623db26e4d1f:1 - Refresh a list of VMFS datastores:
vmkfstools –V - Check the size of the local datastores using this command:
df –h


As you can see, the VMFS datastore has been successfully expanding by 5 GB. The operation was performed online without unmounting the datastore or stopping the VM.
1 comment
Great tutorial, especially the command line part. Saved my day! Thank you!