Windows OS Hub
  • Windows Server
    • Windows Server 2022
    • Windows Server 2019
    • Windows Server 2016
    • Windows Server 2012 R2
    • Windows Server 2008 R2
    • SCCM
  • Active Directory
    • Active Directory Domain Services (AD DS)
    • Group Policies
  • Windows Clients
    • Windows 11
    • Windows 10
    • Windows 8
    • Windows 7
    • Windows XP
    • MS Office
    • Outlook
  • Virtualization
    • VMWare
    • Hyper-V
    • KVM
  • PowerShell
  • Exchange
  • Cloud
    • Azure
    • Microsoft 365
    • Office 365
  • Linux
    • CentOS
    • RHEL
    • Ubuntu
  • Home
  • About

Windows OS Hub

  • Windows Server
    • Windows Server 2022
    • Windows Server 2019
    • Windows Server 2016
    • Windows Server 2012 R2
    • Windows Server 2008 R2
    • SCCM
  • Active Directory
    • Active Directory Domain Services (AD DS)
    • Group Policies
  • Windows Clients
    • Windows 11
    • Windows 10
    • Windows 8
    • Windows 7
    • Windows XP
    • MS Office
    • Outlook
  • Virtualization
    • VMWare
    • Hyper-V
    • KVM
  • PowerShell
  • Exchange
  • Cloud
    • Azure
    • Microsoft 365
    • Office 365
  • Linux
    • CentOS
    • RHEL
    • Ubuntu

 Windows OS Hub / Virtualization / VMWare / How to Change or Disable Session Timeout in VMware vSphere (ESXi) Client

June 8, 2023 VirtualizationVMWare

How to Change or Disable Session Timeout in VMware vSphere (ESXi) Client

By default, inactivity timeouts are configured in ESXi Host Client or vSphere Web Client management interfaces. Inactivity timeouts cause user sessions to automatically close if users have not opened a browser tab with the VMWare management web interface for a specified period of time. In this article, we’ll show how to increase or disable session inactivity timeout in VMware ESXi and vSphere.

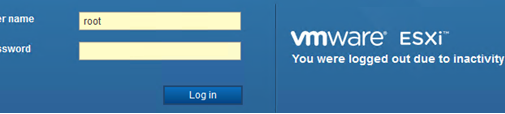
In current ESXi versions, a session is automatically terminated if a user has been inactive for more than 15 minutes. If you return to the ESXi Host Client web interface tab after 15 minutes, you will see the following message:

You were logged out due to inactivity.

vmware esxi: you were logged out due to inactivity

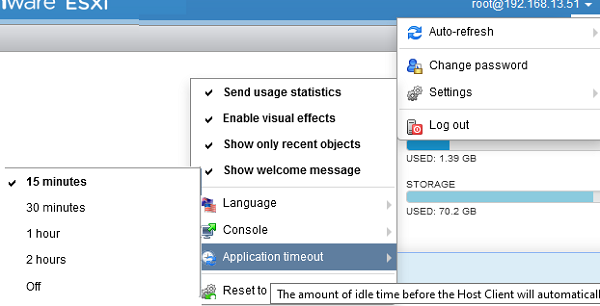
On a standalone ESXi host or in free VMware vSphere Hypervisor, you can change the session timeout in the Host Client Web Interface.

  1. Select your account in the top right corner of the web interface and click Settings -> Application timeout;
  2. The default timeout is 15 minutes;
  3. You can change it to 30 minutes, 1 hour, 2 hours, or disable it completely (off).

esxi application timeout - the ammount of time before the host client will automatically logoff user

If you disable the idle timeout, you will see the following warning:

Disabling session time out could leave your ESXi host vulnerable to malicious activity. Are you sure you want to disable session time out?
For security reasons, it is not recommended to completely disable the automatic logout in the ESXi web interface.

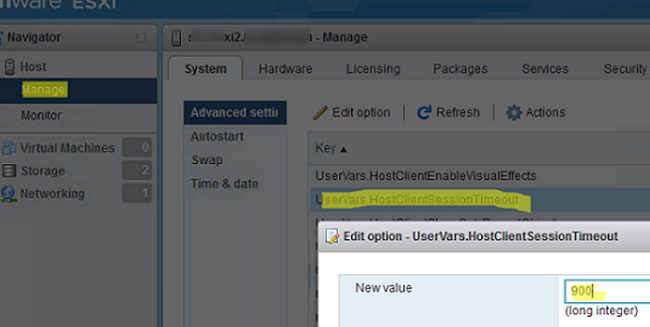
You can also change a web interface session timeout in the ESXi host advanced settings.

  1. Open Manage -> System -> Advanced settings;
  2. Find the UserVars.HostClientSessionTimeout option;
  3. Here you can set the session timeout in seconds. The default value is 900 seconds (15 minutes). You can increase the timeout or disable it (change the value to 0). UserVars.HostClientSessionTimeout - advanced host parameter

To apply new settings, refresh your ESXi management web page (CTRL+F5).

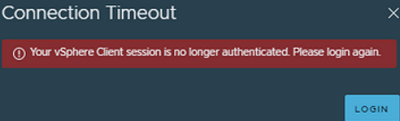
In VMware vSphere 5.1 and newer, the inactivity timeout in vSphere Web Client has been increased from 30 to 120 minutes. If your session is terminated due to a timeout, you will see the following message:

Connection Timeout
Your vSphere Client session is no longer authenticated. Please login again.

Connection Timeout Your vSphere Client session is no longer authenticated

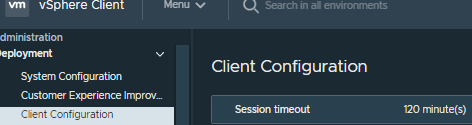
In VMware vSphere 7.0 and newer, you can change the session timeout value in vCenter settings (Administration -> Deployment -> Client Configuration -> Session timeout).

Session timeout in VMware vSphere 7.0

Or in vCenter Server -> Configure -> Settings -> Settings -> Timeout settings. However, you cannot completely disable the inactivity timeout by reducing it to 0.

change the timeout settings in vsphere client

The inactivity timeout value is set in the configuration file on the VCSA host:

  1. Connect to your vCenter Server Appliance host over SSH;
  2. Open the cli console by typing shell;
  3. Edit the webclient.properties file : vi /etc/vmware/vsphere-ui/webclient.properties
  4. Find the session.timeout parameter. As you can see, the default timeout value is 120 minutes; set session.timeout in /etc/vmware/vsphere-ui/webclient.properties
  5. You can change this value or completely disable the inactivity timeout by changing it to 0;
  6. Save the changes: [ESC] -> :wq -> [Enter];
  7. Restart the HTML5 vSphere Web Client:
    service-control --stop vsphere-ui
    service-control --start vsphere-ui

0 comment
0
Facebook Twitter Google + Pinterest
previous post
Removing Built-in Teams Chat in Windows 11
next post
Can’t Remove Language Keyboard Layout in Windows 10

Related Reading

Reset Root Password in VMware ESXi

October 12, 2023

How to Fix ‘An Operating System Wasn’t Found’...

July 14, 2023

Unmounting an NFS Datastore from VMware ESXi

April 21, 2023

How to Increase Virtual Machine Disk Size in...

April 6, 2023

How to Install Free VMware Hypervisor (ESXi)

January 24, 2023

Leave a Comment Cancel Reply

Categories

  • Active Directory
  • Group Policies
  • Exchange Server
  • Microsoft 365
  • Azure
  • Windows 11
  • Windows 10
  • Windows Server 2022
  • Windows Server 2019
  • Windows Server 2016
  • PowerShell
  • VMWare
  • Hyper-V
  • Linux
  • MS Office

Recent Posts

  • How to Connect VPN Before Windows Logon

    November 14, 2023
  • Removing Azure Arc Setup Feature on Windows Server 2022

    November 9, 2023
  • Using WPAD (Web Proxy Auto-Discovery Protocol) on Windows

    November 7, 2023
  • Send Emails with Microsoft Graph API and PowerShell

    November 6, 2023
  • Zabbix: How to Get Data from PowerShell Scripts

    October 27, 2023
  • Tracking Printer Usage with Windows Event Viewer Logs

    October 19, 2023
  • PowerShell: Configure Certificate-Based Authentication for Exchange Online (Azure)

    October 15, 2023
  • Reset Root Password in VMware ESXi

    October 12, 2023
  • How to Query and Change Teams User Presence Status with PowerShell

    October 8, 2023
  • How to Increase Size of Disk Partition in Ubuntu

    October 5, 2023

Follow us

  • Facebook
  • Twitter
  • Telegram
Popular Posts
  • Adding Drivers into VMWare ESXi Installation Image
  • How to Fix ‘An Operating System Wasn’t Found’ Error on Windows
  • Shrinking VMDK Virtual Disk Size on VMWare ESXi
  • How to Access VMFS Datastore from Linux, Windows, or ESXi
  • Hyper-V Virtual Machine Stuck in Stopping/Starting State
  • Recovering a Deleted VMFS Datastore on VMware ESXi/vSphere
  • Updating Windows VM Templates on VMWare with PowerShell
Footer Logo

@2014 - 2023 - Windows OS Hub. All about operating systems for sysadmins


Back To Top