In Exchange Server and Microsoft 365 (Exchange Online), you can create a whitelist of trusted email addresses, domains and IP addresses of senders, from which mail must be accepted regardless of the email contents, bypassing anti-spam checks. Emails from safe senders in the whitelist (individual or entire domains) are considered trusted and delivered to the users’ mailboxes, even if they fall under the anti-spam filtering rules.
Whitelisting Domains and Email Addresses in Exchange Server
The whitelist of senders in on-premises Exchange Server can only be managed from PowerShell command prompt (Exchange Management Shell). Run the EMS console or connect to the Exchange server via PowerShell remotely.
Configuring the sender whitelist in all versions of Exchange Server (2019, 2016, 2013, and 2010) is similar, with minor differences regarding the architecture of the CAS/Edge/Mailbox roles. For example, in Exchange Server 2013, you need to configure a whitelist on a server with the Mailbox or Edge Transport role with Exchange anti-spam protection installed.
The check for whitelisted addresses is performed in a spam filter that performs content filtering. First, check that you have content filter enabled in Exchange:
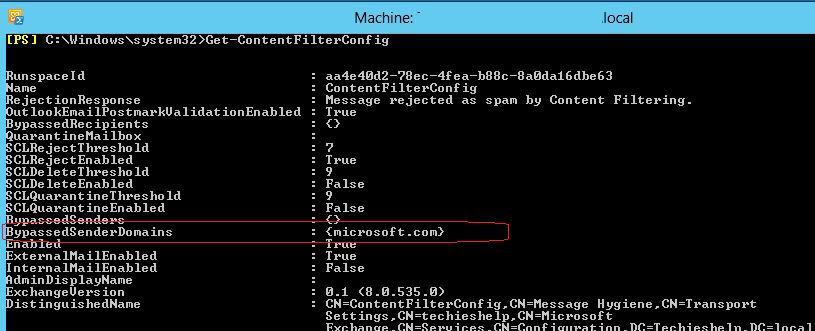
Get-ContentFilterConfig | Format-List Enabled, ExternalMailEnabled, InternalMailEnabled
You can enable the content filtering in Exchange with the command:
Set-ContentFilterConfig -Enabled $true
By default, content filtering is enabled for external and disabled for internal senders. If you need to enable content filtering for external senders, run:
Set-ContentFilterConfig -ExternalMailEnabled $true

To edit the whitelist of addresses, the cmdlet Set-ContentFilterConfig is used. The command has the following syntax:
Set-ContentFilterConfig -BypassedSenderDomains microsoft.com
This command will whitelist the Microsoft.com domain. All emails from senders in this domain will be delivered to Exchange users in your organization regardless of their content or attachments (no further checks are performed by the Content Filter).
![]()
You can view the current domain whitelist entries with this command:
get-ContentFilterConfig
or:
Get-ContentFilterConfig | Format-List Bypassed*
If you have to add several domains to the bypassedsender list at once, the command will look like this:
Set-ContentFilterConfig -BypassedSenderDomains microsoft.com,woshub.com,gmail.com
To add a specific email address to the Content Filter whitelist, use the BypassedSenders parameter:
Set-ContentFilterConfig -BypassedSenders [email protected]
The main problem with using Set-ContentFilterConfig cmdlet is that each time it is runs, it completely overwrites (clears) the current whitelist of the safe senders. To avoid it, each time you have to add a new address/domain to this list, get the current white list of addresses, add a new one entry to it and upload it back to Exchange.
To add multiple domains to the Exchange trusted list (without overwriting current list entries), you can use the following PowerShell script:
$list = (Get-ContentFilterConfig).BypassedSenderDomains
 $list.add("domain1.com")
 $list.add("domain2.com")
 $list.add("domain3.com")
 Set-ContentFilterConfig -BypassedSenderDomains $list
If you are adding individual email addresses:
$list = (Get-ContentFilterConfig).BypassedSenders
 $list.add("[email protected]")
 $list.add("[email protected]")
 Set-ContentFilterConfig -BypassedSenders $list
To delete one entry from the whitelist of senders, run this command:
Set-ContentFilterConfig -BypassedSenderDomains @{Remove="gmail.com"}
Or:
Set-ContentFilterConfig -BypassedSenders @{Remove="[email protected]"}
Similarly, you can block specific addresses and sender domains in Exchange. Add new email addresses to the blacklist:
Set-SenderFilterConfig -BlockedSenders @{Add="[email protected]"}
Add multiple domains to the Exchange blacklist:
Set-SenderFilterConfig -BlockedDomainsAndSubdomains @{Add="sample.net","spammest.com”,"fishing.com"}
List blocked senders and domains:
Get-SenderFilterConfig | Format-List BlockedSenders,BlockedDomains,BlockedDomainsAndSubdomains
If the recipient is blacklisted by Exchange, they will receive the following NDR messages:
550 5.7.1. Message rejected as spam by Content Filtering
To add the IP address of a specific SMTP server to the trusted ones, use the command:
IPAllowListEntry -IPAddress 123.45.67.89
To block an IP subnet:
Add-IPBlockListEntry -IPAddress 123.45.67.0
How to Whitelist a Domain or Email Address in Office 365 (Exchange Online)?
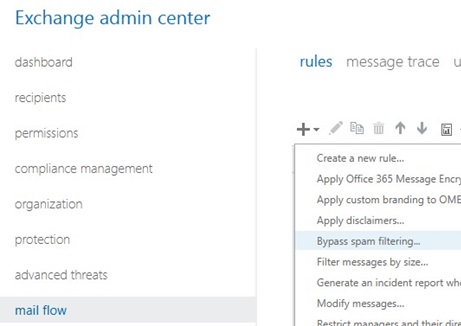
You can also create sender allowed list in the cloud-based Microsoft 365 (Exchange Online). There are several ways to add safe senders list to Exchange Online. Microsoft recommends using mail flow rules for this.
- Open the Exchange Admin Center control panel for Exchange Online (https://outlook.office365.com/ecp);
- In EAC, go to Mail flow -> Rules;
- Create a new rule Bypass spam filtering;

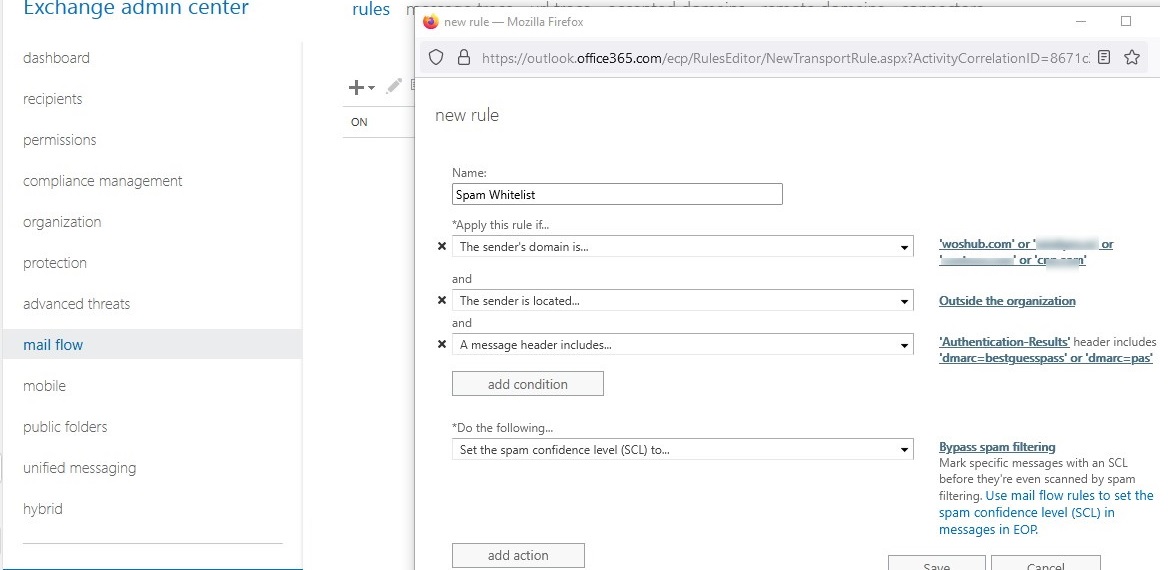
- Specify the rule name Spam Whitelist;
- In the Apply this rule if… field, select The sender -> domain is. Add a list of trusted domains for which you want to bypass spam checks;If you need to add specific emails to trusted senders, select The sender -> is this person in the rule and specify the email addresses.
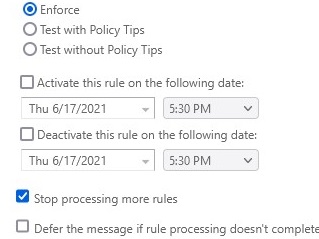
- Click the button Add condition and select The sender -> is external/internal -> Outside the organization;
- In order to protect your users from spoofing and phishing attacks, be sure to enable the email authentication for external senders (SPF, DKIM, and DMARC checks should be passed). Add the rule A message header includes: Header name =
Authentication-Results, Header value:dmarc=passordmarc=bestguesspass; - In the Do the following select Set the spam confidence level (SCL) -> Bypass spam filtering;

- Scroll down and enable the option Stop processing more rules.

As a result, incoming emails from domains and email addresses added to the allowed list won’t pass through Exchange Online Protection (EOP) spam filters and will be delivered directly to user mailboxes.
New-TransportRule cmdlet. Use the Exchange Online PowerShell v2 module (EXO V2) to connect to Exchange Online.You can also add trusted addresses and domains to anti-spam filters using the Office 365 Security and Compliance Center (https://protection.office.com/antispam). Allowed senders and domains can be added here.
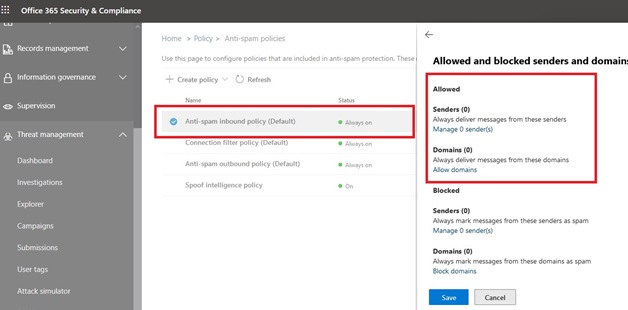
However, Microsoft doesn’t recommend adding allowed senders this way, because messages from these senders won’t be processed by spam, spoofing and phishing EOP rules, and no sender authentication checks will be performed (SPF, DKIM, DMARC). Any external sender can specify a trusted domain in the SMTP From field and such email won’t be scanned by the Exchange Protection Online. Use these options for testing purposes only.
6 comments
Set-ContentFilterConfig -BypassedSenders [email protected]
it’s true for RBL providers like Spamhaus and SpamCop??
You want that one specific sender/domain ignored by RBL ? The Connection Filter does not provide the functionality to exclude senders from RBL processing. Try to use whitelist the IPs of the sender (Add-IPAllowListEntry).
Set-ContentFilterConfig works on another level of Exchange antispam protection – Content Filter Agent, when RBL – on Connection Filtering Agent level.
Thanks, fantastic job, well done!
Should the command be Set-SenderFilterConfig instead of Set-ContentFilterConfig ?
This however does not work for attachments. Not in Exchange 2013. At least not Exchange Edge server. Even if the sender is on the whitelist, attachments get blocked. Tested. Proofed. Each filter agent does whitelisting only for itself. It does not whitelist for other agents. but you are right that “(Further scanning with the Content Filter won’t take place.)” But it will take place on next filter. 🙂
Very helpful