Windows OS Hub
  • Windows Server
    • Windows Server 2022
    • Windows Server 2019
    • Windows Server 2016
    • Windows Server 2012 R2
    • Windows Server 2008 R2
    • SCCM
  • Active Directory
    • Active Directory Domain Services (AD DS)
    • Group Policies
  • Windows Clients
    • Windows 11
    • Windows 10
    • Windows 8
    • Windows 7
    • Windows XP
    • MS Office
    • Outlook
  • Virtualization
    • VMWare
    • Hyper-V
    • KVM
  • PowerShell
  • Exchange
  • Cloud
    • Azure
    • Microsoft 365
    • Office 365
  • Linux
    • CentOS
    • RHEL
    • Ubuntu
  • Home
  • About

Windows OS Hub

  • Windows Server
    • Windows Server 2022
    • Windows Server 2019
    • Windows Server 2016
    • Windows Server 2012 R2
    • Windows Server 2008 R2
    • SCCM
  • Active Directory
    • Active Directory Domain Services (AD DS)
    • Group Policies
  • Windows Clients
    • Windows 11
    • Windows 10
    • Windows 8
    • Windows 7
    • Windows XP
    • MS Office
    • Outlook
  • Virtualization
    • VMWare
    • Hyper-V
    • KVM
  • PowerShell
  • Exchange
  • Cloud
    • Azure
    • Microsoft 365
    • Office 365
  • Linux
    • CentOS
    • RHEL
    • Ubuntu

 Windows OS Hub / Virtualization / Hyper-V / How to Enable and Configure Hyper-V Remote Management

June 8, 2023 Hyper-VWindows 10Windows Server 2019

How to Enable and Configure Hyper-V Remote Management

If you installed Hyper-V on a non-GUI edition of Windows (Windows Server Core or Microsoft Hyper-V Server), you can use PowerShell cmdlets from the Hyper-V module to manage your hosts and virtual machines. To make managing virtual machines more convenient, it is recommended to use the graphical interface of the Hyper-V Manager console or the Windows Admin Center (WAC) web interface. This article shows you how to enable and configure remote Microsoft hypervisor management using the Hyper-V Manager console in a non-domain (workgroup) environment.

In this example, we’ll show you how to remotely connect to a Hyper-V host (running on Windows Server 2022/2019/2016/2012 R2 or Win 11/10/8.1) from a Windows 10 Pro x64 workstation using the Hyper-V Manager console. Make sure that the host with the Hyper-V role and your workstation are in the same WORKGROUP.

The first step is to enable remote management on the Hyper-V host. If the Hyper-V role is installed on a Server Core or Microsoft Hyper-V Server, run the utility sconfig.cmd command, then go to section 4 — Remote Management and enable remote management.

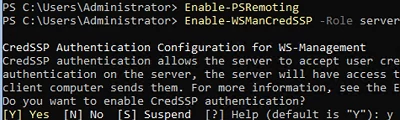
Then, open the PowerShell console, configure the WinRM service, and allow CredSSP authentication:

Enable-PSRemoting
Enable-WSManCredSSP -Role server

Enable-PSRemoting and WSManCredSSP on Hyper-V host

If you enabled WinRM by using the ‘Enable-PSRemoting’ command, this will automatically create the necessary rules in the Microsoft Defender Firewall.

If you want to check if the default WinRM port (TCP 5985) is available on the client side of the server, you can use the following command:

Test-NetConnection -ComputerName 192.168.21.30 -Port 5985

If both hosts (both the administrator workstation and the Hyper-V server) are joined to the same Active Directory domain, you must add your user account to the local Administrators or Hyper-V Administrators group on the Hyper-V host to establish a remote connection.

The next step is to configure the Windows 10 client computer from which you are going to manage your Hyper-V server.

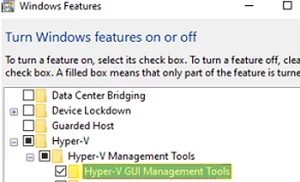
Install the Hyper-V Manager console. To do this, run the optionalfeatures command to open the Turn Windows Features on or off console. Expand the Hyper-V node and check to install the Hyper-V GUI Management Tools.

Install Hyper-V GUI Management Tools

You can also install the Hyper-V Manager client using PowerShell:

Enable-WindowsOptionalFeature -Online –FeatureName Microsoft-Hyper-V-Management-Clients

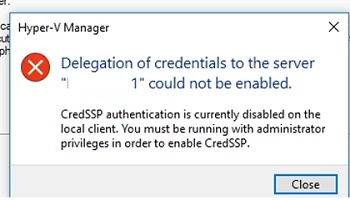
If you try to connect to the remote Hyper-V host right now, you get an error:

CredSSP authentication is currently disabled on the local client. You must be running with administrator privileges in order to enable CredSSP.

Hyper-V: CredSSP authentication is currently disabled on the local client

To make the Hyper-V host accessible by name from the management workstation, you must add an entry to the hosts file (C:\Windows\System32\drivers\etc\hosts) on the client computer.

You can add the entry to the hosts file using PowerShell:

Add-Content -Path "C:\Windows\System32\drivers\etc\hosts" -Value "192.168.21.30 hv19"

The hosts file should contain the following line:

192.168.21.30 hv19

add hyper-v address to hosts file

Now you need to add the name of the Hyper-V server to the trusted hosts:

Set-Item WSMan:\localhost\Client\TrustedHosts -Value "hv19"

Then save the password for the Hyper-V administrator account that you will use to connect to Windows Credential Manager:

cmdkey /add:hv19 /user:Administrator /pass:HypVpaSS22

If you don’t want to use a saved password, you can connect to Hyper-V with an interactive credential prompt:

runas /user:hv19\Administrator /netonly "mmc virtmgmt.msc"

Check that your network connections in Windows 10 have a Public network profile assigned:

Get-NetConnectionProfile|select InterfaceAlias,NetworkCategory

Use Private connection profile for Hyper-V remote management

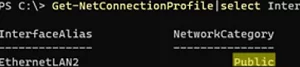
If the command returns the connection type (location) as Public, change it to Private:

Set-NetConnectionProfile -InterfaceAlias "EthernetLAN2" -NetworkCategory Private

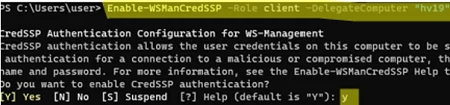
Enable CredSSP authentication on the client and specify the server address you trust to delegate your credentials:

Enable-WSManCredSSP -Role client -DelegateComputer "hv19"

Confirm the action: y -> Enter.

Enable-WSManCredSSP on Hyper-V client machine

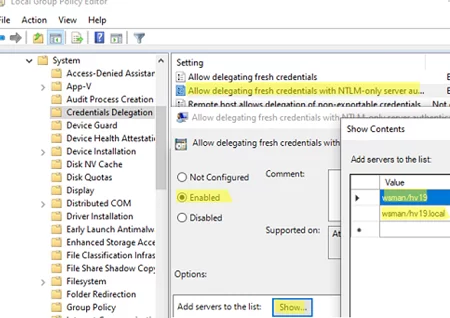
This will also change the settings of the local Allow delegating fresh credentials policy.

Now enable NTLM authentication on the non-domain computer:

  1. Open the local Group Policy Editor: gpedit.msc ;
  2. Go to Local Computer Policy -> Computer Configuration -> Administrative Templates -> System -> Credentials Delegation;
  3. Enable the item Allow Delegating Fresh Credentials with NTLM-only Server Authentication;
  4. Click Show and add two values for the name of your Hyper-V server (in our example, it’s hv19): wsman/hv19 and wsman/hv19.local; Enable GPO option: Allow Delegating Fresh Credentials with NTLM-only Server Authentication
  5. Close the GPO editor and update your computer’s Group Policy settings: gpupdate /force

Now you should be able to connect to the remote host with the Hyper-V role. Open the Hyper-V Manager console (virtmgmt.msc) and click Connect to Server. Enter the name of the remote Hyper-V host:

Hyper-V Manager - connect to remote host in workgroup

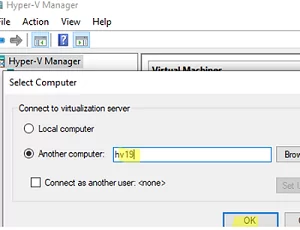
If you have done everything correctly, the console should connect to the Hyper-V server and display a list of registered virtual machines.

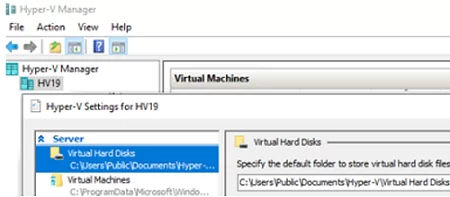
Now you can manage Hyper-V Server settings, create/enable/disable, import/export Hyper-V virtual machines from the graphical console.

Configure Hyper-V using Manager GUI

0 comment
1
Facebook Twitter Google + Pinterest
previous post
How to Protect Windows Against Viruses and Ransomware with Built-in Tools
next post
How to Allow Non-Admin User to Start/Stop Service in Windows

Related Reading

How to Connect VPN Before Windows Logon

November 14, 2023

Using WPAD (Web Proxy Auto-Discovery Protocol) on Windows

November 7, 2023

Zabbix: How to Get Data from PowerShell Scripts

October 27, 2023

Tracking Printer Usage with Windows Event Viewer Logs

October 19, 2023

How to Use Ansible to Manage Windows Machines

September 25, 2023

Leave a Comment Cancel Reply

Categories

  • Active Directory
  • Group Policies
  • Exchange Server
  • Microsoft 365
  • Azure
  • Windows 11
  • Windows 10
  • Windows Server 2022
  • Windows Server 2019
  • Windows Server 2016
  • PowerShell
  • VMWare
  • Hyper-V
  • Linux
  • MS Office

Recent Posts

  • How to Connect VPN Before Windows Logon

    November 14, 2023
  • Removing Azure Arc Setup Feature on Windows Server 2022

    November 9, 2023
  • Using WPAD (Web Proxy Auto-Discovery Protocol) on Windows

    November 7, 2023
  • Send Emails with Microsoft Graph API and PowerShell

    November 6, 2023
  • Zabbix: How to Get Data from PowerShell Scripts

    October 27, 2023
  • Tracking Printer Usage with Windows Event Viewer Logs

    October 19, 2023
  • PowerShell: Configure Certificate-Based Authentication for Exchange Online (Azure)

    October 15, 2023
  • Reset Root Password in VMware ESXi

    October 12, 2023
  • How to Query and Change Teams User Presence Status with PowerShell

    October 8, 2023
  • How to Increase Size of Disk Partition in Ubuntu

    October 5, 2023

Follow us

  • Facebook
  • Twitter
  • Telegram
Popular Posts
  • Hyper-V Virtual Machine Stuck in Stopping/Starting State
  • Poor Network Performance on Hyper-V VMs in Windows Server 2019
  • How to Install Windows 11 on a Hyper-V Virtual Machine
  • How to Install and Configure Free Hyper-V Server 2019/2016
  • Windows Cannot Find the Microsoft Software License Terms
  • Configure SR-IOV for Hyper-V Virtual Machines on Windows Server
  • Managing Hyper-V Virtual Machines with PowerShell
Footer Logo

@2014 - 2023 - Windows OS Hub. All about operating systems for sysadmins


Back To Top