Microsoft released a set of hardware requirements to install Windows 11 on a device. In particular, your computer must have a built-in TPM module (chip), a pretty modern CPU, UEFI Secure Boot support. Even if your computer doesn’t support these features at the hardware level, you can use a virtual TPM module and run Windows 11 on a virtual machine. Let’s take a look at how to install Windows 11 on a Hyper-V virtual machine.
Create a Windows 11 Virtual Machine on Hyper-V
The Hyper-V role must be installed on your computer. You can install Hyper-V both on a desktop Windows 10 edition, on a host running Windows Server, or free Microsoft Hyper-V Server.
You can create a Windows 11 virtual machine from the Hyper-V Manager graphical console or with PowerShell.
- Open Hyper-V Manager and click Create -> New Virtual Machine;
- Set the VM name;
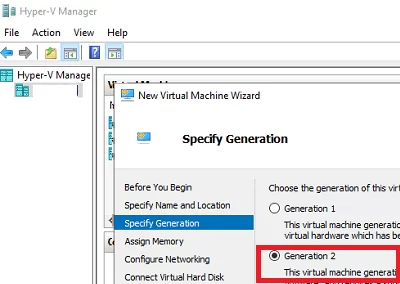
- Select Generation 2 virtual machine (Generation 2 virtual hardware supports UEFI, Secure Boot, and a virtual TPM);

- Specify the RAM size for the VM (at least 4 GB, otherwise an error appears that the device doesn’t meet minimum system requirements to install Windows 11);
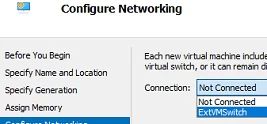
- Connect the VM to a Hyper-V virtual switch having Internet access (optional);
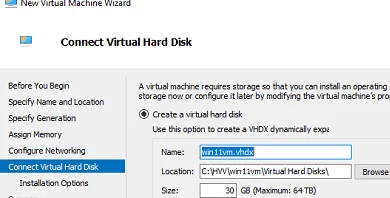
- Specify the size of a VHDX disk for a Windows 11 VM (it is recommended to use at least a 64 GB disk, but 30GB is enough or a minimum VM);
- In the next step, check the option to install the OS later.
So the virtual machine is ready. Now you need to configure the VM options for installing guest Windows 11.
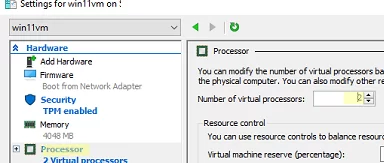
- Open the VM settings;
- Click the Processor tab and increase the number of vCPUs to at least 2;
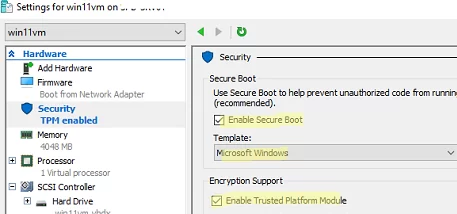
- Go to the Security tab, check the Secure Boot and select Microsoft Windows as a template;
- Check the Enable Trusted Platform Module option;
You can create a Windows 11 virtual machine on Hyper-V using PowerShell:
$VMName = "win11_test"
 $VM = @{
 Name = $VMName
 MemoryStartupBytes = 4Gb
 Generation = 2
 NewVHDPath = "C:\HV\$VMName\$VMName.vhdx"
 NewVHDSizeBytes = 30Gb
 Path = "C:\HV\$VMName"
 SwitchName = "ExtVMSwitch"
 }
 New-VM @VM

Add the second vCPU to the VM:
Set-VM -VMName $VMName -ProcessorCount 2
Installing Windows 11 on a Hyper-VM
To install Windows 11 on a virtual machine, you will need an installation ISO image. You can download the Windows 11 install ISO image from the Microsoft website (https://www.microsoft.com/en-us/software-download/windows11) or use the Media Creation Tool to create a Windows installation image.
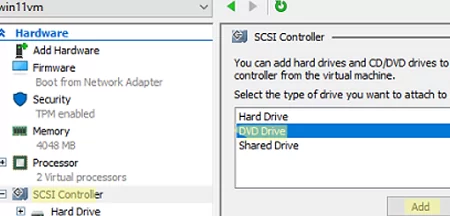
Connect the Windows 11 ISO image to your virtual machine. To do it, open SCSI Controllers and add a virtual DVD drive (DVD Drive -> Add).
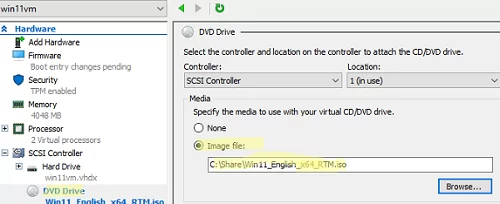
The DVD Drive will appear in the list of VM hardware. Select it, check the Image file item and specify the path to your Windows 11 install image. Save the VM settings.
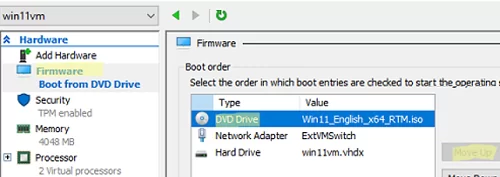
Open the VM properties again, and set the virtual DVD drive as a primary boot device (move the entry to the first position using the Move Up button) on the Firmware tab.
You can do the same things with PowerShell. Mount the ISO image to the virtual DVD drive and change the VM boot order:
$virt_dvd = Add-VMDvdDrive -VMName $VMName -Path 'C:\ISO\Win11x64.iso' -Passthru
 Set-VMFirmware -VMName $VMName -FirstBootDevice $virt_dvd
Then enable the virtual TPM support:
Set-VMKeyProtector -NewLocalKeyProtector -VMName $VMName
 Enable-VMTPM -VMName $vmname
Start the virtual machine from the Hyper-V console or using PowerShell:
Start-VM -Name $vmname
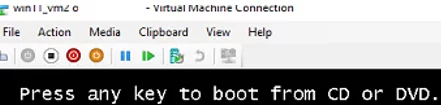
Open the virtual machine console and press any key to boot from the virtual DVD drive.
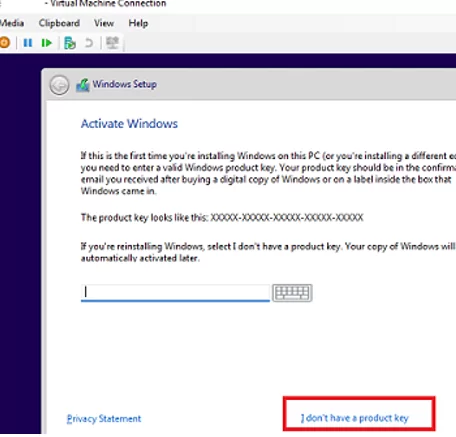
Follow Windows 11 setup wizard instructions: select a language, time format, keyboard layout, OS edition (an ISO image may contain several Windows editions). If you don’t have a Windows 11 installation key, you may skip the step by clicking I don’t have a product key.
This PC can’t run Windows 11. This PC doesn’t meet the minimum system requirements to install this version of Windows. For more information, visit aka.ms/WindowsSysReq
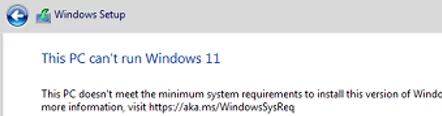
Make sure that your VM meets all hardware requirements or you may continue the installation by ignoring Windows 11 compatibility requirements. Learn more How to Bypass TPM and Secure Boot to Install Windows 11?
Select the installation mode Custom: Install Windows only advanced.
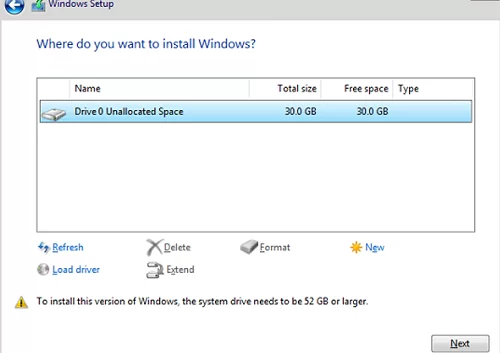
Then you just have to create a partition table on your virtual disk. You can create partitions manually or install Windows to an unallocated space (Drive 0 Unallocated Space -> Next). In this case, the Windows setup wizard will create EFI, MSR, and System Reserved partitions, and the rest space will be used for the Windows partition.
Then Windows 11 will be installed on the selected virtual disk.
6 comments
Seems not to work. SCSI DVD (0,1) The bootloader failed. ISO checksum verified. Any idea? Thx
resolved. you have to press a key after startup.
so I removed “Start-VM -Name $vmname” and connected first, then start manually.
Watch for “Press a key to boot from CD”
now I can test drive win 11
I loaded Win 11 on my HP EliteBook yesterday and as soon as I logged into the new OS version, I immediately rolled back to Windows 10. Win 11 is a bigger resource hog than Win 10 was when they first released it back in 2015. This was installed on an HP EliteBook that I upgraded to 24GB of RAM the other day, and it also has an 8th Gen i7 as well. So as far as hardware goes, there is no sense in how slow Windows 11 was initially after booting into it. I noticed the slowdown just after starting up and attempting to login… Just extremely slow and sluggish. Run smooth as silk on Win 10 with the current hardware. I just installed it on a Hyper-V VM and see how it does. I only threw 8GB of RAM on the hyper-v machine so I might have to beef that up some, but we’ll see how it runs. Right now I’ll definitely hold off on upgrading permanently until they get some of the bugs worked out or I can figure out what is causing the slowness. Might try to remove some items from startup as well and see if that helps.
Nice Tutorial, but it does not work:
I get the following:
[Window Title]
Virtual Machine Connection
[Main Instruction]
The application encountered an error while attempting to change the state of ‘Windows-11’.
[Content]
‘Windows-11’ failed to start.
‘Windows-11’ could not initialize.
The key protector could not be unwrapped. Details are included in the HostGuardianService-Client event log.
[Expanded Information]
‘Windows-11’ failed to start. (Virtual machine ID A22D1BE1-809A-4E06-94EF-C9D406C52F68)
‘Windows-11’ failed to start worker process: The system cannot find the file specified. (0x80070002). (Virtual machine ID A22D1BE1-809A-4E06-94EF-C9D406C52F68)
‘Windows-11’ could not initialize. (Virtual machine ID A22D1BE1-809A-4E06-94EF-C9D406C52F68)
The key protector for the virtual machine ‘Windows-11’ could not be unwrapped. . Details are included in the HostGuardianService-Client event log. The system cannot find the file specified. (0x80070002). (Virtual machine ID A22D1BE1-809A-4E06-94EF-C9D406C52F68)
[^] Hide details [Close]
Does not work