To install Windows 11 (or upgrade from Windows 10), your computer must meet certain minimum system requirements: TPM 2.0 chip (Trusted Platform Module), UEFI + Secure Boot mode enabled, 3+ GB RAM, at least 64 GB hard drive, and a compatible 1GHz dual-core CPU (not all processors are supported!). Microsoft restricts the installation of Windows 11 to non-compatible devices by performing some pre-installation hardware requirements checks. In this article, we’ll show how to install Windows 11 on unsupported hardware without checking CPU, TPM, Secure Boot, and other requirements.
If your computer does not meet the minimum Windows 11 hardware requirements, you will see the following error during the OS installation:
This PC can’t run Windows 11.
This PC doesn’t meet the minimum system requirements to install this version of Windows. For more information, visit aka.ms/WindowsSysReq
To understand what requirements your computer doesn’t meet, check the Windows 11 setup errors in the setuperr.log file. This file contains only Windows installation errors (you can find the complete Windows install log in the setupact.log file, but it is hard to debug it since it is very large).
To open the Windows setup error log, open the command prompt right on the setup screen by pressing Shift + F10 and run this command:
notepad x:\windows\panther\setuperr.log
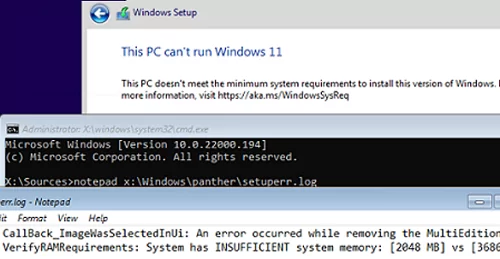
In our case, the error says that there is not enough RAM on the computer (only 2 GB instead of 3 GB):
2022-02-02 08:17:57, Error VerifyRAMRequirements: System has INSUFFICIENT system memory: [2048 MB] vs [3686 MB]
Please note that if your computer doesn’t meet several minimal requirements to install Windows, only the first one will be displayed in the setup log. It means that if you fixed or bypassed one of the compatibility errors, another compatibility error will appear in the installation log the next time you run Windows 11 Setup.
After we have added more RAM to the device, another error appeared:
2022-02-02 08:43:21, Error VerifyTPMSupported:Tbsi_GetDeviceInfo function failed - 0x8028400f[gle=0x0000007a]
This means that the Windows 11 setup wizard detected there was no TPM chip on the computer.
However, you can continue Windows 11 setup by ignoring one or more of the compatibility requirements.
To do it, use the command prompt on the Windows 11 setup screen:
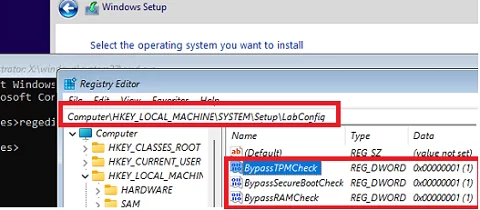
- Run the Registry Editor
regedit.exe. - Go to HKEY_LOCAL_MACHINE\SYSTEM\Setup registry key and create a new key with the name LabConfig;
- Create reg DWORD parameters with values 1 for those compatibility checks you want to skip during installation.
The following bypass options are available for installing Windows 11 on unsupported hardware:
BypassCPUCheck– for incompatible CPUsBypassTPMCheck– without a TPM 2.0+ chipBypassRAMCheck– to skip minimum RAM checkBypassSecureBootCheck– for Legacy BIOS devices (or UEFI firmware with Secure Boot disabled)BypassStorageCheck– to minimal bypass system drive size check
For example, in order not to check the TPM module during installation, create the BypassTPMCheck registry parameter with the value 1. You can do it using the graphical Registry Editor or with the command:
reg add HKLM\SYSTEM\Setup\LabConfig /v BypassTPMCheck /t REG_DWORD /d 1
In the same way, create other registry parameters for the checks you want to skip when installing Windows 11.
Then get back to Windows 11 setup window, go one step back, and continue with a typical Windows installation without compatibility checks.
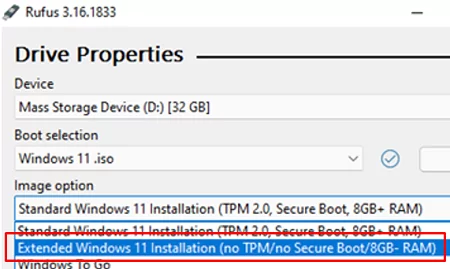
You can modify Windows 11 installation ISO image so that all checks (TPM, SecureBoot, disk size, RAM, CPU) are skipped during OS installation. To do it, create a text file AutoUnattend.xml with the following contents:
<unattend xmlns="urn:schemas-microsoft-com:unattend">
<settings pass="windowsPE">
<component name="Microsoft-Windows-Setup" processorArchitecture="amd64" publicKeyToken="31bf3856ad364e35" language="neutral" versionScope="nonSxS" xmlns:wcm="http://schemas.microsoft.com/WMIConfig/2002/State" xmlns:xsi="http://www.w3.org/2001/XMLSchema-instance">
<RunSynchronous>
<RunSynchronousCommand wcm:action="add">
<Order>1</Order>
<Path>reg add HKLM\System\Setup\LabConfig /v BypassTPMCheck /t reg_dword /d 0x00000001 /f</Path>
</RunSynchronousCommand>
<RunSynchronousCommand wcm:action="add">
<Order>2</Order>
<Path>reg add HKLM\System\Setup\LabConfig /v BypassSecureBootCheck /t reg_dword /d 0x00000001 /f</Path>
</RunSynchronousCommand>
<RunSynchronousCommand wcm:action="add">
<Order>3</Order>
<Path>reg add HKLM\System\Setup\LabConfig /v BypassRAMCheck /t reg_dword /d 0x00000001 /f</Path>
</RunSynchronousCommand>
<RunSynchronousCommand wcm:action="add">
<Order>5</Order>
<Path>reg add HKLM\System\Setup\LabConfig /v BypassCPUCheck /t reg_dword /d 0x00000001 /f</Path>
</RunSynchronousCommand>
<RunSynchronousCommand wcm:action="add">
<Order>4</Order>
<Path>reg add HKLM\System\Setup\LabConfig /v BypassStorageCheck /t reg_dword /d 0x00000001 /f</Path>
</RunSynchronousCommand>
</RunSynchronous>
<UserData>
<ProductKey>
<Key></Key>
</ProductKey>
</UserData>
</component>
</settings>
</unattend>

<component name="Microsoft-Windows-Shell-Setup" processorArchitecture="amd64" publicKeyToken="31bf3856ad364e35" language="neutral" versionScope="nonSxS" xmlns:wcm="http://schemas.microsoft.com/WMIConfig/2002/State" xmlns:xsi="http://www.w3.org/2001/XMLSchema-instance">
<OOBE>
<HideOnlineAccountScreens>true</HideOnlineAccountScreens>
<HideWirelessSetupInOOBE>true</HideWirelessSetupInOOBE>
<ProtectYourPC>3</ProtectYourPC>
</OOBE>
</component>
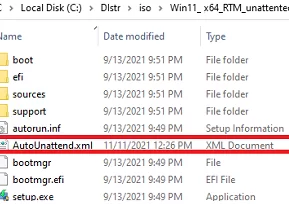
Copy this file to the root of your Windows 11 USB installation media.
If you want to add an answer file to Windows 11 ISO image, extract its contents to any folder on your computer, copy AutoUnattend.xml to the same directory, and rebuild the ISO image.
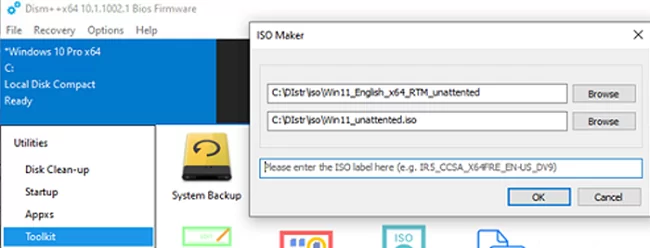
I used free DISM++ (Toolkit -> ISO maker) to create the custom Windows 11 ISO image.
Then no hardware compatibility checks will be performed during Windows 11 setup.