The Memory Compression feature in Windows 10 and 11 is used to optimize physical RAM utilization by compressing some of the pages in RAM. By using process memory compression, you can keep more processes in physical memory without having to page them on a disk. Required data is retrieved from RAM faster, even though additional CPU resources are spent on compressing/decompressing it. With memory compression, you can reduce RAM usage, hard disk load by reducing the amount of I/O operation, and save SSD resources.
Microsoft first introduced memory compression by the Memory Manager (MM) process in Windows 10 and Windows Server 2016. In this article, we will look at how to view compressed memory usage statistics in Windows, how to enable or disable RAM compression (if your computer is slow due to the high load of the Memory Compression process).
Compressed Memory in Windows 10 and 11
If the Windows Memory Manager detects low memory, it tries to compress unused pages of memory instead of writing them to a paging file on disk to free up RAM for other processes.
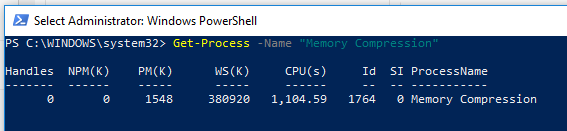
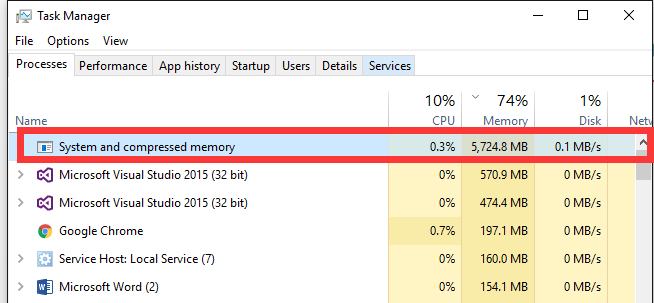
Originally, the process System and compressed memory was located inside the System process, which is not too convenient for troubleshooting. In modern Windows builds (Win 10 20H2 and Windows 11), this functionality is separated into a separate Memory Compression process, which is hidden from the Task Manager. You can get information about this process using the Get-Process PowerShell cmdlet:
Get-Process -Name "Memory Compression"
Handles NPM(K) PM(K) WS(K) CPU(s) Id SI ProcessName
 ------- ------ ----- ----- ------ -- -- -----------
 0 0 1548 380920 1,104.59 1764 0 Memory Compression
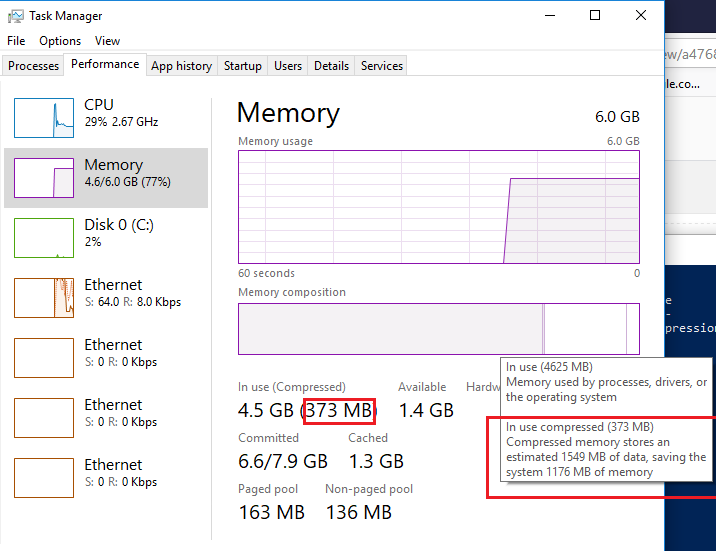
You can only view the current level of memory compression usage in the Windows Task Manager.
Go to the Performance tab and select the Memory section. The current value of compressed memory usage is displayed in the In use (Compressed) parameter. In my example, 4.5 GB is used, of which 373 MB is compressed. To understand what initial amount of memory was compressed, hover the mouse over the Memory composition graph:
In use compressed (373 MB). Compressed memory stores an estimated 1549 MB of data, saving the system 1176 MB of memory.
As you can see, the memory compression level reaches almost 315%, so the RAM savings are quite large.
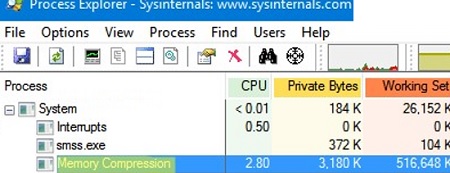
Also, you can see the actual CPU usage and memory size used by the Memory Compression process in Windows 11/10 using Process Explorer.
Run the Process Explorer and find the Memory Compression process in the System process tree.
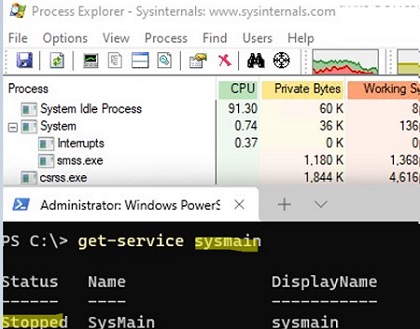
The Memory Compression process is serviced by the SysMain (formerly SuperFetch) service. SysMain reduces disk writes (paging) by compressing and consolidating memory pages. If this service is stopped, then Windows does not use RAM compression.
You can check the status of the SysMain service using PowerShell:
get-service sysmain
In most cases, if your computer works normally and has sufficient RAM size, the compressed memory process works fine and doesn’t require any action from the administrator.
System and Compressed Memory Process High CPU and RAM Usage
The SysMain service and the Memory Compression process are used to improve computer performance. But sometimes it happens that the memory compression process starts to heavily load the CPU or hard drive of the computer (up to 100%, this can be seen in the Task Manager), or takes up too much RAM resources. Of course, the computer starts to work slow or hangs up.
What can you do in this case?
I will give you a couple of tips that will help you to fix the problem of high PC resources usage by the Compressed Memory process
- Try to temporary disable the page file on your computer (No paging file option), restart your computer, enable the paging file (Automatically manage paging file size for all drives option), and reboot again;
- If the problem of the high load of the computer by the Compressed memory process occurs only after waking from the Sleep or Hibernate modes (and disappears after the restart), try to download and install the latest versions of drivers for your storage controllers (ACPI/AHCI/RAID/SCSI), hard drives and video card from the official websites. After that, it is recommended to disable automatic driver update.

If these actions didn’t help, you can try to completely prevent Windows from using compressed memory.
How to Disable the Memory Compression in Windows 10 and 11?
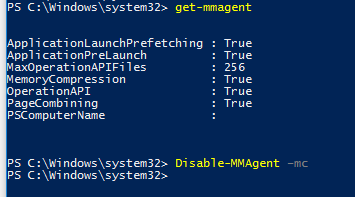
If you want to make sure that Windows 10 works stable without using compressed memory, you can temporarily disable this feature. To do it, open an elevated PowerShell prompt. Let’s make sure that the compressed memory is enabled:
Get-mmagent
ApplicationLaunchPrefetching : True
ApplicationPreLaunch         : True
MaxOperationAPIFiles         : 512
MemoryCompression            : True
OperationAPI                 : True
PageCombining                : True
The parameter MemoryCompression: True shows that the compressed memory is enabled.
Let’s disable the compressed memory in Windows:
Disable-MMAgent –MemoryCompression
And restart your computer:
Restart-Computer
Check if the overall system performance has changed after disabling compressed memory. If the performance has improved, you can leave your Windows 10 with the compressed memory disabled.
In some cases, users are recommended to fix problems with compressed memory with the following actions:
- Disable the SysMain service (ex SuperFetch) (
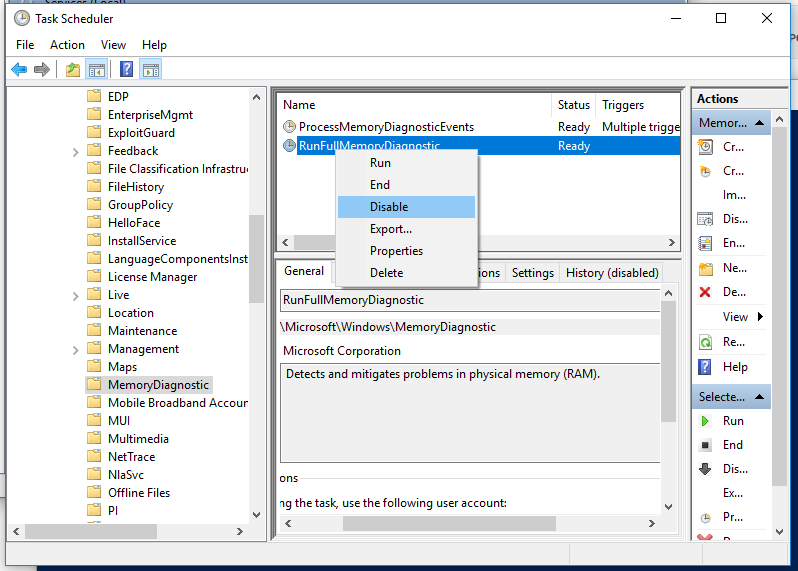
services.msc-> SysMain -> Startup type: Disabled). This will disable Windows 10/11 memory optimization processes in Memory Manager; - Disable full memory diagnostic RunFullMemoryDiagnostic task in the Task Scheduler (Task Scheduler -> Task Scheduler library -> Microsoft -> Windows -> MemoryDiagnostic -> RunFullMemoryDiagnostic (Detects and mitigates problems in physical memory – RAM) -> Disable;
- Try disabling the network activity monitoring driver (Network Data Usage, NDU) (described in the article about non-paged memory pool in Windows);
- Disable real-time protection in your antivirus. Perhaps it doesn’t work correctly with compressed memory;
- Check your Windows image system files using DISM and SFC.
These tips can help you get to rid of the high load of the computer by the Compressed Memory process. However, this disables the underlying Windows performance optimization features, which may adversely affect the overall performance of your device.
How to Enable Memory Compression on Windows Server 2016/2019/2022 or Windows 10?
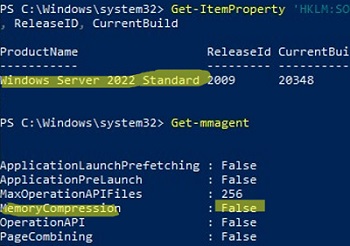
Memory compression is disabled by default in all versions of Windows Server.
Run the Get-mmagent command to verify that compressed memory is disabled. In the screenshot below, we have shown that in Windows Server 2022 the value of Memory Compression = False.
For Windows to use memory compression, the following conditions must be met:
- The paging file must be enabled (at least the minimum size 16 Mb);
- The SysMain service must be running;
- You are using Windows 10/11 or Windows Server 2016+.
To enable memory compression in Windows, run the PowerShell command:
Enable-MMAgent -MemoryCompression
Reboot your computer.
As a rule, the Memory Compression feature in Windows 10 and 11 works quite effectively and doesn’t require any interventions. If memory compression causes any problems on your computer, it is likely that you have problems with system settings, hardware, or drivers. If necessary, the memory compression can be completely disabled.
5 comments
Memory compression may cause bluescreen(like page corruption) when memory is used nearly full and system is under heavily load.It still occur in win10 2004.So if you use win10 for heavy work then it’s recomennded to disable the feature.
Suddenly had this high CPU and memory. culprit: running Microsoft.Photos.exe … i left it opened with an image in zoomed mode… few hours later, high CPU and Memory. Closing it restored system. Windows 10 Pro Version 1909 (OS Build 18363.959)
Yes, the memory compression process causing a high CPU load within the main system process, was due to running Microsoft.Photos.exe with one static simple picture. Microsoft.Photos.exe seems to be the “Bug” here. Just closing Microsoft.Photos.exe resolved the problem, immediately lowering the CPU load to normal values. TY! — Win10 1909, Ent. (current Patchlevel Auhust 2020)
There was very anoying lag / slow response on my rdp* after I disabled the memory compression, remote desktop connection is OK.
*Virtualbox on Debian host with Windows 10 guest
I disabled compression on my Lenovo P1 – and now all programs opens twice as fast! :O