Windows computers and servers may experience troubles with memory overflow caused by a leak of a certain system driver that stores its data in the system’s non-paged memory pool. Non-paged memory pool is data in the computer’s RAM used by the kernel and drivers of the operating system. The non-paged pool is never swapped to the disk (to the paging file), it is always stored only in the physical memory.
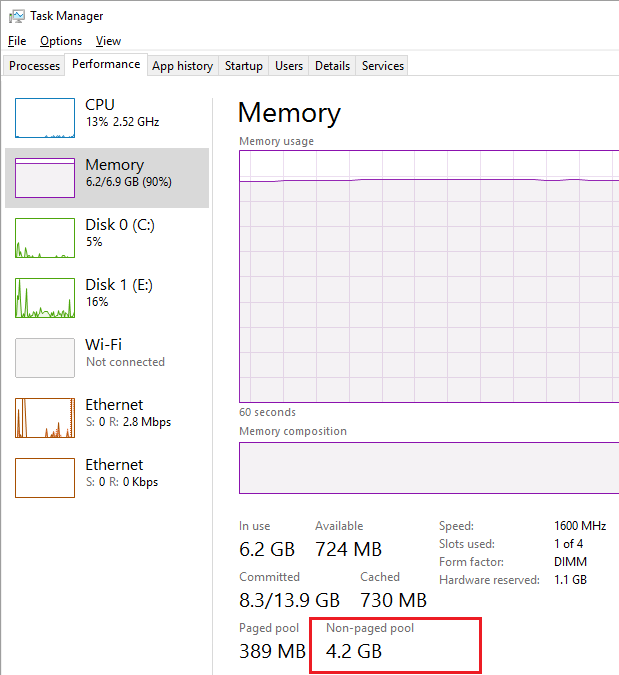
You can see the current size of the non-paged memory in the Memory section of the Performance tab in the Task Manager. The screenshot below shows that almost all memory of the server is busy, and most part of it is occupied by the non-paged pool 4.2GB. Normally, the size of the non-paged pool rarely exceeds 200-400 MB. A large non-paged pool size often indicates that there is a memory leak in some system component or device driver.
If there is a memory leak in the non-paged pool on the server, the following events will appear in the System event log:
Source: Srv
Description:
The server was unable to allocate from the system nonpaged pool because the pool was emptyIn most cases, the reason for the memory leak described above is some problems with the third-party drivers installed in Windows. As a rule, these are network drivers. Please, pay attention to the pool behavior when downloading large files (most likely, it grows rapidly).
Maximum non-paged pool size on Windows:
- Windows x64 up to 128 Gb and no more than 75% of physical memory
- Windows x86 up to 2 Gb and no more than 75% RAM
Only the Windows reboot helps to clean up the non-paged pool. It may be acceptable for a home device, but you should find a better solution for a server working 24/7.
Disable the Network Data Usage Monitoring Driver
Quite often, the reason for a memory leak in the non-paged pool is the incompatibility of the network activity monitoring driver (Network Data Usage — NDU, %WinDir%\system32\drivers\Ndu.sys) with the network adapter drivers. Most often Killer Network and MSI network card drivers conflict with NDU driver. This service can be disabled without much loss of Windows functionality.
Stop the NDU service with the command:
sc config NDU start= disabled

Or through the registry:
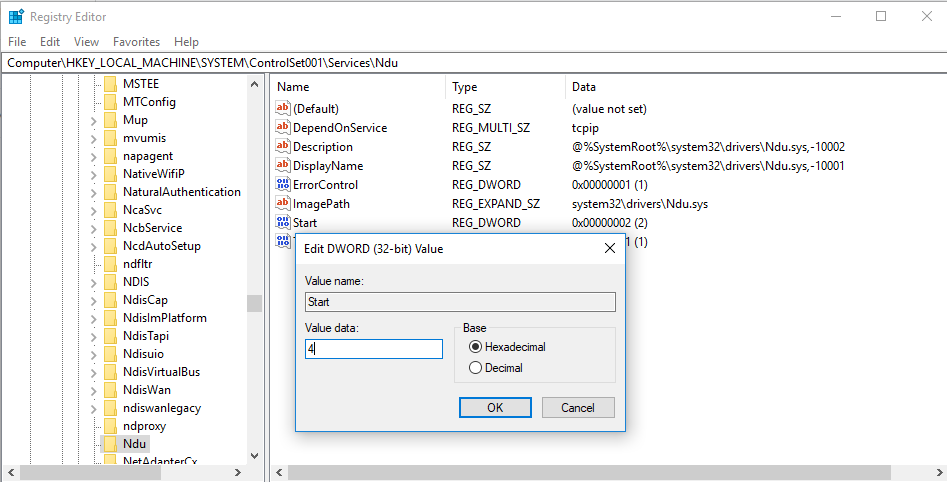
- Open the Registry Editor (regedit.exe);
- Go to registry key HKEY_LOCAL_MACHINE\SYSTEM\ControlSet001\Services\Ndu\;
- Change the value of the Start parameter to 4.
After making changes, you need to restart your computer.
Using PoolMon to Find a Kernel-Mode Memory Leak
You can try to identify the driver that caused the memory leak in the non-paged pool. To do this, we need the Poolmoon.exe console tool included in the Windows Driver Kit (WDK). Download and install the WDK for your Windows version from Microsoft. Then start the Poolmon.exe (in case of WDK for Windows 10, the tool is located in C:\Program Files (x86)\Windows Kits\10\Tools\ folder).
After you have started the tool, press P. The second column will display the tags of the processes that use non-paged memory (the Nonp attribute). Then press the B key to sort the driver list by the Bytes column.
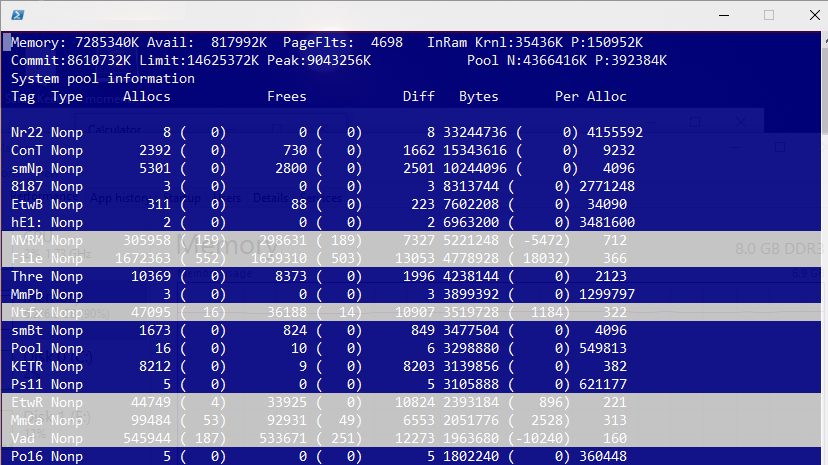
The left column lists the driver tags. Your task is to identify the driver file using this tag. In our example, you can see that most of the RAM in the non-paged pool is used by drivers with tags Nr22, ConT, and smNp.
You should check drivers for found tags using the strings.exe tool (from Sysinternals), using the built-in findstr command, or using PowerShell.
Use the following commands to find the driver files associated with the tags you found:
findstr /m /l /s Nr22 %Systemroot%\System32\drivers\*.sys
 findstr /m /l /s ConT %Systemroot%\System32\drivers\*.sys
 findstr /m /l /s smNp %Systemroot%\System32\drivers\*.sys
Or, you can also use PowerShell:
Set-Location "C:\Windows\System32\drivers"
 Select-String -Path *.sys -Pattern "Nr22" -CaseSensitive | Select-Object FileName -Unique
 Select-String -Path *.sys -Pattern "Py28" -CaseSensitive | Select-Object FileName -Unique
 Select-String -Path *.sys -Pattern "Ne40" -CaseSensitive | Select-Object FileName –Unique
You can map driver files for tags directly in poolmon.exe. To do this, make sure the pooltag.txt file is in the tool directory. You can copy pooltag.txt from the WDK installation directory or download it from GitHub. Run the poolmon as follows:
poolmon /g
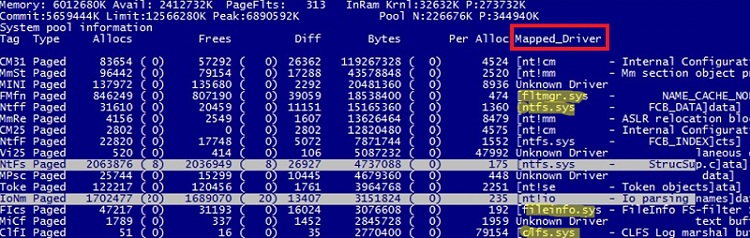
Note that the driver name is now displayed in the Mapped_driver column.
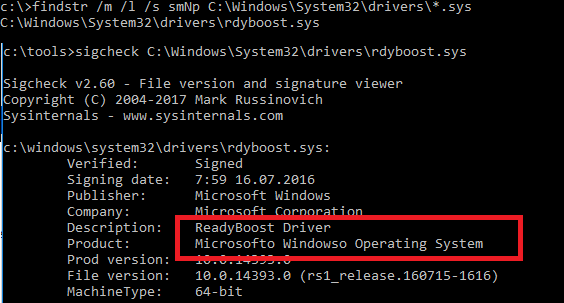
So we have got the list of driver files that may cause the problem. Now you have to identify what drivers and system components these files refer to by their names. To do it, you can use the sigcheck tool from Sysinternals.
sigcheck C:\Windows\System32\drivers\rdyboost.sys
The tool returns the name, description, and version of the driver or Windows component.
Now you can try to uninstall/update/reinstall the problem driver or service.
If a memory leak resulted in a BSOD, you can identify the problematic driver in a memory dump file.
- Load a memory dump into the Windbg debugger;
- Run the command:
!vm - If the NonPagedPool Usage value is greater than NonPagedPool Max, it means that the non-paged pool is exhausted;
- Check the contents of the pool with the command (results will be sorted by non-paged pool usage):
!poolused 2 - After getting the driver tag, find the driver file using
findstrorstrings.exeas described above.
Install the Latest Versions of Network Adapter Drivers
Try to download and install the latest driver versions for your network adapters from the vendor’s website.
If the automatic driver update is enabled in Windows, check to see if problems started after installing new drivers. Try to roll back to the previous driver version and see if the problem persists. If the problem is solved, disable automatic driver update.
Disable the Hyper-V Role
In some cases, the installed Hyper-V role is causing a memory leak to the non-paged pool. If you don’t need this role, we recommend to disable it.
On Windows Server you can disable the Hyper-V role with the PowerShell command:
Remove-WindowsFeature -Name Hyper-V
The command for Windows 10:
Disable-WindowsOptionalFeature -Online -FeatureName Microsoft-Hyper-V-All
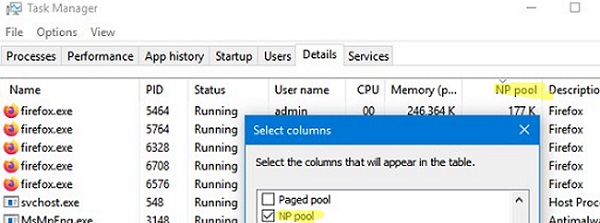
If your search does not return any results, check if the memory leak was caused by a user-mode process. Open the Task Manager, go to the Details tab, add the NP Pool column and look for processes with a large memory size in the non-paged pool.
This guide is applicable both for Windows Server 2019/2016/2012R and desktop Windows 10/8.1.
4 comments
It’s all so clear until we come to the sigcheck part in the PoolMon step. You just give us a command but it does nothing. Now I’m stuck knowing that ndis.sys is using 4.8GB ram in my non-paged pool but I don’t know what it is. When I Google for sigcheck I can find an exe file for it but that also does nothing. Why do everything so perfect but stop being clear right at the end? What do I do now?
You can download the Sigcheck tool from the Microsoft site (_https://docs.microsoft.com/en-us/sysinternals/downloads/sigcheck)
Then open an elevated cmd, go to the directory with Sigcheck.exe and run the command:
sigcheck your_path\ndis.sys
Disable the Network Data Usage Monitoring Driver worked for me I couldn’t do it from command line. Over the course of 2 days my non paged pool would rise to 30gb or more making my computer slow. No issues since.
Do you have any recommendations if the issue is in the HTab tag? It looks like this tag is the hash table pool and running “indstr /m /l /s HTab %Systemroot%\System32\drivers\*.sys” does not return anything