When you connect a new device to your computer, laptop, or tablet, Windows tries to automatically download and install a corresponding hardware driver. Later, the operating system will automatically update the device driver through Windows Update. In most cases, this approach is optimal, since guarantees the installation of the latest driver versions that have been verified by Microsoft. However, in some cases, the user wants to use the old/legacy driver version and doesn’t want them to be updated automatically via Windows Update.
On Windows 10 and 11, you can disable the automatic device driver updates in several ways.
How to Prevent Windows 10/11 from Automatically Updating Specific Driver?
You can prevent automatic driver updates for a specific device in Windows 10 and 11. For example, you are using some kind of old (but stable) video card driver that stops working correctly after each automatic driver update. You want all computer drivers to be updated automatically, except for the driver for a specific device (your video card).
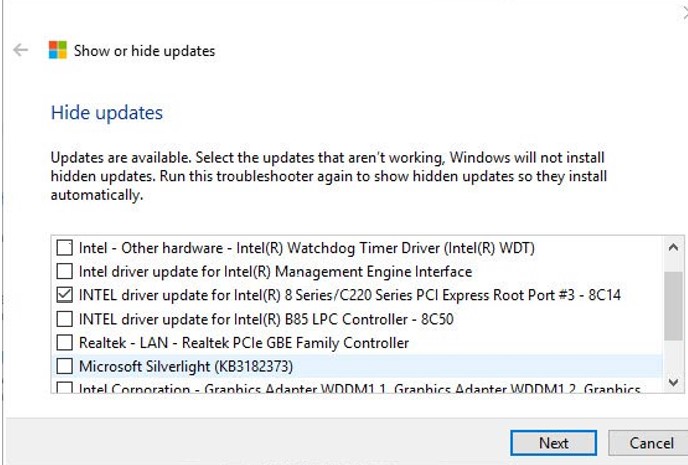
Microsoft suggests using a separate tool – wushowhide.diagcab (“Show or Hide Updates”), which allows you to hide specific updates or drivers in Windows 11 and Windows 10.
- You can download the wushowhide.diagcab utility from the Microsoft Download Center (http://download.microsoft.com/download/f/2/2/f22d5fdb-59cd-4275-8c95-1be17bf70b21/wushowhide.diagcab);
- Run the
wushowhide.diagcabtool and select the option “Hide Updates“; - In the list of the available Windows updates and drivers, check the drivers for which you want to disable the auto-update and click the Next button;

- After that, the selected drivers will not be automatically updated by Windows.
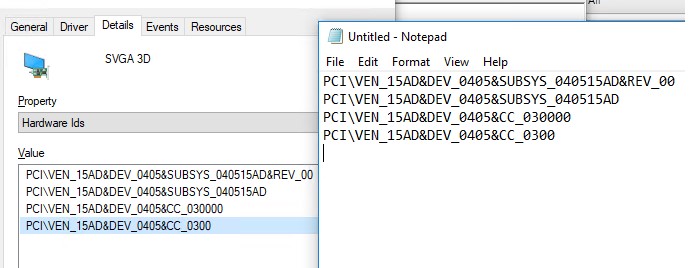
You can disable the update of a specific driver via Group Policy. First of all, you need to get the device ID for which you want to disable the automatic driver updates.
- Open the device manager snap-in (
devmgmt.msc). Find the device you need in the hardware list and open its properties; - Go to the Detail tab and select “Hardware IDs” from the drop-down list;
- Copy the values of the hardware identifiers associated with the device (in the format
PCI\VEN_15AD&DEV_ …) into thenotepad.exe;
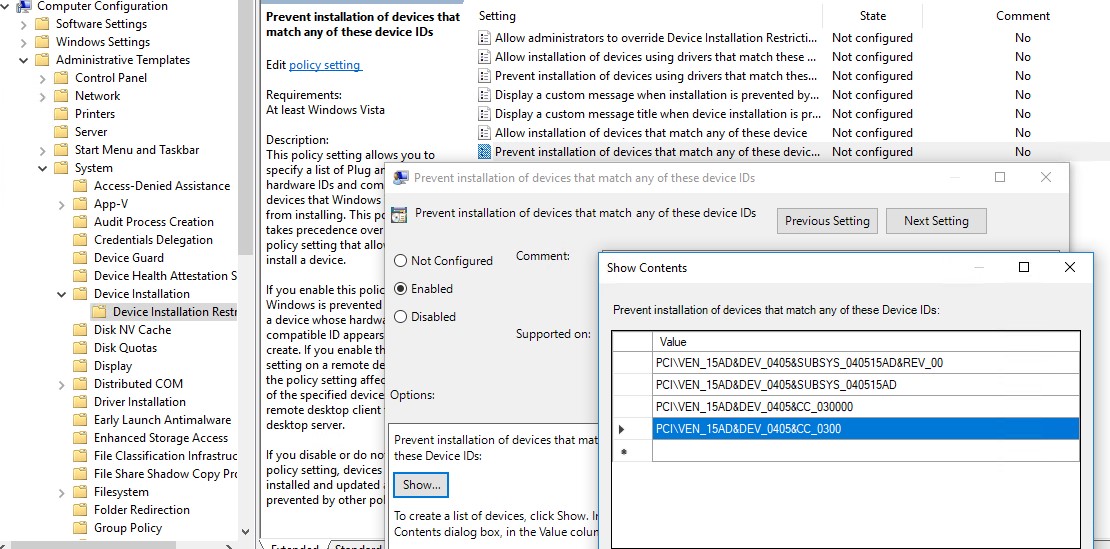
- In the Group Policy Editor console (
gpedit.mscfor standalone computer) go to the section Computer Configuration -> Administrative Templates -> System -> Device Installation -> Device Installation Restrictions. Enable the policy “Prevent installation of devices that match any of these device IDs”; - Click the “Show” button in the policy settings and copy the graphic card IDs you received earlier into the table of values;

- Save the changes and update the Group Policy settings on the client with the command:
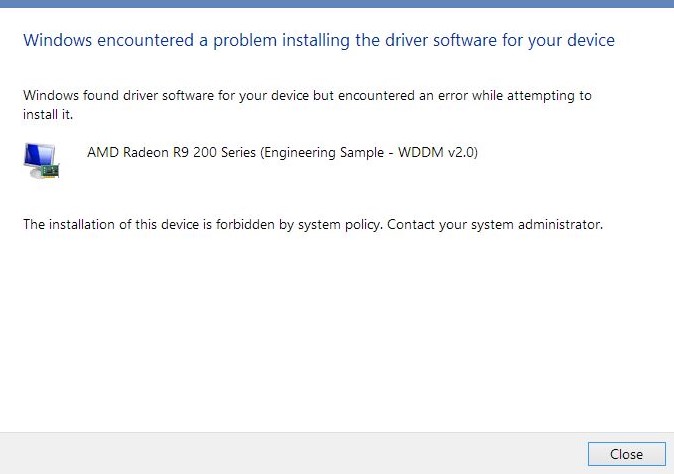
gpupdate /force; - Now, if the computer receives and downloads driver updates for these devices through Windows Update, an error message will appear during their automatic installation (The installation of this device is forbidden by system policy. Contact your system administrator).
 Now you cannot manually update the driver for this device. To update it, you will have to disable this Group Policy option or remove the hardware ID from the list.
Also, you can enable this policy through the registry. To do this, run the registry editor (regedit.exe) and go to the registry key HKLM\SOFTWARE\Policies\Microsoft\Windows\DeviceInstall\Restrictions\DenyDeviceIDs. In this section, create string (REG_SZ) parameters with the names in order, starting with 1, and the hardware ID value in each parameter.

{4d36e972-e325-11ce-bfc1-08002be10318} is a class of network adapters, {4d36e979-e325-11ce-bfc1-08002be10318} and {4658ee7e-f050-11d1-b6bd-00c04fa372a7} – printers, etc. You can find a complete list of hardware class GUIDs here:How to Disable Automatic Hardware Driver Updates on Windows 11 or 10?
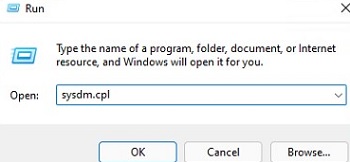
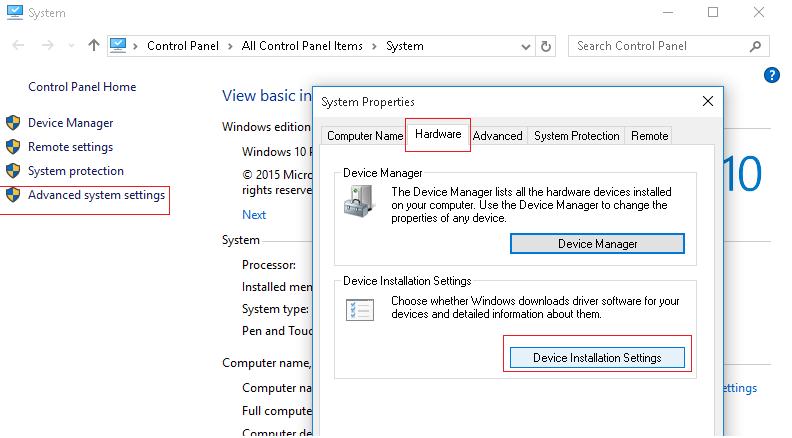
The easiest way to prevent Windows from automatic driver’s update is to change the system settings on the Hardware tab. To do this:
- Press Win + X and run the
sysdm.cplcommand;
- The Hardware tab of the Advanced System Settings dialog will open;
- Click the Device Installation Settings button;

- In the Device Installation Settings window, change the value to “No (your device might not work as expected)” in the dialog “Do you want to automatically download manufacturers’ apps and custom icons available for your device?”;

- Save changes and restart your computer.
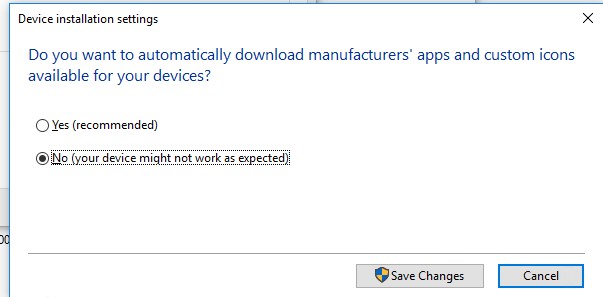
This setting works on both Windows 10 and Windows 11.
How to Stop Windows from Updating Hardware Drivers Using Group Policies?
You can disable device driver updates in Windows 10 or 11 using Group Policy settings. You can use the domain GPO editor (gpmc.msc) or the Local Group Policy Editor gpedit.msc (described below).
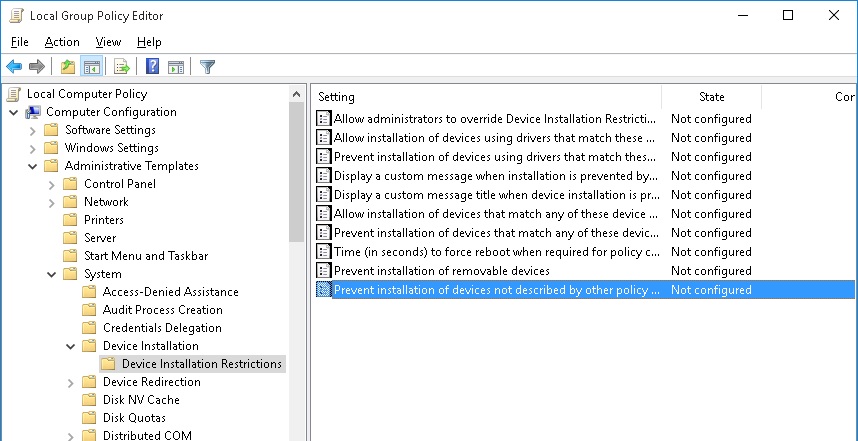
- Press Win + R and type gpedit.msc -> OK (in Windows Home editions you can run the Local Group Policy Editor like this);
- In the Local Group Policy Editor, go to Computer Configuration -> Administrative Templates -> System ->Device Installation ->Device Installation Restrictions;
- Find the policy Prevent installation of devices not described by other policy settings;

- Enable the policy (“Enabled”) and save the changes;
- Then enable the policy “Specify search order for device driver source locations”. This policy is located under the GPO section Computer Configuration -> Administrative Templates -> System -> Device Installation. Change the policy setting to “Do not search Windows Update”. This policy allows you to exclude the search for driver updates on Windows Update sites (when installing a driver for any Windows device, it tries to find a more suitable driver through the Windows Update service);

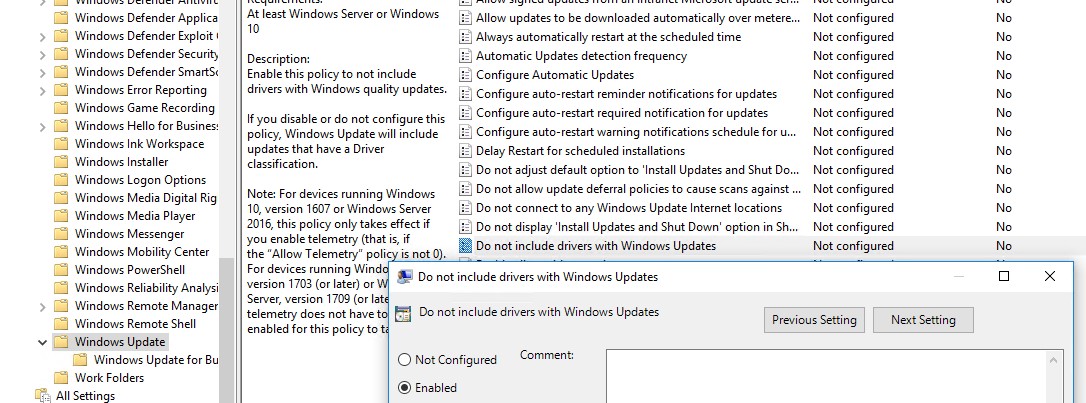
- Go to the section Computer Configuration -> Administrative Templates -> Windows Components -> Windows Update, find and enable the policy named “Do not include drivers with Windows Update”
 On Windows 11 and Windows Server 2022, this GPO option is located under Computer Configuration -> Administrative Templates -> Windows Components -> Windows Update -> Manage Updates offered from Windows Update.

With domain GPOs (configured using the gpmc.msc console), you can apply these settings to multiple computers in an AD domain. In a workgroup, you can copy the local GPO settings to other computers using the LGPO.exe.
Disable Automatic Driver Updates in Windows via PowerShell
You can use a simple PowerShell script to disable automatic driver updates in Windows. This PowerShell script changes the same registry settings as the above GPO options. This method is convenient to use on computers with the Home edition of Windows (without a local GPO editor) and in tasks of automating the disabling of auto-update of drivers.
In order to disable automatic driver update in Windows, you need to change the values of the following registry parameters:
- HKLM\SOFTWARE\Microsoft\Windows\CurrentVersion\DriverSearching –
SearchOrderConfig= 3 (3 — do not install drivers via Windows Update) - HKLM\SOFTWARE\Microsoft\Windows\CurrentVersion\Device Metadata –
PreventDeviceMetadataFromNetwork= 1 - HKLM\SOFTWARE\Microsoft\Windows\WindowsUpdate –
ExcludeWUDriversInQualityUpdate= 1
Open the elevated PowerShell console and run the following code:
Set-ItemProperty -Path HKLM:\SOFTWARE\Microsoft\Windows\CurrentVersion\DriverSearching\ -Name SearchOrderConfig -Value 3
Set-ItemProperty -Path 'HKLM:\SOFTWARE\Microsoft\Windows\CurrentVersion\Device Metadata\' -Name PreventDeviceMetadataFromNetwork -Value 1
# Check that the registry key exists and create it if necessary
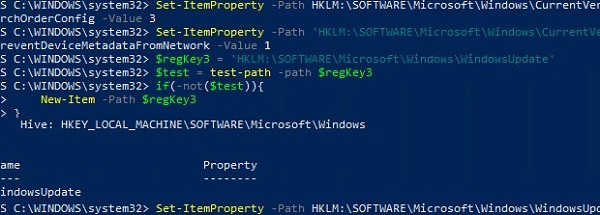
$regKey3 = 'HKLM:\SOFTWARE\Microsoft\Windows\WindowsUpdate'
$test = test-path -path $regKey3
if(-not($test)){
New-Item -Path $regKey3
}
Set-ItemProperty -Path $regKey3 -Name ExcludeWUDriversInQualityUpdate -Value 1
You can also change these registry settings manually using regedit.exe or deploy the registry keys to domain computers using GPO.
After restarting, the automatic driver updates in Windows will be blocked.
- HKLM\SOFTWARE\Microsoft\PolicyManager\current\device\Update
- HKLM\SOFTWARE\Microsoft\PolicyManager\default\Update
- HKLM\SOFTWARE\Microsoft\WindowsUpdate\UX\Settings
- HKLM\SOFTWARE\Policies\Microsoft\Windows\WindowsUpdate
You need to set the parameter ExcludeWUDriversInQualityUpdate = 1 in all specified registry keys. Add the following PowerShell code to the above script:
$regkeys =
 'HKLM:\SOFTWARE\Policies\Microsoft\Windows\WindowsUpdate',
 'HKLM:\SOFTWARE\Microsoft\PolicyManager\default\Update',
 'HKLM:\SOFTWARE\Microsoft\WindowsUpdate\UX\Settings',
 'HKLM:\SOFTWARE\Microsoft\PolicyManager\current\device\Update'
 foreach ($regkey in $regkeys){
 $test = test-path -path $regkey
 if(-not($test)){
 New-Item -Path $regKey
 }
 Set-ItemProperty -Path $regkey -Name ExcludeWUDriversInQualityUpdate -Value 1
 }
 foreach ($regkey in $regkeys){write-host $regkey}
Some administrators prefer to disable driver updates after deploying a Windows 10 image and installing all the necessary drivers. To do this, you can disable the installation of drivers using the GPO parameter “Prevent installation of devices not described by other policy settings” (discussed above) or with the command:
reg add "HKLM\SOFTWARE\Policies\Microsoft\Windows\DeviceInstall\Restrictions" /v DenyUnspecified /t REG_DWORD /d 1 /f
3 comments
All of this methods are just “TEMPORARY”. I found automatic driver update couldn’t be turned off and MS officially told THEY WILL NEVER CHANGE THIS BECAUSE OF SECURITY which is just lie.
actually this worked for me:
In the latest build of Windows 10 21H1 and in Windows 11, the ExcludeWUDriversInQualityUpdate parameter is located in several registry keys:
HKLM\SOFTWARE\Microsoft\PolicyManager\current\device\Update
HKLM\SOFTWARE\Microsoft\PolicyManager\default\Update
HKLM\SOFTWARE\Microsoft\WindowsUpdate\UX\Settings
HKLM\SOFTWARE\Policies\Microsoft\Windows\WindowsUpdate
You need to set the parameter ExcludeWUDriversInQualityUpdate = 1 in all specified registry keys. Add the following PowerShell code to the above script:
if you dont have the ExcludeWUDriversInQualityUpdate file in those locations you have to create one Dword 32-bit key in each location and set the value to one
Block specific device driver from install:
Get the device Hardware ID and class:
pnputil /enum-devices /ids
Go to Computer Configuration/Administrative Templates/System/Device Installation and enable “Device Installation Restrictions/Prevent installation of devices that match any of these device IDs”
If a device is blocked a Event with ID 402 is logged to the Windows Kernel-PNP Log.
Get-WinEvent -FilterHashtable @{“LogName”=”Microsoft-Windows-Kernel-PnP/Configuration”;”ID”=”402″ }