Windows OS Hub
  • Windows Server
    • Windows Server 2022
    • Windows Server 2019
    • Windows Server 2016
    • Windows Server 2012 R2
    • Windows Server 2008 R2
    • SCCM
  • Active Directory
    • Active Directory Domain Services (AD DS)
    • Group Policies
  • Windows Clients
    • Windows 11
    • Windows 10
    • Windows 8
    • Windows 7
    • Windows XP
    • MS Office
    • Outlook
  • Virtualization
    • VMWare
    • Hyper-V
    • KVM
  • PowerShell
  • Exchange
  • Cloud
    • Azure
    • Microsoft 365
    • Office 365
  • Linux
    • CentOS
    • RHEL
    • Ubuntu
  • Home
  • About

Windows OS Hub

  • Windows Server
    • Windows Server 2022
    • Windows Server 2019
    • Windows Server 2016
    • Windows Server 2012 R2
    • Windows Server 2008 R2
    • SCCM
  • Active Directory
    • Active Directory Domain Services (AD DS)
    • Group Policies
  • Windows Clients
    • Windows 11
    • Windows 10
    • Windows 8
    • Windows 7
    • Windows XP
    • MS Office
    • Outlook
  • Virtualization
    • VMWare
    • Hyper-V
    • KVM
  • PowerShell
  • Exchange
  • Cloud
    • Azure
    • Microsoft 365
    • Office 365
  • Linux
    • CentOS
    • RHEL
    • Ubuntu

 Windows OS Hub / Windows 10 / High CPU Usage by Ntoskrnl.exe (System) Process in Windows 10

June 7, 2022 Windows 10

High CPU Usage by Ntoskrnl.exe (System) Process in Windows 10

On one of the computers with newly installed Windows 10, a user began to complain of constant hanging up and slow work of the OS. The Task Manager shows that about 50% of the CPU resources are used by System (ntoskrnl.exe) process. In this article I’ll try to describe the main diagnostics methods of high CPU utilization by different processes and ways to find out the problem Windows component or system driver.

system process high cpu usage in windows 10

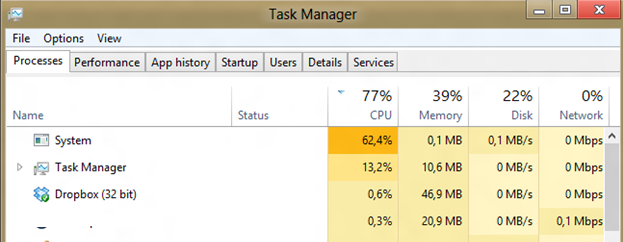
The situation when System process consumes more than a half of CPU resources of the system is not normal. Ntoskrnl.exe is the executable of the OS kernel. It is the core system process. The OS kernel runs system drivers of the devices, which are likely to be the source of the problem (not all drivers are properly tested by hardware developers).

As a rule, the problem of leakage in the driver code and high usage of CPU, memory or disk resources appears after the installation of new hardware, new driver version (including automatic driver updates, which can be disable) or after Windows update.

Tip. In some cases, a high load on the CPU and memory can cause the Compressed Memory process.

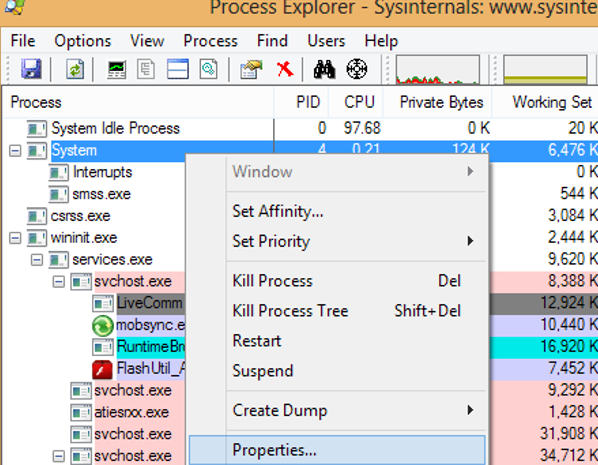
To understand which driver or module causes high CPU utilization, you can use a free tool Process Explorer. Download it and run as administrator.

Find System in the list of running processes, right-click it and open its Properties.

process explorer system process properties

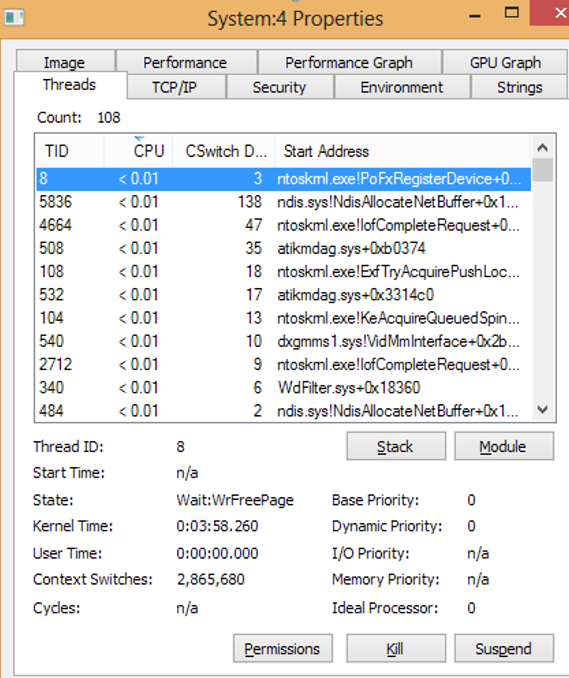
Go to the Threads tab. Sort the list of modules loaded by the kernel by the rate of CPU usage (CPU column). In Start Address column, the name of a component or a driver is shown, which causes high load (the screenshot below is not from the problem system, in my case it was the ntoskrnl.exe process).

Ntoskrnl.exe process Is causing high CPU usage in windows 10

To find out a driver that causes high CPU load, you can also use a free Microsoft tool kernrate.exe (Kernrate Viewer). The tool is a part of WDK (Windows Device Kit). After WDK installation, you can find the tool in the folder …\Tools\Other\amd64.

Run kernrate.exe without parameters and wait till the data are collected (10-15 minutes), then terminate the tool by pressing Ctrl-C. Look at the list of modules in Result for Kernel Mode section.

using kernrate.exe to find problem module, which causes high CPU usage

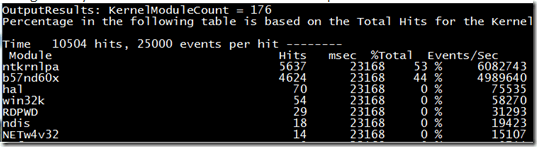
As you can see, in our example b57nd60x module is causing high CPU usage. Using Google or Sigcheck tool (see the example of using the Sigcheck to detect the driver files related with the module), you can detect that the problem is caused by Broadcom NetXtream Gigabit Ethernet NDIS6.0 Driver.

You can also analyze CPU usage during system boot using Windows Performance Toolkit (WPT). You must install the WPT and run data collection in the Windows Perfomance Recorder (First level triangle + CPU usage -> Start) graphic console.

Analyzing high CPU usage with Windows Perfomance Recorder

Or you can start collecting data for analysis using the command :

xperf -on latency -stackwalk profile -buffersize 1024 -MaxFile 256 -FileMode Circular && timeout -1 && xperf -d cpuusage.etl

Tip. This method is recommended to be used if after booting the system hangs up and it is simply impossible to work in it. It is likely that the article about the method of diagnostics of slow Windows boot also may be useful for you.

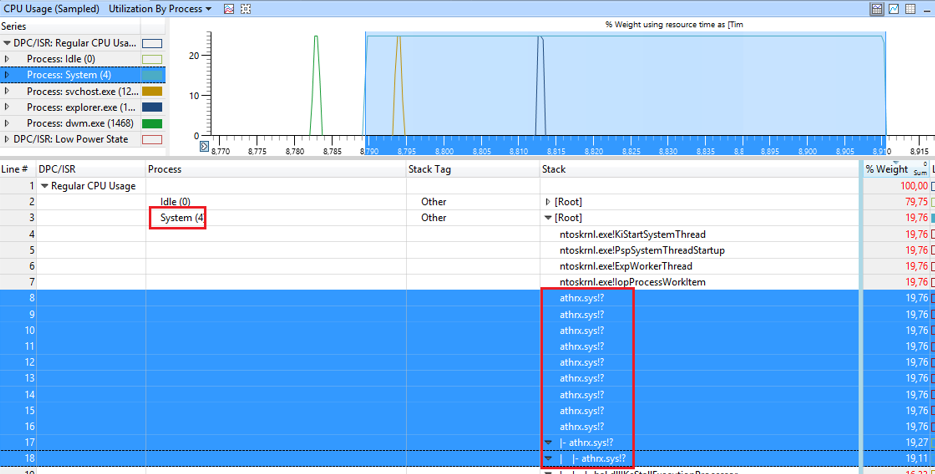
You must save the file and open it in Windows Performance Analyzer (WPA). Expand the System process stack. In this example, you can see that athrx.sys driver (Atheros Wireless Network Adapter) causes high CPU load.

Using WPA to diagnose high CPU usage and find problem driver
So, the problem driver is detected. What’s next?

To solve the problem, install the later (or older) driver version, or completely disable (disconnect) the hardware if the problem persists with any driver version. The updated driver can be additionally stress-tested using the Driver Verifier.

1 comment
1
Facebook Twitter Google + Pinterest
previous post
WSUS Group Policy Settings to Deploy Updates
next post
How to See Number of Active User Sessions on IIS site?

Related Reading

How to Connect VPN Before Windows Logon

November 14, 2023

Using WPAD (Web Proxy Auto-Discovery Protocol) on Windows

November 7, 2023

Zabbix: How to Get Data from PowerShell Scripts

October 27, 2023

Tracking Printer Usage with Windows Event Viewer Logs

October 19, 2023

How to Use Ansible to Manage Windows Machines

September 25, 2023

1 comment

Daniel September 3, 2020 - 9:25 pm

Hi I followed this example to run the xperf command to create the .etl file and visualize it on Windows Performance Analyzer. However, when I expand the systems stack under Root, all I see are bunch of lines that say “?!?” under the Stack tab instead of proper driver names. Do you have any advice?

Reply

Leave a Comment Cancel Reply

Categories

  • Active Directory
  • Group Policies
  • Exchange Server
  • Microsoft 365
  • Azure
  • Windows 11
  • Windows 10
  • Windows Server 2022
  • Windows Server 2019
  • Windows Server 2016
  • PowerShell
  • VMWare
  • Hyper-V
  • Linux
  • MS Office

Recent Posts

  • How to Connect VPN Before Windows Logon

    November 14, 2023
  • Removing Azure Arc Setup Feature on Windows Server 2022

    November 9, 2023
  • Using WPAD (Web Proxy Auto-Discovery Protocol) on Windows

    November 7, 2023
  • Send Emails with Microsoft Graph API and PowerShell

    November 6, 2023
  • Zabbix: How to Get Data from PowerShell Scripts

    October 27, 2023
  • Tracking Printer Usage with Windows Event Viewer Logs

    October 19, 2023
  • PowerShell: Configure Certificate-Based Authentication for Exchange Online (Azure)

    October 15, 2023
  • Reset Root Password in VMware ESXi

    October 12, 2023
  • How to Query and Change Teams User Presence Status with PowerShell

    October 8, 2023
  • How to Increase Size of Disk Partition in Ubuntu

    October 5, 2023

Follow us

  • Facebook
  • Twitter
  • Telegram
Popular Posts
  • Booting Windows 7 / 10 from GPT Disk on BIOS (non-UEFI) systems
  • Removable USB Flash Drive as Local HDD in Windows 10 / 7
  • How to increase KMS current count (count is insufficient)
  • How to Disable UAC Prompt for Specific Applications in Windows 10?
  • Managing Printers and Drivers with PowerShell in Windows 10 / Server 2016
  • Managing Printers from the Command Prompt in Windows 10 / 8.1
  • Fix: RDP Authentication Error Has Occurred – The Function Requested Is Not Supported
Footer Logo

@2014 - 2023 - Windows OS Hub. All about operating systems for sysadmins


Back To Top