VMware vCenter Converter Standalone is a free tool from VMware that allows you to convert (migrate) a physical server (computer) to a virtual machine (P2V, Physical-to–Virtual) or move a VM from one virtualization software (hypervisor) to another (V2V, Virtual-to–Virtual). With vCenter Converter, you can convert computers running Windows and Linux. In this article, we will look at how to migrate a physical server to a VMware vCenter environment using vCenter Converter.
Recently, the latest release was VMware Converter Standalone 6.2, released in 2018. In February 2022, VMware removed this version of Converter from the list of available downloads on its website (significant vulnerabilities were found in previous versions) and promised to release a new version a little later. At the same time, no alternative for performing P2V conversions was offered.
And finally, on October 11, 2022, the new version of vCenter Converter 6.3 became available for download. This version supports the new Windows Server 2019/2022 and Windows 11. However, older versions prior to Windows Server 2012, RHEL/CentOS 6, and Ubuntu 14 are no longer supported.
You can download the latest version of Converter here (registration required): https://www.vmware.com/products/converter.html

Let’s take a look at how to online migrate a physical Windows Server host to a VMware virtual machine with almost no downtime.
Converting a Physical Machine into a VMware Virtual Machine (P2V)
- Download and install vCenter Converter on any Windows computer;
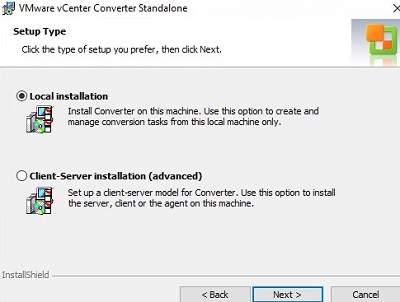
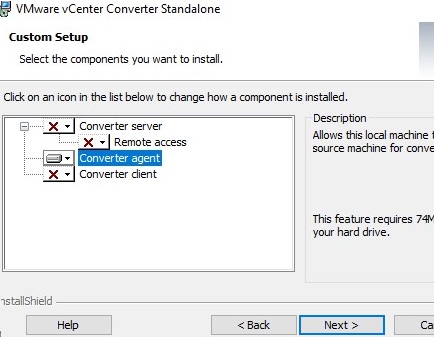
- Two installation modes are available:
Local installation – installs all the necessary components for managing conversion tasks on the local computer (we use this mode) and Client-Server installation — allows you to separately install a server, client, or agent on a computer;
- Create a new conversion task: File-> New-> Convert machine.
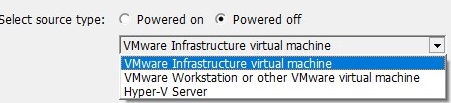
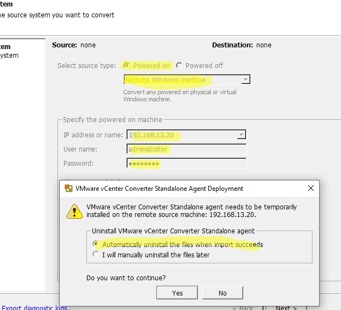
- Choose that you want to convert Windows machine remotely (Powered on -> Remote Windows machine). Specify the FQDN or IP address of the remote computer, and administrator credentials;VMware Converter also allows you to convert a virtual machine that is located on Hyper-V Server, VMware Workstation/Player, or VMware vSphere (including the free VMware vSphere Hypervisor).
 [alert]
- If you are converting a remote computer that has a firewall enabled, you need to open a number of ports. On Windows, you need to open the followingimbound TCP ports: 139,445,9089 and UDP:137,138. You can open ports in Windows Defender Firewall via GPO or with these PowerShell commands
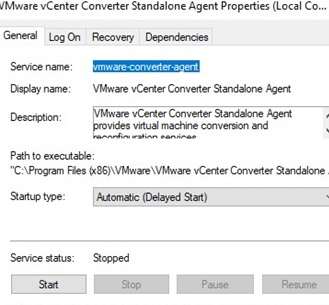
New-NetFirewallRule -DisplayName "VMConverterAgent" -Direction Inbound -Protocol TCP -LocalPort 9089 -Action Allow | Enable-NetFirewallRule - vCenter Converter will connect to the remote computer and try to install the VMware vCenter Converter Standalone Agent service (
vmware-converter-agent);
 [alert type='warning'] In my case when installing the converter agent remotely an error appeared:
Error 1603: A fatal error occurred during installation.
Unable to complete Converter agent installation on '192.168.13.20'. Error code: 1,603.
First, I had to use PowerShell to uninstall the program on the Windows host:
Get-Package -Name "VMware vCenter Converter*" | Uninstall-Package
And then manually install the agent from the vCenter Converter distribution (Custom Setup -> Converter agent).
- If you are converting a remote computer that has a firewall enabled, you need to open a number of ports. On Windows, you need to open the followingimbound TCP ports: 139,445,9089 and UDP:137,138. You can open ports in Windows Defender Firewall via GPO or with these PowerShell commands
- VMware Converter connects to the specified server and installs VMware vCenter Converter Standalone Agent (
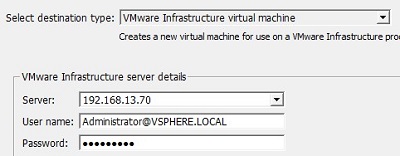
vmware-converter-agent) on it; - Then you will be prompted to specify the name of the ESXi server (or vCenter server), on which the virtual machine will be created, and the credentials to connect;

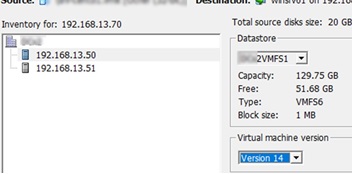
- Select the datacenter, cluster, ESXi host, and VMFS datastore name where you want to place the new virtual machine. Select VM hardware version;

- Then you will need to select the disks of the target system to be copied, RAM and vCPU settings, etc.
VMware Converter: Synchronize changes when performing P2V or V2V Conversion
VMware Converter allows to synchronize changes between the source computer and the target virtual machine located on the ESXi host. This feature allows you to virtualize a physical server with a large amount of data on physical disks in several stages with minimal downtime.
We are going to convert the physical server to a VM in two steps. At the first stage, the Converter copies data from the source computer to the target VM, while the source server is running and the data on it can be changed by users. In the second (final) stage, the synchronization of changes that have occurred since the initial data copying is performed.
The change synchronization feature allows you to reduce the downtime of the application/service during P2V/V2V conversion since the end application only needs to be turned off while the final changes are being transferred.
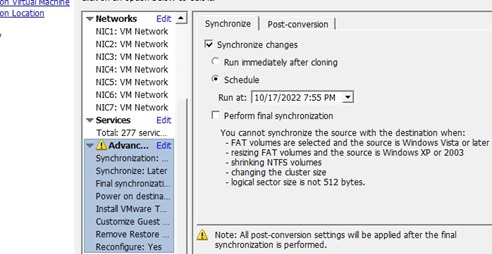
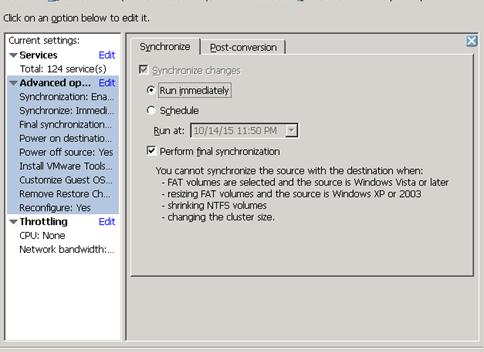
- Check the Synchronize change option in the Advanced section. Select when the next sync will be performed. Be sure to uncheck (!!!) the Perform final synchronization item;

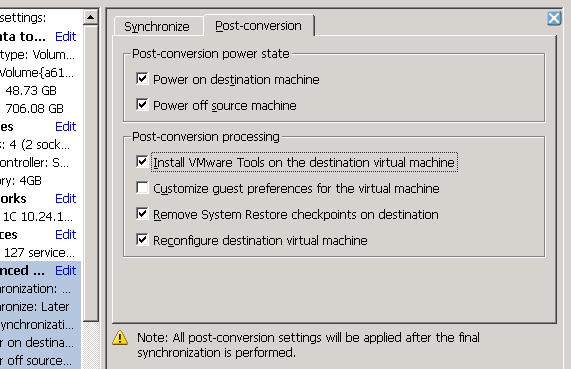
- On the Post-Conversion tab, select the actions to be performed after the final synchronization. We want to automatically turn on the created VM (Power on destination machine), turn off the source server (Power off source machine), install VMTools, etc;

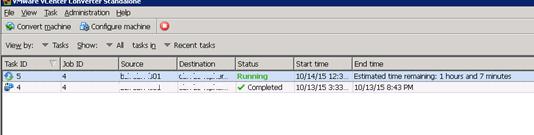
- It remains to start the initial phase of P2V conversion and wait for it to finish.Note. In this case, the conversion of the physical file server with 700 GB of data took about 15 hours.
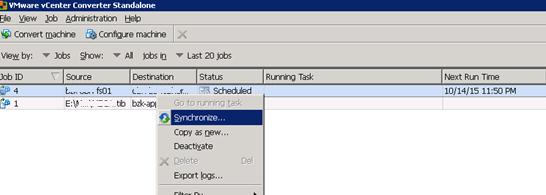
- After the initial conversion is completed, you can manually perform the final synchronization. To do it, select your task in VMware Converter and then click Synchronize in the context menu;
 Note: VMware Converter installs a special “bitmap driver” (bmdrvr service), which tracks changes in the source system since the last synchronization.
 - In the wizard window, select the synchronization to be run immediately, and run the final synchronization after it is over. To prevent users from modifying files on the source server during the final synchronization, you can temporarily stop the main service in the VM (for example, a file server or an application server);

- The final synchronization took about an hour, during which the changes on the source machine were replicated to the VM. After that, the old server was automatically shut down, and the new VM turned on;

- You only have to perform the final configuration of the VM (remove hidden network interfaces, remove old device drivers, configure new network adapters, and assign IP addresses, and the virtual machine is ready to go.
During the synchronization of changes, the vSphere server will create some snapshots on the target machine, which allow to roll back to any stage of synchronization if necessary (in this case the logic of VMware Converter will be broken).