This article covers the basics of managing the settings and rules of the built-in Windows Defender Firewall with Advanced Security from the PowerShell command line. We’ll look at how to enable/disable the firewall for different network profiles, create or remove firewall rules, and import/export Windows Firewall rules with PowerShell.
Windows Firewall settings are typically managed using a separate graphical MMC snap wf.msc (Control Panel -> System and Security -> Windows Defender Firewall -> Advanced settings). You can perform most Windows Firewall configuration and settings management operations from the PowerShell command line. You can use the built-in NetSecurity module to do this (which is available in the version of Windows PowerShell 5.1 or later).
You can list the available cmdlets in the NetSecurity module by using the command:
Get-Command -Module NetSecurity
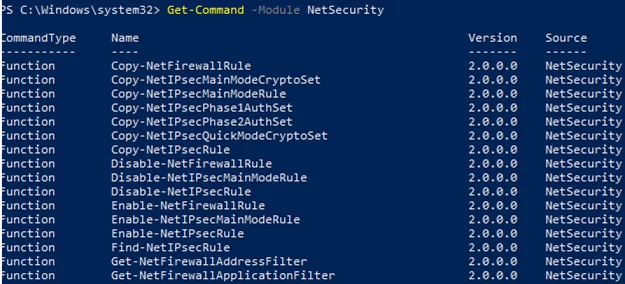
netsh advfirewall firewall command was used to manage Windows Firewall rules and settings.How to Turn Windows Defender Firewall On or Off with PowerShell
The Windows Defender firewall is enabled by default.
Get-NetFirewallProfile | Format-Table Name, Enabled
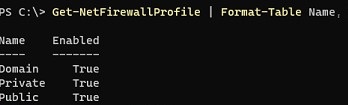
There are three types of network profiles in Windows Firewall:
- Domain – is applied to the computers that are joined to an Active Directory domain;
- Private – home, SOHO, or workgroup networks;
- Public – public networks.
By default, the Windows Firewall allows all outbound connections and blocks all inbound connections (except those that are allowed) for each network profile.
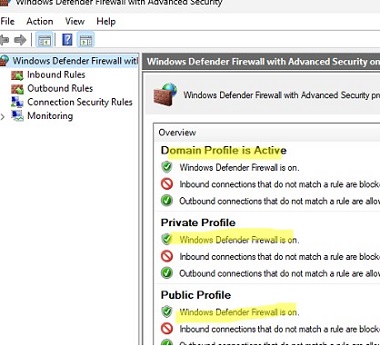
Each network profile (location) may have different firewall rules in use. By default, all of the computer’s network interfaces are protected by a firewall and all three types of profiles are applied to them.
To completely disable the Windows firewall, run the following command
Set-NetFirewallProfile -All -Enabled False
Or specify a specific profile name instead of All:
Set-NetFirewallProfile -Profile Public -Enabled False
In order to enable the Windows Firewall for all three network profiles, use the following command
Set-NetFirewallProfile -All -Enabled True
Displays the type of profile that applies to the network connection:
Get-NetConnectionProfile
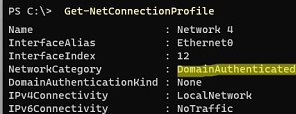
The DomainAuthenticated profile is applied to the Ethernet0 network connection in this example.
$computers = @('WKS01', 'WKS02', 'WKS03')
 Invoke-Command -ComputerName $computers {Set-NetFirewallProfile -All -Enabled False}
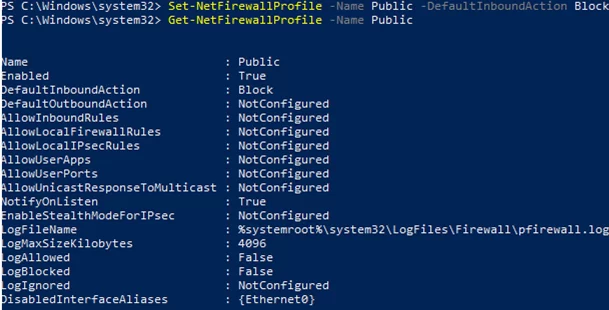
You can change the default action for the Public profile to block all inbound connections.
Set-NetFirewallProfile –Name Public –DefaultInboundAction Block
The current profile settings can be displayed as follows:
Get-NetFirewallProfile -Name Public
If you manage Windows Firewall settings using a GPO, you can view the current resulting profile settings as follows:
Get-NetFirewallProfile -policystore activestore
Make sure that all firewall settings are applied to all network interfaces on the computer:
Get-NetFirewallProfile -Name Public | fl DisabledInterfaceAliases
If all interfaces are protected, the command should return:
DisabledInterfaceAliases : {NotConfigured}
You can disable a particular profile for a network interface ( you can list network adapters in Windows using the Get-NetIPInterface cmdlet):
Set-NetFirewallProfile -Name Public -DisabledInterfaceAliases "Ethernet0"
As you can see, the Public profile is no longer applied to the Ethernet0 interface::
DisabledInterfaceAliases : {Ethernet0}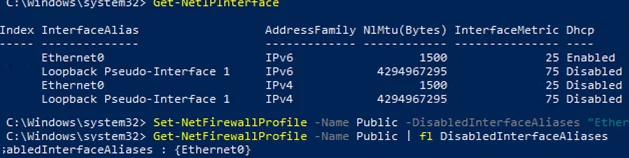
You can use the Set-NetFirewallProfile cmdlet to change the profile settings (default action, logging settings, log file path and size, notification settings, etc.). You can configure network connection logging settings for each network location profile. By default, Windows Firewall logs are stored in %systemroot%\system32\LogFiles\Firewall, and the file size is 4MB. You can enable connection logging and increase the maximum file size:
Set-NetFireWallProfile -Profile Domain -LogBlocked True -LogMaxSize 20000 -LogFileName ‘%systemroot%\system32\LogFiles\Firewall\pfirewall.log’
Create Windows Firewall Rules Using PowerShell
There are 9 PowerShell cmdlets to manage firewall rules on Windows:
- New-NetFirewallRule
- Copy-NetFirewallRule
- Disable-NetFirewallRule
- Enable-NetFirewallRule
- Get-NetFirewallRule
- Remove-NetFirewallRule
- Rename-NetFirewallRule
- Set-NetFirewallRule
- Show-NetFirewallRule
Let’s take a look at a few simple examples of how to open ports in the Windows Firewall.
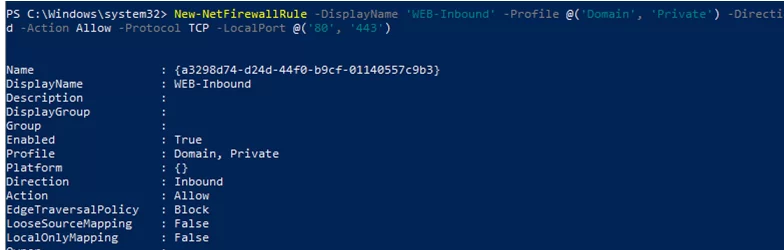
For example, if you want to allow incoming TCP connections on TCP ports 80 and 443 for both the Domain and Private profiles, run the following command:
New-NetFirewallRule -DisplayName 'HTTP-Inbound' -Profile @('Domain', 'Private') -Direction Inbound -Action Allow -Protocol TCP -LocalPort @('80', '443')
You can allow or block network access for a specific application (executable). For example, you may want to block outbound connections for the Firefox browser:
New-NetFirewallRule -Program “C:\Program Files (x86)\Mozilla Firefox\firefox.exe” -Action Block -Profile Domain, Private -DisplayName “Block Firefox browser” -Description “Block Firefox browser” -Direction Outbound
Let’s allow an incoming RDP connection on the default TCP\3389 port from only one IP address:
New-NetFirewallRule -DisplayName "AllowRDP" –RemoteAddress 192.168.2.200 -Direction Inbound -Protocol TCP –LocalPort 3389 -Action Allow
To allow ICMP pings for IP addresses from the specified ranges of IP addresses and subnets, create the following rule:
$ips = @("192.168.2.15-192.168.2.40", "192.168.100.15-192.168.100.200", ”10.1.0.0/16”)
 New-NetFirewallRule -DisplayName "Allow inbound ICMPv4" -Direction Inbound -Protocol ICMPv4 -IcmpType 8 -RemoteAddress $ips -Action Allow
 New-NetFirewallRule -DisplayName "Allow inbound ICMPv6" -Direction Inbound -Protocol ICMPv6 -IcmpType 8 -RemoteAddress $ips -Action Allow
Add a list of IP addresses from a plain text file to the firewall rule (one IP address per line):
$ips=Get-Content C:\temp\ip.txt
 Get-NetFirewallrule -DisplayName 'AllowRDP'|Set-NetFirewallRule -RemoteAddress $ips
Allow all incoming connections from the specified IP address. This will add the IP address to the firewall whitelist:
$IP = '192.168.1.20'
 New-NetFirewallRule -DisplayName "Allow $IP" -Direction Inbound -Action Allow -RemoteAddress $IP
Modifying an Existing Windows Firewall Rule Using PowerShell
If you want to edit a firewall rule, use the Set-NetFirewallRule cmdlet. For example, you may want to allow inbound connections from a specific IP address for a rule that you have previously created:
Get-NetFirewallrule -DisplayName 'HTTP-Inbound' | Get-NetFirewallAddressFilter | Set-NetFirewallAddressFilter -RemoteAddress 192.168.1.10
To add multiple IP addresses to a firewall rule, use the following PowerShell script:
$ips = @("192.168.2.15", "192.168.2.17",”192.168.100.15”)
 $current_ips = (Get-NetFirewallRule -DisplayName 'HTTP-Inbound'| Get-NetFirewallAddressFilter).RemoteAddress
 $current_ips += $ips
 Get-NetFirewallrule -DisplayName 'HTTP-Inbound'|Set-NetFirewallRule -RemoteAddress $current_ips
List of all IP addresses in a firewall rule:
Get-NetFirewallrule -DisplayName 'Http_inbound'|Get-NetFirewallAddressFilter
Remove one IP address from a firewall rule:
$removeip = "192.168.100.5"
 $current_ips = (Get-NetFirewallRule -DisplayName 'HTTP-Inbound'| Get-NetFirewallAddressFilter).RemoteAddress
 $filterIP = $current_ips | Where-Object{ $_ -notin $removeip }
 Get-NetFirewallrule -DisplayName 'HTTP-Inbound'|Set-NetFirewallRule -RemoteAddress $filterIP

How to Enable/Disable/Remove Windows Firewall Rule with PowerShell
You can use the Disable-NetFirewallRule and Enable-NetFirewallRule cmdlets to enable and disable firewall rules.
Disable-NetFirewallRule –DisplayName 'HTTP-Inbound'
To allow ICMP (ping), run this command:
Enable-NetFirewallRule -Name FPS-ICMP4-ERQ-In
To remove a firewall rule, use the Remove-NetFirewallRule cmdlet.
Remove-NetFirewallRule -DisplayName 'HTTP-Inbound'
To reset all Microsoft Firewall rules and restore the default settings, run the following command
netsh advfirewall reset
or:
(New-Object -ComObject HNetCfg.FwPolicy2).RestoreLocalFirewallDefaults()
This will delete all of the user-defined settings as well as the Microsoft Defender firewall rules. Only the network access rules that are built into Windows will remain.
netsh advfirewall export "C:\Backup\firewall-config.wfw"
Later, you can restore the old firewall settings by importing the rules file:
netsh advfirewall import "C:\Backup\firewall-config.wfw"
PowerShell: List Active Rules in Windows Firewall
The list of enabled firewall rules for incoming traffic can be displayed as follows
Get-NetFirewallRule | where {($_.enabled -eq $True) -and ($_.Direction -eq "Inbound")} |ft
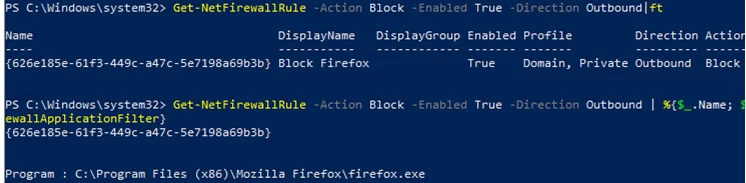
You can only list outbound blocking rules:
Get-NetFirewallRule -Action Block -Enabled True -Direction Outbound
If you want to display the program (executable) name in the rule:
Get-NetFirewallRule -Action Block -Enabled True -Direction Outbound | %{$_.Name; $_ | Get-NetFirewallApplicationFilter}
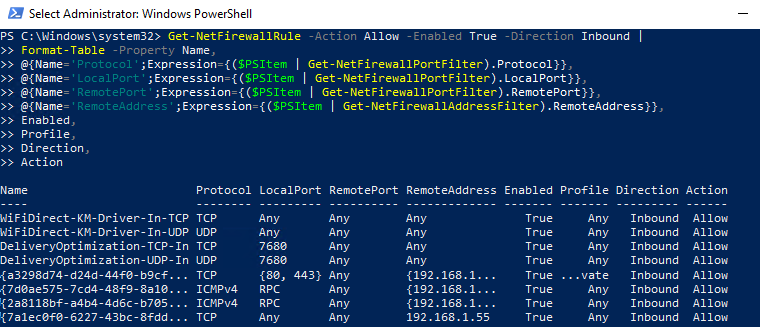
As you can see, the Get-NetFirewallRule cmdlet doesn’t show network ports and IP addresses for firewall rules. To display the detailed information about allowed inbound (outbound) connections in a more convenient way with the port numbers, use the following PowerShell script:
Get-NetFirewallRule -Action Allow -Enabled True -Direction Inbound |
 Format-Table -Property Name,
 @{Name='Protocol';Expression={($PSItem | Get-NetFirewallPortFilter).Protocol}},
 @{Name='LocalPort';Expression={($PSItem | Get-NetFirewallPortFilter).LocalPort}},
 @{Name='RemotePort';Expression={($PSItem | Get-NetFirewallPortFilter).RemotePort}},
 @{Name='RemoteAddress';Expression={($PSItem | Get-NetFirewallAddressFilter).RemoteAddress}},
 Enabled,Profile,Direction,Action
PowerShell provides a wide range of options for managing Windows Firewall rules from the command prompt. You can automatically run PowerShell scripts to open/close ports if certain events happen. In the following article, we’ll look at simple PowerShell- and Windows Firewall-based solution to automatically block RDP brute-force attacks on your Windows VDS host by adding the attacker’s IP address to the firewall rule.
3 comments
Did you even tried to read all (ALL) ip adresses from a rule with the last scitpt you provided?
Awesome article!
Hi there, I want some help about 2 things in windows 10. Is there som contact email ? (i cant find it)