This guide covers how to issue and install an SSL certificate on an IIS (Internet Information Services) web server running on a Windows Server.
Create a Certificate Signing Request (CSR) with IIS on Windows
To create an SSL/TLS certificate from an external Certificate Authority (CA), you need to generate a Certificate Signing Request (CSR). You can create a CSR from within the IIS GUI:
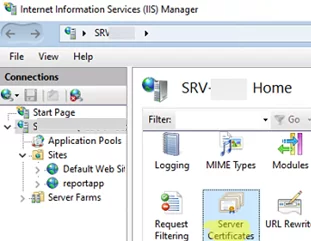
- Open the Internet Information Services Manager console (
InetMgr.exe); - Select your Windows host and go to the Server Certificates section;

- From the Actions menu on the right, select Create Certificate Request;
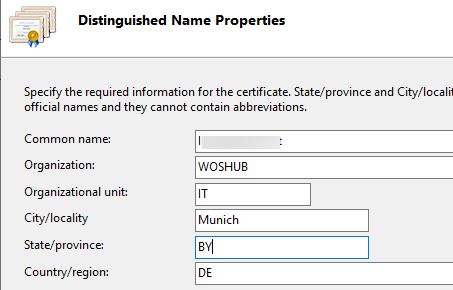
- Fill in the certificate information =:
- Common Name – specify the FQDN of the site (webserver) your clients will connect to. For example:
reports.woshub.com. If you want to create a wildcard certificate for a domain, please type in*.woshub.com - Organization – specify the name of your organization. For Organization Validation (OV) and Extended Validation (EV) certificates, please enter the official organization name. Individuals may use Domain Validation (DV) SSL certificates. In this case, you must provide the full name of the certificate owner;
- Organizational unit – the internal name of the department within your organization that is responsible for the certificate;
- City/locality
- State/province
- Country/region – two-letter country code.
- Common Name – specify the FQDN of the site (webserver) your clients will connect to. For example:
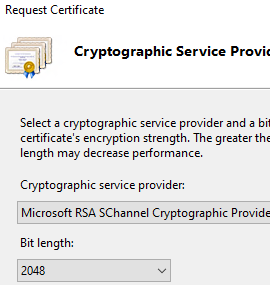
- Select a cryptographic service provider and key length. We recommend using the Microsoft RSA SChannel Cryptographic Provider with a key length of at least 2048 bits;
- Specify the name of the file to save the CSR request;
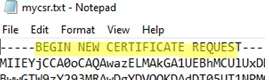
- You should get a text file that starts with
BEGIN NEW CERTIFICATE REQUESTand ends withEND NEW CERTIFICATE REQUESTline.
- Open the Internet Information Services Manager console (
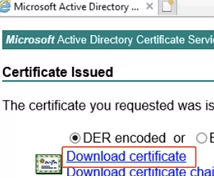
Submit your CSR file to the organization authorized to issue SSL certificates. If you are using an internal Microsoft-based Certificate Authority, please upload the CSR, sign the certificate, and then download the CER file.
How to Install an SSL/TLS certificate in Windows IIS
Once you have received your SST/TLS certificate file (*.CER) from your CA, you can proceed to install it in IIS.
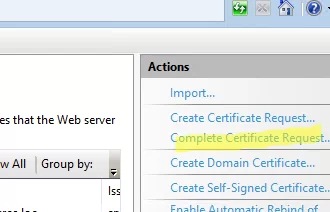
Open the IIS Manager console, go to the Certificates section, and select Complete Certificate Request.
What you need to do is to convert your CRT certificate to PFX format. The easiest way to do this is to use the openssl tool, which is available in any Linux distribution. You will need a certificate (*.crt) and a private key (*.key) file. To do the conversion, run the command below.
$ openssl pkcs12 -export -out target.pfx -inkey source.key -in source.crt
Once you have a certificate in a PFX format, you can have it imported through the Import menu. If you have a certificate file in PFX format, you can upload it to your Windows cert store via the Import menu.
You can also do a CRT certificate conversion directly from Windows:
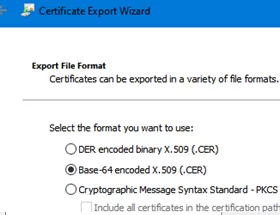
- Double-click your CRT file;
- Go to the Details tab and click Copy to File;
- Select Base-64 encoded X.509(.CER); < /li>
- Specify the path to save your CER certificate file.

 < /li>
Select the *.crt file that contains the SSL certificate that you received from the Certification Authority. Specify the friendly name of the SSL Certificate and the certificate store where you want to place the certificate (Personal or Web Hosting). 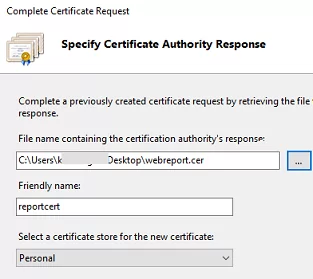
Once that’s done, the new SSL certificate should appear in the list of available certificates in IIS.
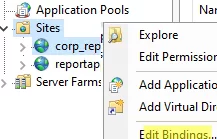
Bind an SSL certificate to an IIS Website
Now you need to bind your certificate to the IIS website, port, and/or IP address. Locate your website in the IIS console, and select Edit Bindings.
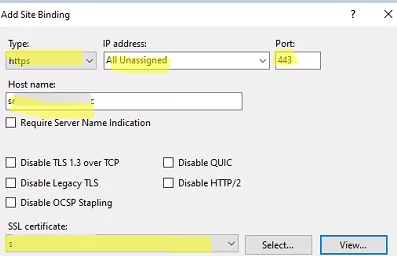
Click Add and fill in the following info:
- Type:
https - IP Address: select
All Unassignedor a specific IP address to bind the SSL certificate to (you can run multiple websites on the same port and IP address of the IIS web server) - Port number:
443 - Hostname: specify the name of the host the certificate was issued for
- SSL Certificate: find and select the SSL certificate that you installed from the list
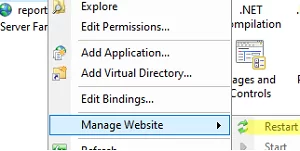
Now restart the IIS website ( select Manage Website -> Restart or use the iisreset command).
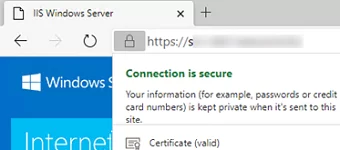
Try opening your IIS website in a browser using the https:// prefix. If the certificate is installed correctly, a green padlock will appear in the address bar of your browser. This means the connection is secure. Click the padlock icon to view information about the SSL certificate.
Next, configure IIS rules to redirect all HTTP requests to the site to HTTPS URL addresses.