(User Account Control) is an important component of the Windows security. When you run any application or process that requires administrator privileges, trying to change system settings, protected registry keys or system files, the UAC component switches the desktop to protected mode (Secure Desktop) and asks the administrator for confirmation of these actions. In this way, UAC helps prevent the launch of processes and malware that could potentially harm your computer.
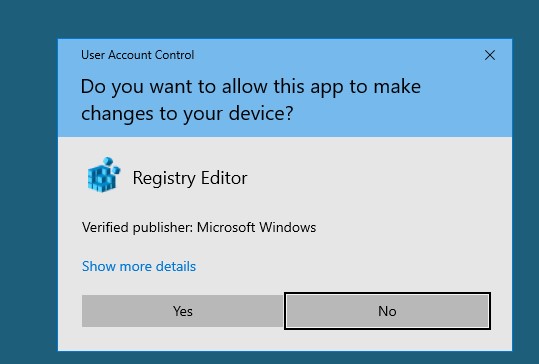
The screenshot below shows that when you trying to run Registry Editor (regedit.exe) on Windows 10, a UAC confirmation window appears:
User Account Control
Do you want to allow this app to make changes to your device?
In this article, we’ll look at how to manage UAC settings on a single computer, or multiple computers in a domain using Group Policies.
User Account Control Slider Levels on Windows 10
In Windows 7 (and newer), the UAC settings on the computer are managed using a special slider (called through the control panel or the UserAccountControlSettings.exe file). Using the slider, you can select one of four predefined User Account Control protection levels.
- Level 4 — Always notify — the highest UAC protection level;
- Level 3 — Notify only when programs try to make changes to mycomputer (default) – default protection level;
- Level 2 — Notify only when programs try to make changes to my computer (do not dim my desktop) – almost the same as the previous level, but without switching to Secure Desktop with desktop locking;
- Level 1 — Never notify – UAC is disabled.
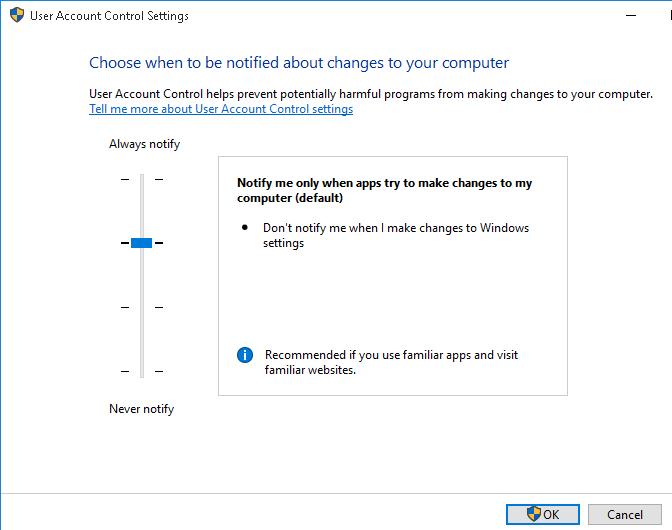
By default in Windows 10, the UAC protection Level 3 is used, which displays a notification only when you try to change system files or settings.
How to Disable User Account Control in Windows Using GPO?
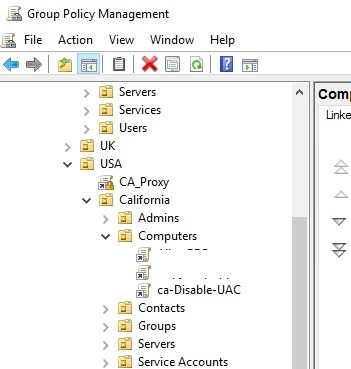
You can disable UAC using Group Policy. On a standalone computer, you can use the Local Group Policy Editor gpedit.msc. If you need to deploy the policy to domain computers, you need to use the Group Policy Management Console – gpmc.msc (let’s consider this option).
- In the domain GPO Management Console, click on the OU with computers on which you want to disable UAC and create a new policy object;

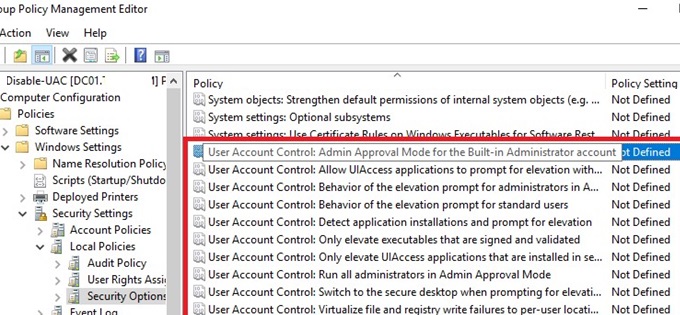
- Edit the policy and go to the section Computer Configuration -> Policies -> Windows Settings -> Security Settings -> Local Policies -> Security Options;
- This section has several options that control the UAC settings. The names of these parameters start with User Account Control;

- To completely disable UAC, set the following parameter values:
- User Account Control: Behavior of the elevation prompt for administrators in Admin Approval Mode =
Elevate without prompting; - User Account Control: Detect application installations and prompt for elevation =
Disabled; - User Account Control: Run all administrators in Admin Approval Mode =
Disabled; - User Account Control: Only elevate UIAccess applications that are installed in secure locations =
Disabled.
- User Account Control: Behavior of the elevation prompt for administrators in Admin Approval Mode =
- You need to restart client computer in order to update the Group Policy settings and disable UAC. After reboot, UAC will switch to “Never notify” mode.

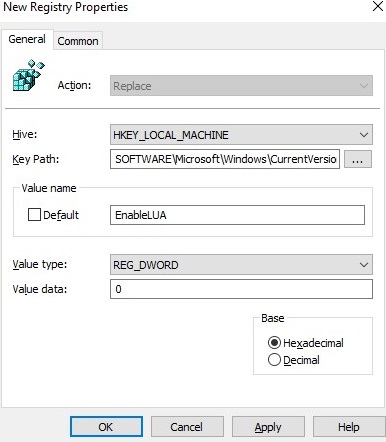
You can also disable UAC only for some users/computers via the registry, and deploy the settings through Group Policy Preferences.
Create a new registry parameter under GPO section Computer Configuration -> Preferences -> Windows Settings -> Registry with the following settings:
- Action: Replace
- Hive: HKEY_LOCAL_MACHINE
- Key Path: SOFTWARE\Microsoft\Windows\CurrentVersion\Policies\System
- Value name: EnableLUA
- Value type: REG_DWORD
- Value data: 0
Then go to the Common tab and enable the options:
- Remove this item when it is no longer applied
- Item-Level targeting
Click the Targeting button and specify the computers or domain security groups to which you want to apply the UAC disable policy.
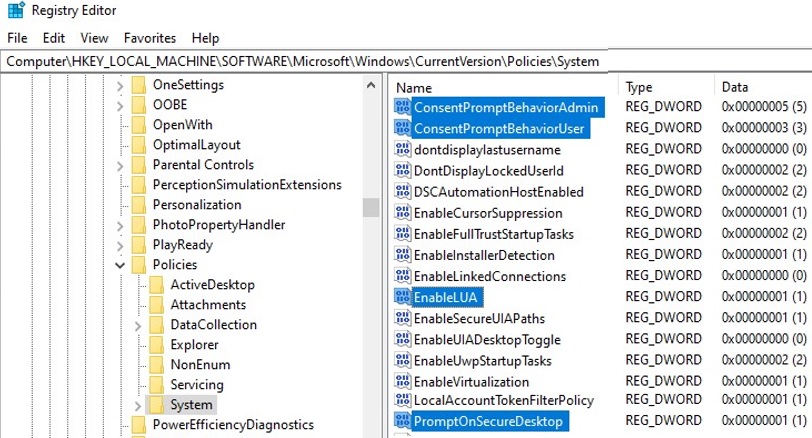
UAC Registry Key Settings
You can manage UAC settings through the registry. The parameters responsible for the behavior of User Account Control are located under the registry key HKLM\SOFTWARE\Microsoft\Windows\CurrentVersion\Policies\System .
When you change the value of the UAC slider in the Control Panel, Windows changes the value of the registry settings from this reg key as follows (below are ready REG files for different levels of the User Account Control slider):
UAC level 4 (Always notify):
Windows Registry Editor Version 5.00
[HKEY_LOCAL_MACHINE\SOFTWARE\Microsoft\Windows\CurrentVersion\Policies\System]
"ConsentPromptBehaviorAdmin"=dword:00000002
"ConsentPromptBehaviorUser"=dword:00000003
"EnableInstallerDetection"=dword:00000001
"EnableLUA"=dword:00000001
"EnableVirtualization"=dword:00000001
"PromptOnSecureDesktop"=dword:00000001
"ValidateAdminCodeSignatures"=dword:00000000
"FilterAdministratorToken"=dword:00000000
UAC level 3 (Notify only when programs try to make changes to my computer):
"ConsentPromptBehaviorAdmin"=dword:00000005
"ConsentPromptBehaviorUser"=dword:00000003
"EnableInstallerDetection"=dword:00000001
"EnableLUA"=dword:00000001
"EnableVirtualization"=dword:00000001
"PromptOnSecureDesktop"=dword:00000001
"ValidateAdminCodeSignatures"=dword:00000000
"FilterAdministratorToken"=dword:00000000
UAC level 2:
"ConsentPromptBehaviorAdmin"=dword:00000005
"ConsentPromptBehaviorUser"=dword:00000003
"EnableInstallerDetection"=dword:00000001
"EnableLUA"=dword:00000001
"EnableVirtualization"=dword:00000001
"PromptOnSecureDesktop"=dword:00000000
"ValidateAdminCodeSignatures"=dword:00000000
"FilterAdministratorToken"=dword:00000000
UAC level 1 (Never notify — completely disable UAC):
"ConsentPromptBehaviorAdmin"=dword:00000000
"ConsentPromptBehaviorUser"=dword:00000003
"EnableInstallerDetection"=dword:00000001
"EnableLUA"=dword:00000001
"EnableVirtualization"=dword:00000001
"PromptOnSecureDesktop"=dword:00000000
"ValidateAdminCodeSignatures"=dword:00000000
"FilterAdministratorToken"=dword:00000000
You can change the value of any parameter using the Registry Editor GUI or from the command prompt. For example, to disable UAC on the computer (a reboot is required), you can run the command:
reg.exe ADD HKLM\SOFTWARE\Microsoft\Windows\CurrentVersion\Policies\System /v EnableLUA /t REG_DWORD /d 0 /f.
Or a similar PowerShell command:
New-ItemProperty -Path HKLM:Software\Microsoft\Windows\CurrentVersion\policies\system -Name EnableLUA -PropertyType DWord -Value 0 -Force
User Account Control on Windows Server
User Account Control in Windows Server works and is managed in the same way as it does on Windows desktop editions.
It is acceptable to completely disable UAC in Windows Server 2016/2019 if the following conditions are true:
- Only administrators have remote access to the server desktop (RDP access to the server for non-admin users must be disabled). On RDS hosts, leave UAC enabled;
- Administrators should only use Windows Server for administrative management tasks. The administrator should work with office documents, messengers, web browsers only on workstation under a non-privileged user account with UAC enabled, and not on server hosts.
When UAC is enabled, Windows Server doesn’t allow connecting remotely under local computer accounts (via net use, winrm, Powershell Remoting). The user’s token will be filtered by the enabled UAC LocalAccountTokenFilterPolicy parameter (discussed in the previous section).
UAC Slider and Group Policy Settings
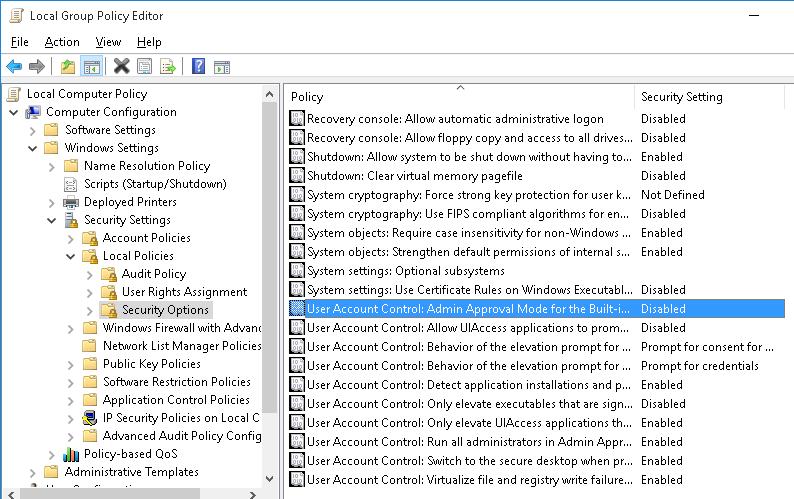
You can manage UAC settings both using the slider and GPO. But there is no single Group Policy parameter that allows to select one of the four UAC protection levels (corresponding to the position of the UAC slider). It is suggested to manage UAC settings using 10 different GPO parameters instead. These policies are located in the following section of GPO editor: Computer Configuration -> Policies -> Windows Settings -> Security Settings -> Local Policies -> Security Options. UAC-related Group Policy parameters start with User Account Control.
The following table shows the list of UAC Group Policy parameters and their corresponding register keys.
| Policy Name | Registry Parameter Set by the Policy |
| User Account Control: Admin Approval Mode for the Built-in Administrator account | FilterAdministratorToken |
| User Account Control: Allow UIAccess applications to prompt for elevation without using the secure desktop | EnableUIADesktopToggle |
| User Account Control: Behavior of the elevation prompt for administrators in Admin Approval Mode | ConsentPromptBehaviorAdmin |
| User Account Control: Behavior of the elevation prompt for standard users | ConsentPromptBehaviorUser |
| User Account Control: Detect application installations and prompt for elevation | EnableInstallerDetection |
| User Account Control: Only elevate executables that are signed and validated | ValidateAdminCodeSignatures |
| User Account Control: Only elevate UIAccess applications that are installed in secure locations | EnableSecureUIAPaths |
| User Account Control: Run all administrators in Admin Approval Mode | EnableLUA |
| User Account Control: Switch to the secure desktop when prompting for elevation | PromptOnSecureDesktop |
| User Account Control: Virtualize file and registry write failures to per-user locations | EnableVirtualization |
By default, UAC Level 3 uses the following Group Policy settings:
UAC Level 3 (default)
DisabledAllow UIAccess applications to prompt for elevation without using the secure desktop =
DisabledBehavior of the elevation prompt for administrators in Admin Approval Mode =
Prompt for consent for non-Windows binariesBehavior of the elevation prompt for standard users =
Prompt for credentials on the secure desktopDetect application installations and prompt for elevation =
Enabled (for Workgroup), Disabled (for domain-joined Windows device)Only elevate executables that are signed and validated =
DisabledOnly elevate UIAccess applications that are installed in secure locations =
EnabledRun all administrators in Admin Approval Mode =
EnabledSwitch to the secure desktop when prompting for elevation =
EnabledVirtualize file and registry write failures to per-user locations =
Enabled
7 comments
Methinks your values for the behavior on “standard users” is not accurate. Per this Microsoft link (https://technet.microsoft.com/en-us/library/dd835564(v=ws.10).aspx) the “default” value (level3) is “Prompt for consent on the secure desktop”.
Sorry, default value is “Prompt for credentials on the secure desktop”
You gotta love (hate) Microsoft documentation! In that same link/URL, they give conflicting information about the default value for “standard users”. In the first/top table, it says “User Account Control: Behavior of the elevation prompt for standard users ConsentPromptBehaviorUser Prompt for credentials on the secure desktop”. But in the last/bottom table, it says “ConsentPromptBehaviorUser User Account Control: Behavior of the elevation prompt for standard users 0 = Automatically deny elevation requests
1 = Prompt for credentials on the secure desktop
3 (Default) = Prompt for credentials”
SO WHICH IS IT MICROSOFT?!?
I apologize for questioning your page…
Using your level 1 settings does not corresponds to level 1 in Windows 10.
If I set these settings I can’t run Microsoft Edge and everythiing is run as administrator.
Simple way to check this is to rRight click start and run Powershell always runs it as admin even tho’ I don’t select the (admin) choice.
So how I make it behave like Windows 10 UAC level 1?
How does one go about locking out UAC access to users and administrators? I want to gray out the button so people cannot make changes to UAC. Forcing it to level 3 is great, but if a local admin (all my users) can just change it, it doesn’t do me much good. I want to disable access to UAC. Any help would be greatly appreciated!
Thanks for the info, this was very helpful!
In your first blue comment box, you have two links for two different pages, but they link to the same page. I believe the 2nd link was supposed to be for this page:
https://woshub.com/run-program-without-admin-password-and-bypass-uac-prompt/
HTH
👍