Windows OS Hub
  • Windows Server
    • Windows Server 2022
    • Windows Server 2019
    • Windows Server 2016
    • Windows Server 2012 R2
    • Windows Server 2008 R2
    • SCCM
  • Active Directory
    • Active Directory Domain Services (AD DS)
    • Group Policies
  • Windows Clients
    • Windows 11
    • Windows 10
    • Windows 8
    • Windows 7
    • Windows XP
    • MS Office
    • Outlook
  • Virtualization
    • VMWare
    • Hyper-V
    • KVM
  • PowerShell
  • Exchange
  • Cloud
    • Azure
    • Microsoft 365
    • Office 365
  • Linux
    • CentOS
    • RHEL
    • Ubuntu
  • Home
  • About

Windows OS Hub

  • Windows Server
    • Windows Server 2022
    • Windows Server 2019
    • Windows Server 2016
    • Windows Server 2012 R2
    • Windows Server 2008 R2
    • SCCM
  • Active Directory
    • Active Directory Domain Services (AD DS)
    • Group Policies
  • Windows Clients
    • Windows 11
    • Windows 10
    • Windows 8
    • Windows 7
    • Windows XP
    • MS Office
    • Outlook
  • Virtualization
    • VMWare
    • Hyper-V
    • KVM
  • PowerShell
  • Exchange
  • Cloud
    • Azure
    • Microsoft 365
    • Office 365
  • Linux
    • CentOS
    • RHEL
    • Ubuntu

 Windows OS Hub / Windows Server 2022 / Enable SMB Compression for Fast File Transfers on Windows 11/ Windows Server 2022

May 10, 2023 Windows 11Windows Server 2022

Enable SMB Compression for Fast File Transfers on Windows 11/ Windows Server 2022

With the SMB protocol version introduced in Windows Server 2022 and Windows 11, you can use the inline SMB compression feature when copying, moving, or opening files over a network. This allows to make file transfers faster, reduce bandwidth and network operation latency when transferring large files over a network (such as VM disk files, ISO images, etc.). In this article, we’ll show how to enable and configure SMB compression for shared folders in Windows.

Thanks to the use of SMB compression (don’t mix it with NTFS compression), you no longer need to use third-party tools to pre-compress files before transferring them over a slow (or metered) network. The default compression algorithm is XPRESS (LZ77). You can also enable XPRESS Huffman (LZ77+Huffman), LZNT1, or PATTERN_V1* compression algorithms in Windows.

You can enable SMB compression both on the client-side and on the SMB server-side.

In Windows Server 2022, you can enable SMB compression in two ways:

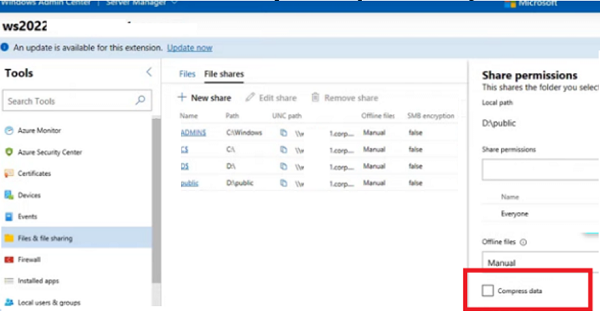
  • Using Windows Admin Center (WAC): Files and File Sharing -> File Shares -> select a network shared folder and check the Compress data option in its settings; Enable SMB compression on Windows Server 2022 with Windows Admin Center
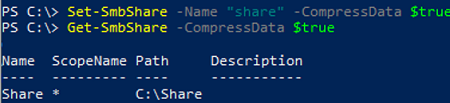
  • Using PowerShell: when creating a new shared folder (New-SmbShare -Name "Public" -Path "E:\Public" -CompressData $true) or for an existing share (Set-SmbShare -Name "Public" -CompressData $true). You can list all directories that have SMB compression enabled: Get-SmbShare -CompressData $true enable SMB Compression with PowerShell Set-SmbShare CompressData $true

SMB compression may also be enabled on the client-side. Then it doesn’t matter if the server-side support SMB compression.

The following commands allow to map a shared network drive in Windows 11 with SMB compression enabled:

net use * \\munfs01\images /requestcompression:yes

or:

New-SmbMapping -LocalPath "U:" -RemotePath "\\munfs01\images" -CompressNetworkTraffic $true

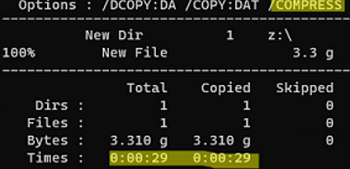
Let’s try to measure the speed and time of VMDK (VMware virtual machine disk) file transfer with SMB compression enabled. You can create a shared folder with and without SMB compression option enebled, or use the /compress option of robocopy to force copy a file using SMB compression. Here are the examples of the commands:

robocopy z:\ c:\VM\without_smb_compression.vmdk srv02.vmdk

robocopy z:\ c:\VM\with_smb_compression.vmdk srv02.vmdk /compress

In my example, it took 20% less time to copy a 3GB VMDK file with SMB compression compared to not using it (29 seconds vs 37 seconds).

RoboCopy supports copying files over SMB with compression on Windows Server 2022

In RTM versions of Windows 11 and Windows Server 2022, SMB compression is used for all files regardless of their size.

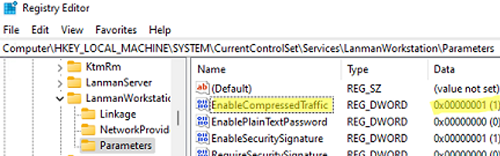
To always use SMB compression for file transfers, you can set the parameter EnableCompressedTraffic = 1 under the registry key HKLM\System\CurrentControlSet\Services\LanManWorkstation\Parameters. You can set this registry parameter using PowerShell:

Set-ItemProperty -Path HKLM:\System\CurrentControlSet\Services\LanManWorkstation\Parameters\ -Name EnableCompressedTraffic -Value 1

EnableCompressedTraffic - enable SMB compression in registry

If you want SMB compression to be applied to large files only (over 100 MB), set the following attributes in the same registry key:

  • CompressibilitySamplingSize = 524288000
  • CompressibleThreshold = 104857600
If you set CompressibleThreshold = 0 and CompressibilitySamplingSize = 4294967295, then SMB compression will be used when you access any file in the SMB folder over a network.

If you want to completely disable the use of SMB compression on Windows, set DisableCompression = 1:

Set-ItemProperty -Path HKLM:\System\CurrentControlSet\Services\LanManWorkstation\Parameters\ -Name DisableCompressedTraffic -Value 1

Or use the command below:

Set-SmbClientConfiguration -DisableCompression $true

The SMB Compression feature is compatible with SMB encryption and signing, SMB over QUIC, SMB multichannel, and Hyper-V Live Migration. SMB Direct and RDMA are not supported yet. You can use the new /compress option in Robocopy and Xcopy tools to force use SMB compression when copying files over the network.

1 comment
2
Facebook Twitter Google + Pinterest
previous post
The Application Failed To Start Because Its Side-by-Side Configuration is Incorrect
next post
How to Disable or Remove the Microsoft Wi-Fi Direct Virtual Adapter in Windows

Related Reading

How to Connect VPN Before Windows Logon

November 14, 2023

Removing Azure Arc Setup Feature on Windows Server...

November 9, 2023

Using WPAD (Web Proxy Auto-Discovery Protocol) on Windows

November 7, 2023

Tracking Printer Usage with Windows Event Viewer Logs

October 19, 2023

Installing Language Pack in Windows 10/11 with PowerShell

September 15, 2023

1 comment

Randy Mike October 17, 2022 - 8:04 am

SMB compression is now supported by the backup/sync tool GS RichCopy 360, which enhances and simplifies the speed so much . this requires two things:
1) Both nodes (source and destination) must support SMB compression.
2) The shared hosting of the data must have SMB compression turned on.

GS RichCopy 360 has an option that says (SMB Compression) which you can select. If the prerequisites above are met, then SMB compression will be used.

Reply

Leave a Comment Cancel Reply

Categories

  • Active Directory
  • Group Policies
  • Exchange Server
  • Microsoft 365
  • Azure
  • Windows 11
  • Windows 10
  • Windows Server 2022
  • Windows Server 2019
  • Windows Server 2016
  • PowerShell
  • VMWare
  • Hyper-V
  • Linux
  • MS Office

Recent Posts

  • How to Connect VPN Before Windows Logon

    November 14, 2023
  • Removing Azure Arc Setup Feature on Windows Server 2022

    November 9, 2023
  • Using WPAD (Web Proxy Auto-Discovery Protocol) on Windows

    November 7, 2023
  • Send Emails with Microsoft Graph API and PowerShell

    November 6, 2023
  • Zabbix: How to Get Data from PowerShell Scripts

    October 27, 2023
  • Tracking Printer Usage with Windows Event Viewer Logs

    October 19, 2023
  • PowerShell: Configure Certificate-Based Authentication for Exchange Online (Azure)

    October 15, 2023
  • Reset Root Password in VMware ESXi

    October 12, 2023
  • How to Query and Change Teams User Presence Status with PowerShell

    October 8, 2023
  • How to Increase Size of Disk Partition in Ubuntu

    October 5, 2023

Follow us

  • Facebook
  • Twitter
  • Telegram
Popular Posts
  • How to Allow Multiple RDP Sessions on Windows 10 and 11
  • How to Repair EFI/GPT Bootloader on Windows 10 or 11
  • How to Restore Deleted EFI System Partition in Windows
  • Network Computers are not Showing Up in Windows 10/11
  • How to Run Program without Admin Privileges and Bypass UAC Prompt
  • Fixing ‘The Network Path Was Not Found’ 0x80070035 Error Code on Windows
  • Updating List of Trusted Root Certificates in Windows
Footer Logo

@2014 - 2023 - Windows OS Hub. All about operating systems for sysadmins


Back To Top