You can use the built-in telnet command line tool to connect to a remote SMTP server and send a test e-mail. This is the easiest and fastest way to test a remote SMTP server, and it doesn’t require a full SMTP client to be installed. But in most cases, SMTP servers require user authentication, and unauthenticated sending is possible only through anonymous SMTP servers (SMTP relays).
In this example, we will show you how to authenticate to an SMTP server and send an e-mail from the telnet command line. We will consider the option with a regular SMTP server, as well as with an SMTP server that accepts connections only over a secure SST/TLS protocol.
Testing SMTP Authentication with Telnet
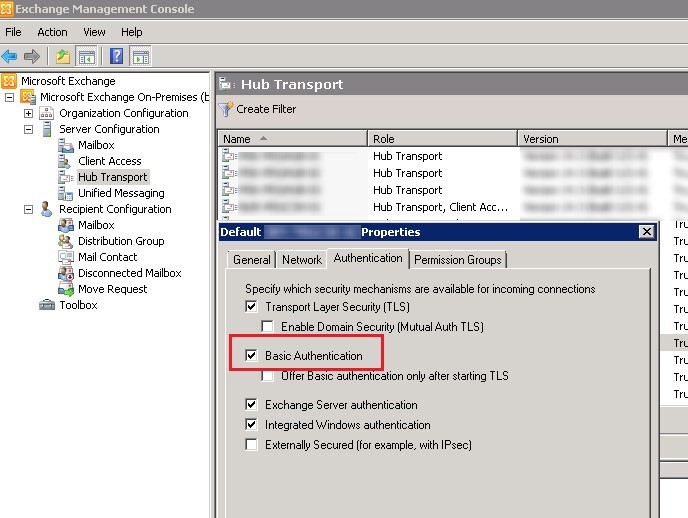
In order to authenticate to a remote SMTP host via telnet, Basic Authentication must be allowed in its settings. Basic Authentication is enabled by default on Exchange servers on the corporate network. This type of authentication involves sending the username and password over the network in base64 encoded form.
In Exchange Server, you can enable or disable Basic Authentication in the receive connector settings.
You can enable Basic Authentication on the Exchange connector from the PowerShell console (you need to install EMS on your computer or connect to Exchange Server remotely):
Get-ReceiveConnector "ExchRecConnector1" | Set-ReceiveConnector -AuthMechanism Tls, Integrated, BasicAuth, ExchangeServer
If you are using unsecured communication channels between the client and Exchange host, it is advisable to allow BasicAuth only after establishing a secure TLS session. Enable the Offer basic authentication only after starting TLS option in the connector properties in EMC, or use PowerShell:
Get-ReceiveConnector "ExchRecConnector1" | Set-ReceiveConnector -AuthMechanism 'Tls, BasicAuth, BasicAuthRequireTLS'
The specifics of sending SMTP messages over TLS/SSL are described in the next section of the article.
To authenticate on the SMTP server through AUTH LOGIN, you need to convert the username and password from which the e-mail will be sent to the Base64 format. To convert string to Base64, you can use the PowerShell function:
[System.Convert]::ToBase64String([System.Text.Encoding]::UTF8.GetBytes("[email protected]"))

Or the Perl MIME::Base64 module:
perl -MMIME::Base64 -e 'print encode_base64("username");'
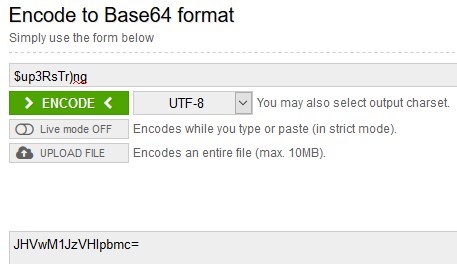
Or use any online service, for example, https://www.base64encode.org.
The user name [email protected] looked like dGVzdF91c2VyQHdvc2h1Yi5jb20g in Base64
The password $up3RsTr)ng turned into JHVwM1JzVHIpbmc= in Base64
Open a command prompt and use Telnet to connect to port 25 (SMTP) of the server (I’ll highlight the commands to be entered in blue):
telnet mail.woshub.com 25
If it is a host with Exchange Server, it will return something like;
220 mail.woshub.com Microsoft ESMTP MAIL Service ready at Thu, 25 Nov 2021 10:22:31 +0300
First you need to introduce yourself to the server:
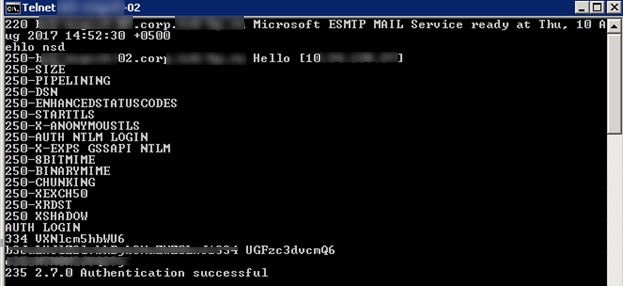
ehlo sender.woshub.com
The server will return the list of supported authentication methods and options. As you can see, there is AUTH LOGIN (basic authentication) in the list.
250-mail.woshub.com Hello [192.168.1.115]
250-SIZE 36700160
250-PIPELINING
250-DSN
250-ENHANCEDSTATUSCODES
250-STARTTLS
250-AUTH LOGIN
250-8BITMIME
250-BINARYMIME
250 CHUNKING
For example, such a response from the SMTP server indicates that 3 authentication protocols are supported.
250 AUTH GSSAPI DIGEST-MD5 PLAIN
The basic authentication methods PLAIN and LOGIN use BASE64 encoding of the name and password. The difference between them is that for the PLAIN method the login and password are sent in one line. And when using LOGIN, the login is sent first, then the password.
If your SMTP server supports the PLAIN authentication method, you can encode the username and password using the perl function or PowerShell:
perl -MMIME::Base64 -e 'print encode_base64("\[email protected]\000$up3RsTr)ng")'
[System.Convert]::ToBase64String([System.Text.Encoding]::UTF8.GetBytes("\0username\0password"))
Tell the SMTP server that you want to authenticate using the LOGIN method:
AUTH LOGIN
The server will respond:
334 VXNlcm5hbWU6
AUTH PLAIN XDB0ZXN0X3VzZXJAd29zaHViLmNvbVwwKW5n
Now copy and paste the username in the Base64 format you encrypted earlier:
dGVzdF91c2VyQHdvc2h1Yi5jb20g
The server will respond with a 334 code:
334 UGFzc3dvcmQ6.
Then copy and paste the password in Base64 format:
JHVwM1JzVHIpbmc=
If the user name and password are correct, the server will return:
235 2.7.0 Authentication successful
If not:
535 5.7.8 Error: authentication failed: UGFzc3dvcmQ6
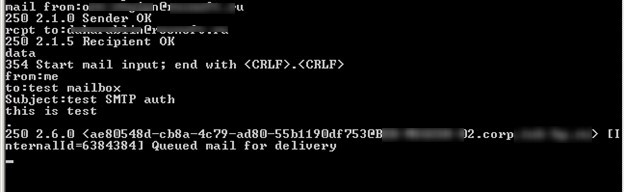
It’s time to fill in the standard e-mail fields:
mail from: [email protected]
250 2.1.0 Sender OK
rcpt to: [email protected]
250 2.1.5 Recipient OK
data
354 Start mail input; end with .
from: TestUser <[email protected]><
to: TheMainAdmin < [email protected] >
Subject: Test BASE SMTP Authenticated via Telnet
This is test
.
250 2.6.0 <[email protected]> [InternalId=6334284] Queued mail for delivery
The e-mail has been queued for delivery.
QUIT
221 2.0.0 Closing connection.
Connection closed by foreign host.
After a while, check if the e-mail has been delivered to the recipient’s mailbox.
Using Authenticated SMTP over TLS/SSL
Most SMTP providers don’t allow plain text SMTP sessions. Only SMTP connections encrypted with TLS are allowed. You can authenticate to the SMTP server using the LOGIN and PLAIN methods only after initializing the TLS connection. Telnet doesn’t support SSL or TLS, so you need to use the OpenSSL tool to connect to the SMTP server via TLS.
Let’s look at how to use OpenSSL to connect to the SMTP server via TLS and authenticate using AUTH LOGIN.
Download and install OpenSSL:
- On Windows, you can use: http://slproweb.com/products/Win32OpenSSL.html
- On Linux, OpenSSL is installed from the base repositories:
sudo apt-get install openssl– on Ubuntu/Debian
sudo yum install openssl– on CentOS/RedHat
In order to connect to the SMTP host from the command line with the SSL/TLS encryption, use the following command:
openssl.exe s_client -starttls smtp -connect smtp.woshub.com:25
Run the EHLO command after establishing a secure SSL connection with the SMTP server.
The SMTP server will return:
EHLO sender.woshub.com
250- smtp.woshub.com
 250-PIPELINING
 250-SIZE 52428800
 250-ETRN
 250-AUTH PLAIN LOGIN
 250-ENHANCEDSTATUSCODES
 250-8BITMIME
 250 DSN
Now you can authenticate with AUTH LOGIN or AUTH PLAIN, and send email as described above.
SMTP Authentication on Office 365 with TLS
At the end of October 2020, Microsoft blocked the use of basic authentication to connect to mailboxes in Exchange Online. SMTP Auth to servers in Office 365 (Microsoft 365/Exchange Online) is still supported, but considered insecure. Microsoft disables SMTP AUTH for all new tenants. This means that you won’t be able to connect to SMTP hosts on Office 365 from the command line using telnet or openssl.
To send test email via Office 365 SMTP servers to, you need to use the Send-MailMessage PowerShell cmdlet.
$emailto='[email protected]'
 $emailfrom='[email protected]'
 $smtpserver='smtp.office365.com'
 $MailMessage = @{
 To = $emailto
 From = $emailfrom
 Subject = "Testing SMTP TLS on O365"
 Body = "This is a test measles "
 Smtpserver = $smtpserver
 #ErrorAction = "SilentlyContinue"
 Port="587"
 }
 Send-MailMessage @MailMessage -UseSsl -Credential $cred