After you deploy Exchange, you may notice that free disk space starts to decrease very quickly. In addition to the growth of the mailbox databases themselves, the various logs take up a lot of space on Exchange servers. The problem of large log sizes is especially noticeable in versions starting with Exchange 2013. Unless you are using some solution to clean up old log files, it is very common for mailbox databases get unmounted and the Exchange service becomes unavailable to users due to Exchange logs taking up all the available disk space (often accompanied by the 452 4.3.1 Insufficient system resources error). In this article, we’ll look at different ways for cleaning, truncating and moving log files in Exchange Server 2013/2016/2019.
How to Truncate/Purge Transaction Logs on Exchange?
The transaction logs of mailbox databases are one of the most important Exchange elements. For instance: when sending/receiving an email message, Exchange first writes the information into the transaction log file, and only then saves the item directly to the mailbox database. Transactional logs contain all operations that are performed on the database and are extremely important for the recovery of the damaged mailbox database. A single transaction log file is 1 MB in size, and there can be thousands of them in the mailbox database folder (their number depends on the activity of users in the mailbox database).
There are several ways to cleanup Transaction logs in Exchange:
- Perform regular backups of your Exchange mailbox databases. After a correct backup, transaction logs that are no longer needed to restore the database are automatically purged. Use any modern Exchange backup solution (Exchange supports only backups based on Volume Shadow Copy, VSC). You can even use the built-in Windows Server Backup role;
- Enable the Circular Logging for your transaction logs. When circular logging is enabled, the transaction log is purged right after the transactions have been applied to the database. You can enable Circular Logging via EAC (Enable Circular logging in the mailbox database properties) or using PowerShell:
Set-MailboxDatabase mbxDBname1 -CircularLoggingEnabled $true(to apply the changes, you need to unmount and mount the mailbox database);
- Move the Exchange database with transaction logs to another large drive. By default, when you install Exchange, the first mailbox database is saved to the C:\Program Files\Microsoft\Exchange Server\… folder. It is advisable to move mailbox databases from the system drive C:. To do this, use the Move-DatabasePath cmdlet. For example, to move the database and transaction logs to the M: drive, run the command:
Move-Databasepath “MDB1” –EdbFilepath “M:\DB\MDB1\databases\mdb1.edb” –LogFolderpath “M:\DB\MDB1\logs\”


Mail Queue Database Logs on Exchange 2013/2016/2019
The queue database Mail.que temporarily stores messages awaiting for the next processing stage. All items in each queue are processed by the transport server in a specific order. The queue database is a regular ESE database. Queues are located only on Mailbox or Edge transport servers (here it depends on the version of Exchange, since the architecture is different in 2013, 2016 and 2019). The location of the queue database and its transactional logs is specified in the XML configuration file %ExchangeInstallPath%Bin\EdgeTransport.exe.config (check the QueueDatabasePath and QueueDatabaseLoggingPath parameters). If the queue database and its transactional logs take up a lot of space, you can move it from the default directory %ExchangeInstallPath%TransportRoles\data\Queue to another drive (for a pretty detailed information on moving queue database, see Change the Location of the Queue Database.)
How to Move Transport Logs on Exchange Server?
Exchange Transport logs store information about all messages processed by the MSExchangeTransport service. For a detailed information on how to enable, disable, or move transport logs in Exchange, check the article Transport Logs.
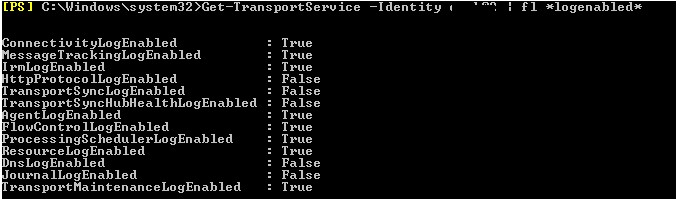
You can check if transport logs are enabled on your server and their paths using the following PowerShell (EMS) commands:
Get-TransportService -Identity mun-exch1 | fl *logpath*
 Get-TransportService -Identity mun-exch1 | fl *logenabled*
The main transport logs of Microsoft Exchange Server are stored in the following folders by default:
| %ExchangeInstallPath%TransportRoles\Logs\Hub\Connectivity |
| %ExchangeInstallPath%TransportRoles\Logs\MessageTracking (used when searching messages via Get-MessageTrackingLog) |
| %ExchangeInstallPath%Logging\IRMLogs |
| %ExchangeInstallPath%TransportRoles\Logs\Hub\ActiveUsersStats |
| %ExchangeInstallPath%TransportRoles\Logs\Hub\ServerStats |
| %ExchangeInstallPath%TransportRoles\Logs\Hub\ProtocolLog\SmtpReceive |
| %ExchangeInstallPath%TransportRoles\Logs\Hub\Routing |
| %ExchangeInstallPath%TransportRoles\Logs\Hub\ProtocolLog\SmtpSend |
| %ExchangeInstallPath%TransportRoles\Logs\Hub\QueueViewer |
| %ExchangeInstallPath%TransportRoles\Logs\Hub\AgentLog |
You can change the folder for storing SMTP send/receive logs (Protocollogs) via EAC (Servers -> servers -> select_a_server -> Transport Logs -> Protocol log).
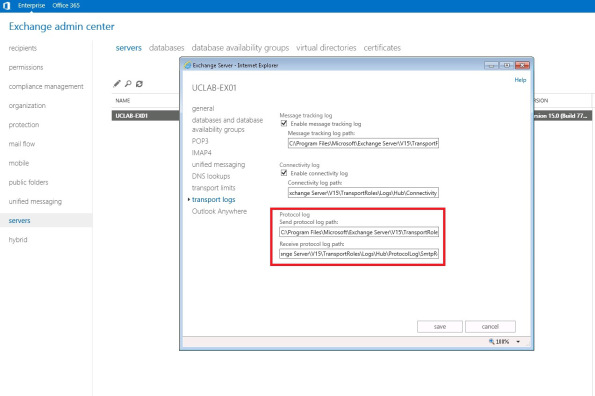
You can change the Message Tracking log path via EAC.
![]()
Also, you can use the symbolic links to safely redirect any of the transport log folders to another drive or even a shared network folder (by UNC path). To create a symbolic link, use the built-in mklink tool:
mklink /d "D:\HubReceiveSMTPLogs" \\filesServer1\HubReceiveSMTPLog
All that remains is to change the path to the log directory using the cmdlet:
Set-TransportService mun-exch1 –ReceiveProtocolLogPath “D:\ReceiveSMTPLosg”
Thus, you can store any Exchange transport logs in a shared network folder on a remote server. This method is suitable for other Exchange logs.
Rotate and Remove IIS Log Files in Exchange
IIS logs contain information about connections to Exchange mailboxes through OWA and ActiveSync. Over time, the IIS logs that users create when accessing Exchange can grow too large, if uncontrolled.
You can automatically clean up old IIS logs. You can make an automatic task in Windows Task Scheduler that runs every day and removes IIS logs older than 28 days:
set-location c:\inetpub\logs\LogFiles\W3SVC1\
 foreach ($File in get-childitem) {
 if ($File.LastWriteTime -lt (Get-Date).AddDays(-28)) {
 del $File
 }
 }
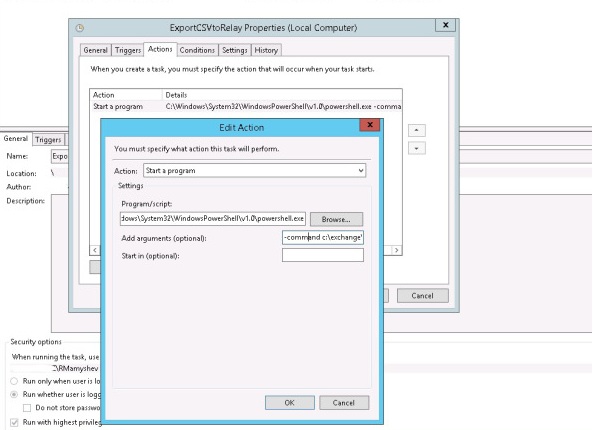
It remains to create a new task in the Task Scheduler, which should run your PS1 log cleanup script.
You can run the PowerShell script via the Task Scheduler as follows:
- Create a task in the Task Scheduler
- Create action: start a program;
- In the field program/script add:
C:\Windows\System32\WindowsPowerShell\v1.0\powershell.exe - In the field add arguments(optional):
-command "c:\ps\clear_iis_logs.ps1"
powershell.exe -NoProfile -NoLogo -NonInteractive -ExecutionPolicy Bypass -File c:\ps\clear_iis_logs.ps1
If you need to keep old IIS logs for further analysis and troubleshooting, you can move them to another location (drive):
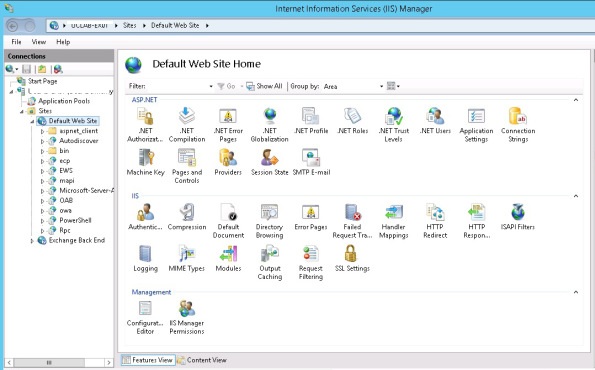
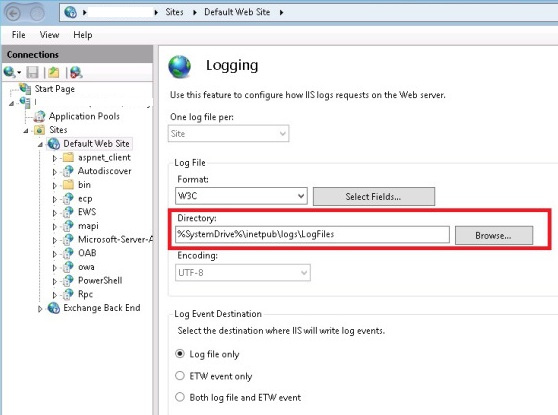
- Open IIS Manager from Administrative Tools and select Default Web Site;

- Open Logging;
- Change the default log location (Directory);

- Save the changes and restart IIS. The next log file will be written to the new location.
You can also change the path to the IIS logs using PowerShell:
Import-Module WebAdministration
 Set-ItemProperty ‘IIS:\Sites\Default Web Site’ -name logfile.directory "M:\IISLogs"
Clearing Logging Folder on Exchange
A large number of logs of different Exchange services are stored in the Logging folder (for example, in Exchange 2013, this is C:\Program Files\Microsoft\Exchange Server\V15\Logging). Over time, they can consume a significant amount of the disk space. Of particular note are the diagnostic and performance logs in C:\Program Files\Microsoft\Exchange Server\V15\Logging\Diagnostics (with high-detailed diagnostics enabled, they can take tens of gigabytes).
You can use PowerShell to delete old Exchange log files in these folders. The following script will delete all logs from these folders older than 21 days:
Get-ChildItem 'C:\Program Files\Microsoft\Exchange Server\V15\Logging','C:\inetpub\logs' -Directory | gci -Include '*.log','*.blg' -Recurse | ? LastWriteTime -lt (Get-Date).AddDays(-21) | Remove-Item
You can prefer to remove only diagnostics log files:
Get-ChildItem 'C:\Program Files\Microsoft\Exchange Server\V15\Logging\Diagnostics' -Directory | gci -Include '*.log','*.blg' -Recurse | ? LastWriteTime -lt (Get-Date).AddDays(-5) | Remove-Item
You can add these PowerShell scripts to your Task Scheduler in order to automatically clear old Exchange logs.
Cleanup Exchange Logs with PowerShell Script
You can join all of the above commands to clean up old Exchange logs into one PowerShell script that you can run on a schedule:
$days = 14
 $dirs=@(
 "C:\inetpub\logs\LogFiles\",
 "C:\Program Files\Microsoft\Exchange Server\V15\Logging\",
 "C:\Program Files\Microsoft\Exchange Server\V15\Bin\Search\Ceres\Diagnostics\ETLTraces\",
 "C:\Program Files\Microsoft\Exchange Server\V15\Bin\Search\Ceres\Diagnostics\Logs\",
 "C:\Program Files\Microsoft\Exchange Server\V15\TransportRoles\Logs\"
 )
 Get-ChildItem $dirs -Recurse -File | Where-Object { $_.Name -like "*.log" -or $_.Name -like "*.blg" -or $_.Name -like "*.etl" } | Where-Object LastWriteTime -lt (Get-Date).AddDays(-$days) | Remove-Item -ErrorAction "SilentlyContinue"
5 comments
Thank you for this useful post
Thanks you very much!
Thanks you very much about this useful article
My Exchange 2013 Folder grow to 900GB, running out disk space. After i do VSS Full Backup, Exchange folder shrinks to only 150 GB
Nach einem Wechsel unseres Backups was nicht sauber configuriert war. Dank deines Posts konnten wir kurzfristig den Exchange aus dem überlaufen befreien und uns Zeit schaffen das Backup richtig zu konfigurieren. Vielen DAnk
After changing our backup, which was not properly configured. Thanks to your post, we were able to free the exchange from overflowing at short notice and give us time to configure the backup correctly. Many Thanks