Windows OS Hub
  • Windows Server
    • Windows Server 2022
    • Windows Server 2019
    • Windows Server 2016
    • Windows Server 2012 R2
    • Windows Server 2008 R2
    • SCCM
  • Active Directory
    • Active Directory Domain Services (AD DS)
    • Group Policies
  • Windows Clients
    • Windows 11
    • Windows 10
    • Windows 8
    • Windows 7
    • Windows XP
    • MS Office
    • Outlook
  • Virtualization
    • VMWare
    • Hyper-V
    • KVM
  • PowerShell
  • Exchange
  • Cloud
    • Azure
    • Microsoft 365
    • Office 365
  • Linux
    • CentOS
    • RHEL
    • Ubuntu
  • Home
  • About

Windows OS Hub

  • Windows Server
    • Windows Server 2022
    • Windows Server 2019
    • Windows Server 2016
    • Windows Server 2012 R2
    • Windows Server 2008 R2
    • SCCM
  • Active Directory
    • Active Directory Domain Services (AD DS)
    • Group Policies
  • Windows Clients
    • Windows 11
    • Windows 10
    • Windows 8
    • Windows 7
    • Windows XP
    • MS Office
    • Outlook
  • Virtualization
    • VMWare
    • Hyper-V
    • KVM
  • PowerShell
  • Exchange
  • Cloud
    • Azure
    • Microsoft 365
    • Office 365
  • Linux
    • CentOS
    • RHEL
    • Ubuntu

 Windows OS Hub / Windows 10 / How to Stop Automatic Upgrade to Windows 11

June 8, 2023 Questions and AnswersWindows 10Windows 11

How to Stop Automatic Upgrade to Windows 11

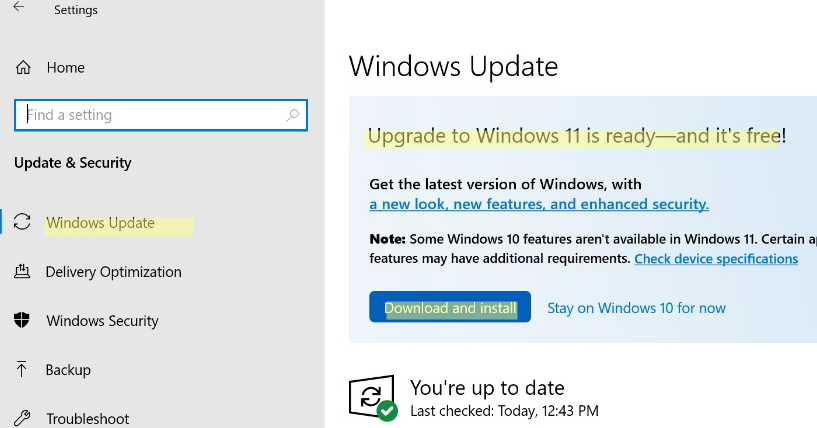
If your computer running Windows 10 meets the minimum requirements for Windows 11, Microsoft will offer you a free upgrade to the newer OS version. You can upgrade your OS version directly through Windows Update. Make sure that you see the message “Upgrade to Windows 11 is ready — and it’s free“. You can choose whether you want to “Download and install Windows 11” or “Stay on Windows 10 for now.”

Microsoft is not going to force upgrade all computers running Windows 10 to Windows 11 so far. However, it may change at any time. In this guide, we’ll show how to disable the auto upgrade to Windows 11.

Getting ready for the Windows 11 upgrade notification in Settings -> Windows Update

If the computer does not have a TPM chip and the UEFI+Secure Boot mode is not available, the device is considered unsupported for installing/upgrading to Windows 11. However, you may bypass all hardware checks during Windows 11 installation.

In Windows 10, you can specify a target version (build number) that will be used on your computer and not automatically updated. You will receive all security updates for your target Windows version until the end of support. After that, you will have to set a new target build, otherwise, Windows will be automatically updated to the latest available build within 60 days.

You can configure the target version using GPO or through the registry:

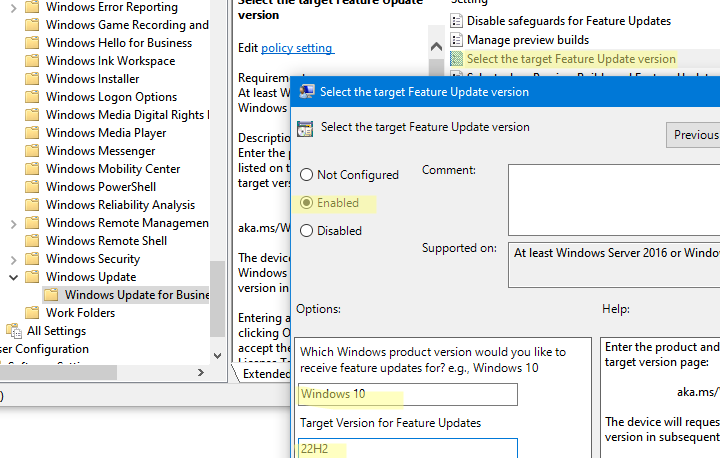
  1. Open the Local Group Policy Editor (gpedit.msc);
  2. Go to Computer Configuration -> Administrative Templates -> Windows Components -> Windows Update -> Windows Update for Business;
  3. Enable the option Select the target Feature Update version (this GPO option is available in Windows 10 2004 and newer). Specify the target Windows version and the build number you want to use;
  4. Enter Windows 10 in Which Windows product version would you like to receive feature updates for;
  5. Set a target Windows 10 build number in Target Version for Feature Updates. For example, 22H2;
    If you specify a newer Windows 10 version than you currently have, the system will be automatically updated to the target build. If the target version is no longer supported or is earlier than the current one, the value of this policy will be ignored.
    Select the target Feature Update version using GPO
  6. Save the changes and restart your computer to update GPO settings.

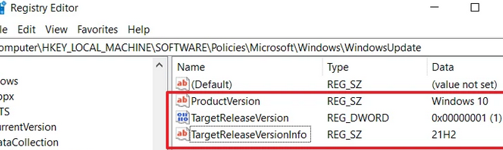
You can also disable the upgrade to Windows 11 through the registry (similar to the GPO setting described above). Apply the following REG file on your computer:

Windows Registry Editor Version 5.00
[HKEY_LOCAL_MACHINE\SOFTWARE\Policies\Microsoft\Windows\WindowsUpdate]
"ProductVersion"="Windows 10"
"TargetReleaseVersion"=dword:00000001
"TargetReleaseVersionInfo"="22H2"

How to set target feature update version in registry

You can create these registry parameters manually with regedit.exe, deploy registry keys to domain computers using GPO, or create them using PowerShell:

if(!(Test-Path 'HKLM:\SOFTWARE\Policies\Microsoft\Windows\WindowsUpdate')){New-Item 'HKLM:\SOFTWARE\Policies\Microsoft\Windows\WindowsUpdate'}
Set-ItemProperty -Path 'HKLM:\SOFTWARE\Policies\Microsoft\Windows\WindowsUpdate' -Name TargetReleaseVersion -value '00000001' -Type DWord –Force
Set-ItemProperty -Path 'HKLM:\SOFTWARE\Policies\Microsoft\Windows\WindowsUpdate' -Name "ProductVersion" -value 'Windows 10' -Type String -Force
Set-ItemProperty -Path 'HKLM:\SOFTWARE\Policies\Microsoft\Windows\WindowsUpdate' -Name TargetReleaseVersionInfo -value '22H2' -Type String -Force

Then your computer will block automatic update to Windows 11. If you decide to upgrade your operating system, specify Windows 11 and the number of the current build you want to make a target. If you completely disable the GPO setting and remove the registry options, your Windows will switch to the normal release update cycle.

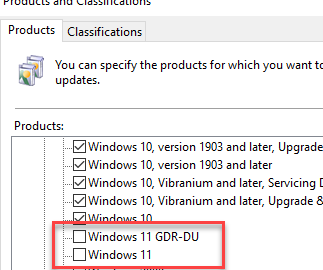
If your devices get updates from an internal Windows Server Update Services (WSUS) server, you can simply disable receiving Windows 11 updates in the available product settings (WSUS console -> Options -> Products and Classifications). Make sure that Windows 11 option is not checked. WSUS: Prevent Windows 11 upgrade

0 comment
0
Facebook Twitter Google + Pinterest
previous post
How to Enable TLS 1.2 on Windows
next post
How to Install Free VMware Hypervisor (ESXi)

Related Reading

How to Connect VPN Before Windows Logon

November 14, 2023

Using WPAD (Web Proxy Auto-Discovery Protocol) on Windows

November 7, 2023

Zabbix: How to Get Data from PowerShell Scripts

October 27, 2023

Tracking Printer Usage with Windows Event Viewer Logs

October 19, 2023

How to Use Ansible to Manage Windows Machines

September 25, 2023

Leave a Comment Cancel Reply

Categories

  • Active Directory
  • Group Policies
  • Exchange Server
  • Microsoft 365
  • Azure
  • Windows 11
  • Windows 10
  • Windows Server 2022
  • Windows Server 2019
  • Windows Server 2016
  • PowerShell
  • VMWare
  • Hyper-V
  • Linux
  • MS Office

Recent Posts

  • How to Connect VPN Before Windows Logon

    November 14, 2023
  • Removing Azure Arc Setup Feature on Windows Server 2022

    November 9, 2023
  • Using WPAD (Web Proxy Auto-Discovery Protocol) on Windows

    November 7, 2023
  • Send Emails with Microsoft Graph API and PowerShell

    November 6, 2023
  • Zabbix: How to Get Data from PowerShell Scripts

    October 27, 2023
  • Tracking Printer Usage with Windows Event Viewer Logs

    October 19, 2023
  • PowerShell: Configure Certificate-Based Authentication for Exchange Online (Azure)

    October 15, 2023
  • Reset Root Password in VMware ESXi

    October 12, 2023
  • How to Query and Change Teams User Presence Status with PowerShell

    October 8, 2023
  • How to Increase Size of Disk Partition in Ubuntu

    October 5, 2023

Follow us

  • Facebook
  • Twitter
  • Telegram
Popular Posts
  • 0x80244010 Exceeded Max Server Round Trips: Windows Update Error
  • How to Disable or Uninstall Internet Explorer (IE) in Windows
  • Printer Settings Could Not Be Saved, Operation Not Supported
  • How to Force Remove a Printer That Won’t Uninstall on Windows
  • Group Policy Management in Active Directory
  • Computer Doesn’t Turn Off After Shutting Down Windows 10/11
  • How to Find Driver for Unknown Device in Windows
Footer Logo

@2014 - 2023 - Windows OS Hub. All about operating systems for sysadmins


Back To Top