One of the servers (running Windows Server 2016) has run out of free disk space on a system drive (C:\). I checked and cleaned all resource-consuming locations (WinSxS, TEMP folders, inactive user profiles, old update files, etc.), but it didn’t give a noticeable effect. There was still not enough disk space. At last, I have found that a large part of a system drive has been occupied by System Volume Information folder. In this article I will try to tell you how the System Volume Information folder is used on Windows, what is stored in it, and how to properly clean it up.

How to Access System Volume Information Folder on Windows?
The System Volume Information folder is automatically created at the root of each drive (be it a local HDD, SSD, removable USB flash drive, SD card). It stores system data related to System Restore, Indexing, File History, etc.
By default, the System Volume Information folder is hidden and only the NT AUTHORITY\SYSTEM account can access it.
In order to show this folder, you need to disable the option “Hide protected operating system files” in File Explorer or run a PowerShell script:
$regkey = 'HKCU:\Software\Microsoft\Windows\CurrentVersion\Explorer\Advanced'
 Set-ItemProperty $regkey Hidden 1
 Set-ItemProperty $regkey HideFileExt 0
 Set-ItemProperty $regkey ShowSuperHidden 1
 Stop-Process -ProcessName explorer
Even the administrator cannot open it and view the contents of the folder. If you try to open the System Volume Information folder in File Explorer under any user (even under the built-in administrator account), you will receive an access denied error:
 Location is not available.
C:\System Volume Information is not accessible.
Access is denied.
![] Location is not available. C:\System Volume Information is not accessible. Access is denied](jpg/system-volume-information-access-is-denied.jpg)
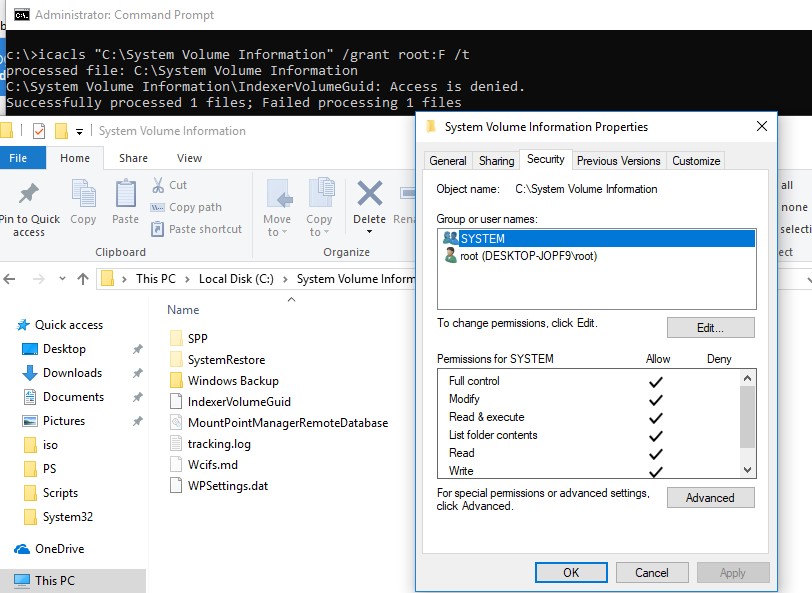
To view the contents of the folder, you have to assign yourself as the directory owner and grant your account the NTFS permissions to access it (this can be done through the Security tab in the folder properties). But it is much faster to assign yourself the owner and grant access to the directory from the command prompt:
takeown /f "C:\System Volume information"
 icacls "C:\System Volume Information" /grant woshub\jwolf:F
Check in the folder properties on the Security tab that your account now has full control permissions.
PsExec.exe -i -s powershell.exe
To view the contents of a folder, run the command:
Get-ChildItem 'C:\System Volume Information\'
The folder size can be found with the following PowerShell command:
(Get-ChildItem 'C:\System Volume Information\' | measure Length -s).sum / 1Gb
To restore the original permissions on the System Volume Information folder, run:
icacls "C:\System Volume Information" /setowner "NT Authority\System"
 icacls "C:\System Volume Information" /remove woshub\jwolf
What is System Volume Information Folder in Windows?
What is stored in the System Volume Information folder? I found information about the following services, which store their files in this folder (the list is not exhaustive):
- WindowsImageBackup —system restore points on desktop Windows versions or System State backups made using Windows Server Backup (
wbadmin) in server OSs; - The contents of Indexing Service database used for fast file search (including Outlook search);
- Distributed Link Tracking Service database;
- Disk snapshots made by Volume Shadow Copy, which can be used to recover older versions of files. For each snapshot, a separate file is created with a long ID as a name;

- NTFS disk quota settings;
- Base and chunks of the Data Deduplication service;
- DFS Replication database (dfsr.db);
- WPSettings.dat file – created by the storage service (StorSvc);
- The USB drives will also store an IndexerVolumeGuid file that defines the unique disk label used by the Windows Search service;
- AppxProgramDataStaging, AppxStaging – Windows UWP app backups (it can be used for recovery after removal).

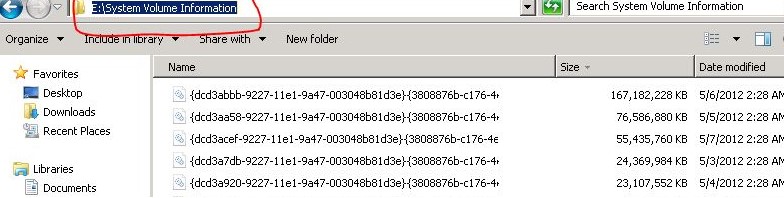
If you are using shadow copies on your computer or server to roll back to old versions of files/system states, keep in mind that each new VSS snapshot saves data to the System Volume Information directory, increasing its size. The more often shadow copies are created and the more often the files on the disk change, the faster the size of this directory grows.
In the screenshot below, you can see that in the System Volume Information folder there is a system file larger than 160 GB.
How to Clean Up System Volume Information Folder?
You can radically clean up the System Volume Information directory by disabling the system restore points and file history. But this is not always acceptable.
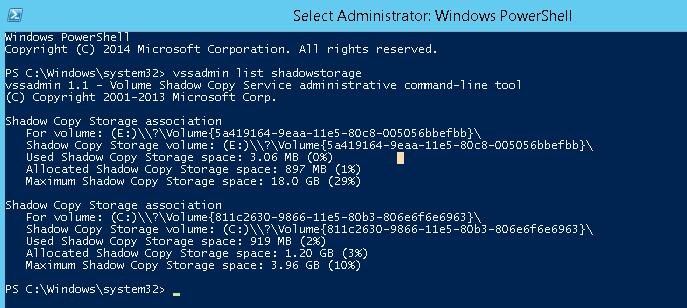
Firstly, let’s see what is stored in this directory. Display the statistics of using shadow copies:
vssadmin list shadowstorage
vssadmin 1.1 - Volume Shadow Copy Service administrative command-line tool
(C) Copyright 2001-2013 Microsoft Corp.
Shadow Copy Storage association
For volume: (E:)\\?\Volume{5a419164-9eba-11e5-84c5-004046bbefbb}\
Shadow Copy Storage volume: (E:)\\?\Volume{5a419164-9eba-11e5-84c5-004046bbefbb}\
Used Shadow Copy Storage space: 3.08 MB (0%)
Allocated Shadow Copy Storage space: 896 MB (1%)
Maximum Shadow Copy Storage space: 19.0 GB (29%)
Shadow Copy Storage association
For volume: (C:)\\?\Volume{843c6330-9866-11e5-80b3-806e6f6e6942}\
Shadow Copy Storage volume: (C:)\\?\Volume{843c6330-9866-11e5-80b3-806e6f6e6942}\
Used Shadow Copy Storage space: 912 MB (2%)
Allocated Shadow Copy Storage space: 1.20 GB (3%)
Maximum Shadow Copy Storage space: 3.98 GB (10%)
As you can see, 10% of system drive (C:\) space is allocated for shadow copy files and only 2% of which is used. If the value of Maximum Shadow Copy Storage space is set to UNBOUNDED, it means that the limit for shadow copies is not set and they can potentially take up all available free disk space. Windows by default allocates 10% of the total disk size for storing shadow copies.
You can reduce the disk usage limit of VSS to 2 GB using the vssadmin command. The vssadmin command has the following syntax:
vssadmin resize shadowstorage /on=[drive letter]: /For=[drive letter]: /MaxSize=[maximum size]
In our example it will look like this:
vssadmin resize shadowstorage /on=c: /for=c: /maxsize=2GB

vssadmin 1.1 - Volume Shadow Copy Service administrative command-line tool
(C) Copyright 2001-2013 Microsoft Corp.
Successfully resized the shadow copy storage association
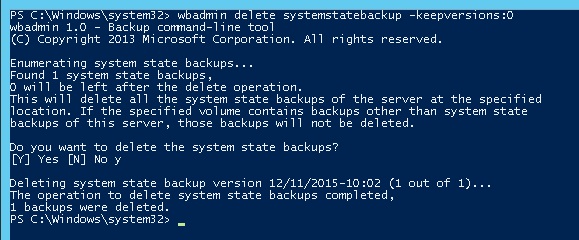
If you create system state backups using WSB (Windows Server Backup), all old system state copies can be deleted as follows (in the Windows Server editions):
wbadmin delete systemstatebackup -keepversions:0
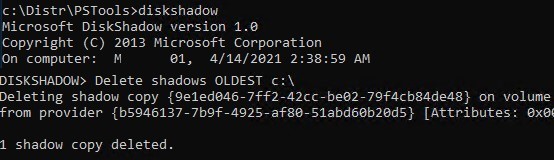
To quickly clean up old versions of VSS snapshots on Windows Server, use the diskshadow tool:
DiskShadow
 Delete shadows OLDEST c:\
Each time the command is run, the oldest shadow copy (snapshot) of the volume is deleted.
When you run the wbadmin delete systemstatebackup command in Windows 10, an error appears: “The DELETE BACKUP command is not supported in this version of Windows“. The fact is that on desktop OS (Windows 10/ 8.1/ 7), restore point and limits can only be managed from the Windows GUI. Open the System properties and click on the System Protection tab.
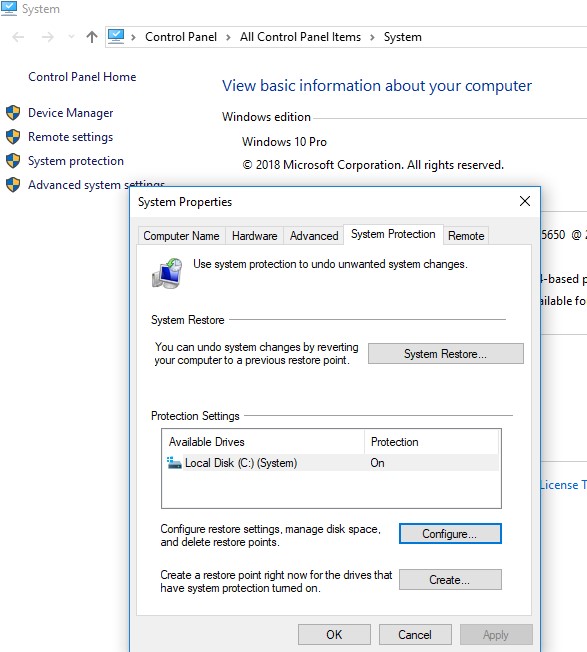
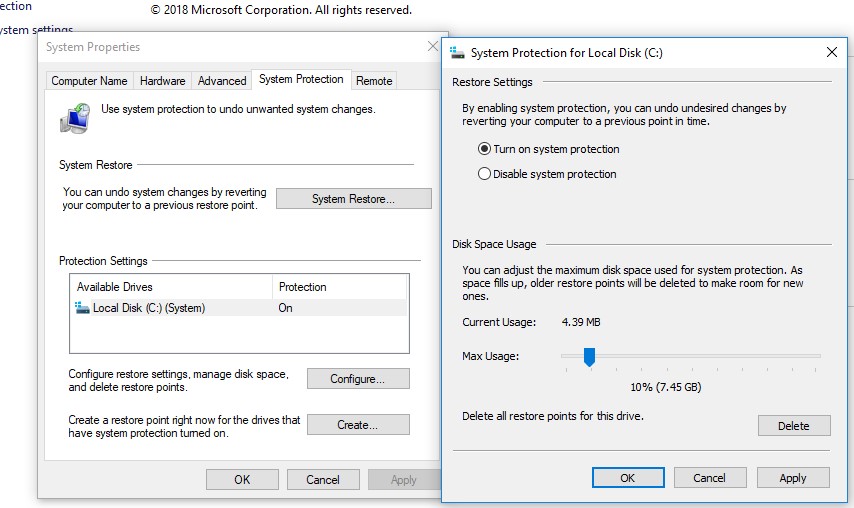
Select the system drive and click the Configure button. The quota configuration dialog box for storing system restore points will open. You can reduce the size of the disk for storing shadow copies. Here you can either delete all existing restore points (Delete button), or completely disable the creation of restore points by selecting Disable system protection.
To reduce the size of the System Volume Information directory you can also:
- Move the VSS data to another NTFS drive (
vssadmin add shadowstorage /for=c: /on=d: /maxsize=30%); - Disable or reconfigure the Windows File History feature;
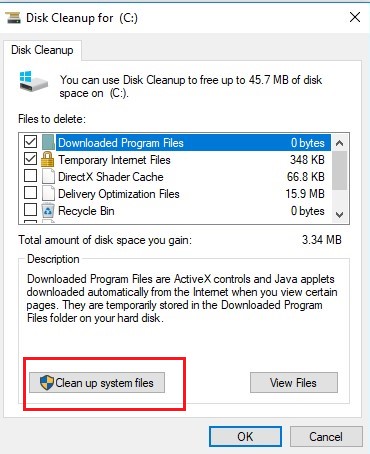
- Clean up system files using the built-in tool cleanmgr.exe (disk properties -> Disk Cleanup).

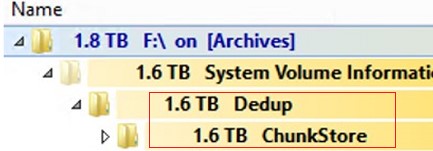
Clean Up Dedup ChunkStore in System Volume Information
When analyzing the contents of the System Volume Information folder on Windows Server, you may notice that the Dedup\ChunkStore directory is consuming a lot of space. This means that file deduplication feature is enabled for this volume.
If the Windows Data Deduplication service found identical chunks (fragments) in files on a volume, it replaces them with a link to the unique chunk, which is saved to the System Volume Information directory. If you move or delete optimized files from a deduplicated volume, old chunks are not deleted immediately. These blocks are removed by a special GarbageCollection job that runs once a week. This is why space on a deduplication-enabled volume is not immediately reclaimed.
To immediately start the process of removing unused chunks, run the PowerShell command:
start-dedupjob -Volume C: -Type GarbageCollection
The next dedup job will check the integrity of the remaining chunks:
start-dedupjob -Volume C: -Type DataScrubbing
To monitor these tasks, use the Get-DedupJob cmdlet.
After the completion of the tasks, unused chunks in the System Volume Information directory will be deleted, and additional disk space will be freed.
Start-DedupJob -Volume D: -Type Unoptimization command. This command will delete all chunks in the System Volume Information directory and the unoptimized files on the volume will revert to their original size. Therefore, before disabling optimization, make sure that there is enough free disk space.
28 comments
Thanks, this is brilliant.
I found a VSS for one disk on another this way. Cleaned it up and voila: space back!
Thanks for this, saved me on our 2013 exchange servers
Brilliant! This was it. If only I found this out before the other server crashed due to the “unbound” limit being set on C:\
Brilliant! the folder “sys.vol.info.” was huge. Approx 250 gb. Cleaned it with these litle tricks!!! Now i know where space were wasted due to misconfiguration of the limits of the disk space used by VSS. Life saver of the server!!
This works.
Thanks
Great!!!
Thanks I had a server that the System Volume was using 212 GB of a 279 GB drive. I now have plenty of free space after resetting the maxsize.
Excellent article – terrific detective work. I had a 500GB SSD that had only 21GB free and now it has 221GB free.
Simply brilliant! Thanks a ton..
Yeah, it was just 30GB, but this was driving me crazy. It turned out that somehow the allowed Restore Point space was set to 100%, so it’d eventually have filled the entire partition O_O, limiting it to 5% automatically freed the space. Thanks!
Hi. I has a similar issue on an Hyper-v cluster. there you sould use DISKSHADOW command first.
then you can us LIST SHADOWS ALL
otherwise, the CSV volumes will not show his shadows.
if you want, you can delete the shadows using DELETE SHADOWS ID {XX-XX-XXX-XX}
best regards
Thanks a lot
Fantastic article thank you so much !!! 270GB shadow storage in less than a month.
very well demonstrated, thanks
Excellent. It simply works.
Thanks.
Thank you !
Thank You got a little stuck at vssadmin resize shadowstorage /on=c: /for=c: /maxsize=2GB
for me it was vssadmin resize shadowstorage /for=c: /on=c: /maxsize=2000MB
the for and on needed to be switched and needed MB instead of GB other than that awesome
Afraid the “vssadmin add shadowstorage /for=c: /on=v: /maxsize=100%” didn’t work for my V drive (Win 10, i5-6600K). What did I miss, please?
Try to set maxsize in MB as mentioned above, instead of %:
vssadmin add shadowstorage /for=c: /on=v: /maxsize=10000MB
Is anyone else getting stuck because of
“No mapping between account names and security IDs was done.”
“Successfully processed 0 files; Failed processing 1 files”
I was also stuck with that,
“No mapping between account names and security IDs was done.”
because of the USB’s folder “System Volume Information”.
my problem is: my usb/flash-drive always getting auto-hide all folder & folder and it auto-create a shortcut file (named base on flash-drive name).
After unhiding it using batch command, and opening the no-name folder, (all my files and folder was moved there) and to move it to flash-drive path and to delete the “System Volume Information” including unwanted files. After safely removing the flash-drive and to flash it again, the problem keep on coming back.
I was totally stuck, Thanks a lot
Excellent Article – Thank you, this helped me solve my issue with the system volume information consuming all of the C Drive
Thank you very much for this excellent tutorial. It helps a lot. In my case, “Synology Active Backup for Business” agent was over leaving 200GB of useless files on my Windows Server 2019 and storage space was set to UNBOUNDED.
great work absolutely brilliant
Even from a few people discussing in the comments, this MS junk keeps going way past the 10% default limit all the time. Have not been able to find a reason why it does not listed to the rules that are in place limiting at 10%. I keep cleaning/deleting manually but eventually it always creeps back up for no apparent reason. Brand new server just 2 months old and the C drive “200GB” was left with 18GB now. WHY????
Thanks for posting this, it helped me clean up about 90GB on a failing drive on an Exchange server!
Thank you so much for posting this. Saved 122 GB. It was a headache since last couple of hours to figure out why this was happening. The reason was “Shadow copy storage Space was set to UNBOUNDED”. Thanks again!