In on-premises Exchange Server and Microsoft 365 (Exchange Online), you can grant users permission to send e-mails on behalf of another user or mailbox. In this article, we will show how to grant Send As and Send On Behalf permissions using the Exchange Admin Center and PowerShell.
There are two types of permissions in Exchange to send emails on behalf of another mailbox or group:
- Send as – allow a user (delegate) to send email as if they came directly from another mailbox or group. A recipient doesn’t see that the message was sent by the delegate;
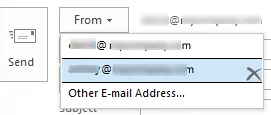
- Send on behalf – permission similar to Send-As, but a real sender is displayed in the From field of an email message. In the Outlook screenshot below, you can see that XXX user has sent the email on behalf of YYY.


How to Grant Send As Permissions in Exchange Server?
In on-premises Exchange Server 2019, 2016, and 2013, you can grant mailbox permissions using the Exchange Admin Center (EAC).
- Sign in to ECP:
https://exchsrv1/ecp - Go to Recipients -> Mailboxes -> find a user mailbox you want to grant permissions on;
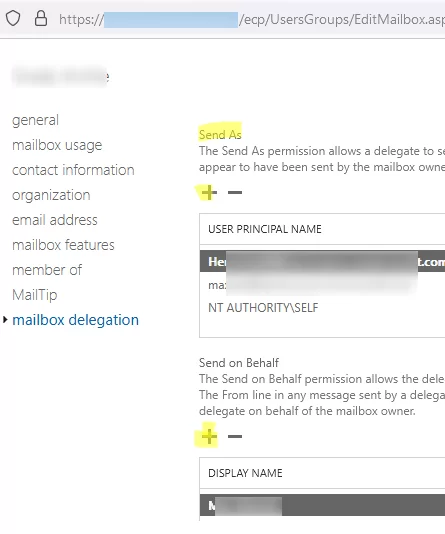
- Open the mailbox properties and go to the Mailbox Delegation tab;
- Here you can grant SendAs or SendOnBehalf permissions to another user by adding their account to the appropriate section.
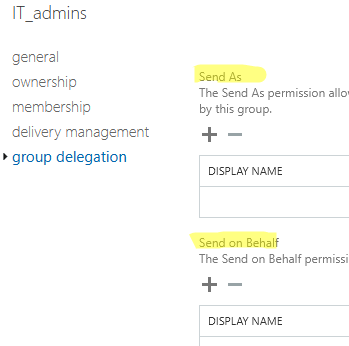
In the same way, you may grant permission to send emails on behalf of the distribution groups or mail-enabled security groups (go to the group delegation tab).
You can grant send as permission using PowerShell. To do it, open the Exchange Management Shell console or connect to your Exchange server remotely with PowerShell.
In order to delegate SendAs permissions, run the command below:
Get-Mailbox [email protected] | Add-ADPermission -User [email protected] -ExtendedRights "Send As"
The permissions are assigned on a user account object in Active Directory. You can also set them manually in the Security tab of user properties in the ADUC console.
You can grant SendOnBehalf permission:
Set-Mailbox -Identity [email protected] -GrantSendOnBehalfTo [email protected]
The previous command clears the current access list and adds only the new account to it. If you want to add a new user to the SendOnBehalf access list, use this command:
Set-Mailbox secr[email protected] -GrantSendOnBehalfTo @{Add="[email protected]"}
You can delegate SendOnBehalf permissions to all mailboxes in a specific Organizational Unit in Active Directory:
Get-Mailbox | Where {$_.DistinguishedName -like "*OU=Service,OU=MUN,DC=woshub,DC=com*"} | Set-Mailbox -GrantSendOnBehalfTo @{add="User1","User2"}
If you want to grant permissions to send on behalf of an Exchange distribution group:
Set-DistributionGroup -Identity mun_a[email protected] -GrantSendOnBehalfTo @{Add="[email protected]"}
To delegate SendOnBehalf permissions on a dynamic distribution group:
Set-DynamicDistributionGroup "IT_DeptUsers" -GrantSendOnBehalfTo @{Add="[email protected]"}
To send an e-mail on behalf of another mailbox in Outlook or OWA, add the From field to the interface. When creating a new e-mail message, select the sender’s e-mail address in the From (or select Other Email Address and find the owner from the Global Address List).
In an on-premises Exchange Server organization, you will have to wait up to two hours or restart the Exchange Information Store service for the changes to propagate.
If you get the following error message when trying to send an e-mail message on behalf of another user:
You do not have permission to send to this recipient. For assistance, contact your system administrator.
or
You can't send a message on behalf of this user unless you have permission to do so.
Try the following:
- Send an email on behalf of a mailbox from OWA;
- If you were able to send the e-mail message from OWA, try to remove Offline Address Book (OAB,
C:\Users\%username%\AppData\Local\Microsoft\Outlook\Offline Address Books) when desktop Outlook is not running.
Adding Send On Behalf Permissions in Microsoft 365 (Exchange Online)
In Exchange Online, you may delegate permissions to send emails on behalf of a mailbox or a distribution group using the Exchange Admin Center.
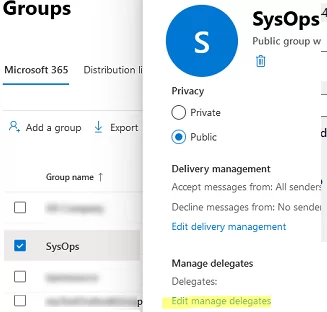
- Go to the Recipients and select Mailboxes (or Groups);
- Find the mailbox you want to delegate permissions on;
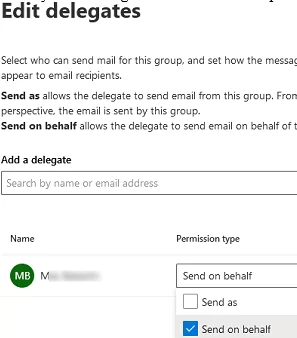
- Open mailbox properties, go to the Settings tab, and select Edit manage delegates;
- Then select a user you want to grant access to and the permission type (Send as or Send on behalf).
You can also delegate SendAs permissions in Exchange Online using PowerShell. Connect to your Microsoft 365 tenant using the Exchange Online PowerShell (EXO) module:
Connect-ExchangeOnline -UserPrincipalName [email protected] -ShowProgress $true
To allow a user to send messages on behalf of a distribution group, use the Add-RecipientPermission cmdlet:
Add-RecipientPermission <GroupName> -Trustee <MailboxName> -AccessRights SendAs
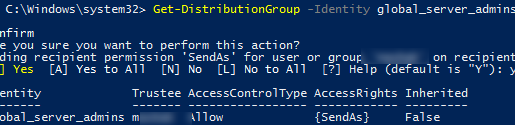
To delegate Send As permissions on a distribution group:
Get-DistributionGroup -Identity server_admins | Add-RecipientPermission -AccessRights SendAs -Trustee jsmith
To grant SendOnBehalf permission on a user mailbox, run this command:
Get-Mailbox max.joseph | Set-Mailbox -GrantSendOnBehalfTo HenriettaM
Grant permissions to send on behalf of a Microsoft 365 group:
Set-UnifiedGroup msteams_cc1234 -GrantSendOnBehalfTo max.joseph
List users having SendOnBehalf permissions on a mailbox:
Get-Mailbox max.joseph | Where {$_.GrantSendOnBehalfTo -ne $null} | Select UserprincipalName,GrantSendOnBehalfTo

Display a list of users with SendAs permissions on a mailbox:
Get-RecipientPermission max.joseph
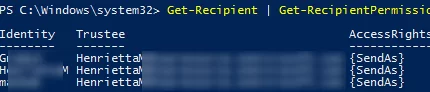
Find all mailboxes in the organization that have SendAs permissions set for the specified user:
Get-Recipient | Get-RecipientPermission -Trustee HenriM@woshub.onmicrosoft.com | Select Identity, Trustee, AccessRights
Use the Remove-RecipientPermission cmdlet to remove SendAs permissions on a mailbox:
Get-Recipient max.joseph | Remove-RecipientPermission -AccessRights SendAs –Trustee [email protected]