Windows OS Hub
  • Windows Server
    • Windows Server 2022
    • Windows Server 2019
    • Windows Server 2016
    • Windows Server 2012 R2
    • Windows Server 2008 R2
    • SCCM
  • Active Directory
    • Active Directory Domain Services (AD DS)
    • Group Policies
  • Windows Clients
    • Windows 11
    • Windows 10
    • Windows 8
    • Windows 7
    • Windows XP
    • MS Office
    • Outlook
  • Virtualization
    • VMWare
    • Hyper-V
    • KVM
  • PowerShell
  • Exchange
  • Cloud
    • Azure
    • Microsoft 365
    • Office 365
  • Linux
    • CentOS
    • RHEL
    • Ubuntu
  • Home
  • About

Windows OS Hub

  • Windows Server
    • Windows Server 2022
    • Windows Server 2019
    • Windows Server 2016
    • Windows Server 2012 R2
    • Windows Server 2008 R2
    • SCCM
  • Active Directory
    • Active Directory Domain Services (AD DS)
    • Group Policies
  • Windows Clients
    • Windows 11
    • Windows 10
    • Windows 8
    • Windows 7
    • Windows XP
    • MS Office
    • Outlook
  • Virtualization
    • VMWare
    • Hyper-V
    • KVM
  • PowerShell
  • Exchange
  • Cloud
    • Azure
    • Microsoft 365
    • Office 365
  • Linux
    • CentOS
    • RHEL
    • Ubuntu

 Windows OS Hub / Group Policies / How to Create a Scheduled Task Using GPO

June 8, 2023 Active DirectoryGroup PoliciesPowerShellWindows 10Windows Server 2019

How to Create a Scheduled Task Using GPO

You can use the Group Policy to create and deploy scheduled tasks to domain computers. For example, you can create a task that automatically logs out users or shuts down computers at a specified time, runs a script, etc.

In this example, we will create a new Scheduler task that displays a pop-up notification and distribute it to users’ computers using Group Policy Preferences.

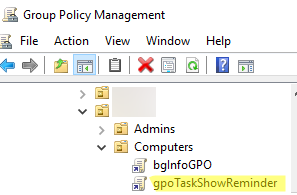
  1. Open the Group Policy Management console (gpmc.msc), create a new GPO, and link it to an Organizational Unit with users or computers you want to assign the task to (if you assign the GPO to an OU with computers, enable the Configure user Group Policy Loopback Processing mode under Computer Configuration -> Administrative Templates -> System -> Group Policy, see the guide here);
    Create a Windows Schedule Task GPO
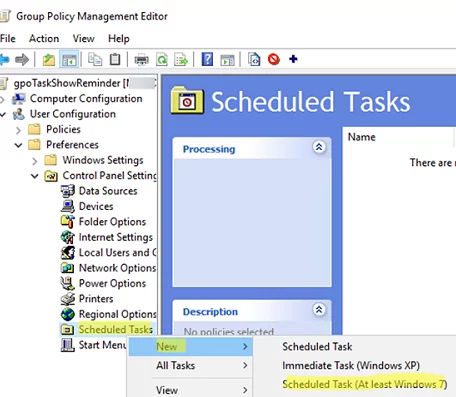
  2. Go to User Configuration -> Preferences -> Control Panel Settings -> Scheduled Tasks;
  3. Create a new scheduled task: New -> Scheduled task (At least Windows 7);
    The Immediate Task (at least Windows 7) item allows to create of a task that will run only once, but as quickly as possible (immediately after the next Group Policy update on the client).
    Create new Scheduled task Item using Group Policy
  4. You will see a form similar to the standard Windows Scheduler task configuration window. Configure the settings of your task;
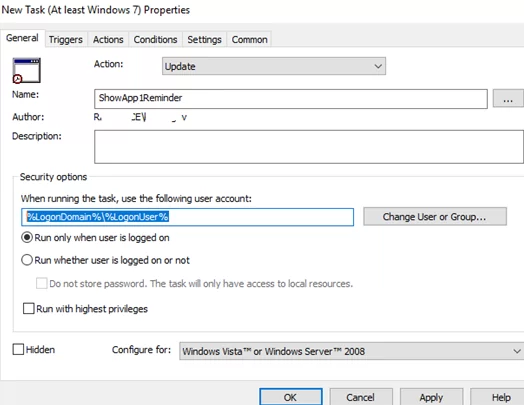
  5. On the General tab, set Action = 
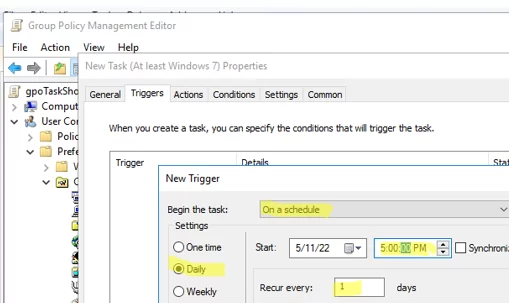
Update, enter the task name. To make the task run on behalf of the current user, enter %LogonDomain%\%LogonUser% here. To run the task as administrator, check the Run with highest privileges option;
    If you create a task in the Computer Configuration GPO section, you may run the job on behalf of the system (NT AUTHORITY\System).
    Configure a scheduled task item with Group Policy Preferences
  6. Navigate to the Triggers tab. Specify the date and time when you want to run the task. In my case, it is 5 PM every day. Select New -> Begin the task On a schedule -> Daily, and specify the time to start the task;
    run a task on a schedule
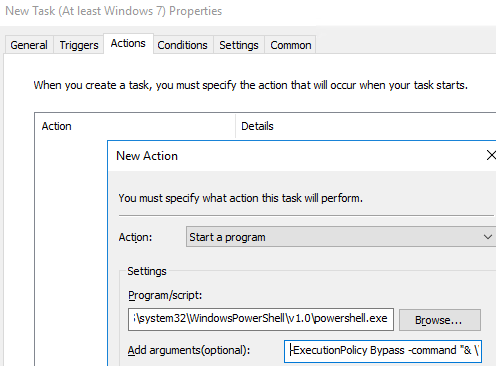
  7. On the Actions tab, specify a command or a script you want to run using the Task Scheduler. Configure the following task options:
    Action: Start a program
    Program/Script: C:\WINDOWS\system32\WindowsPowerShell\v1.0\powershell.exe
    Add Arguments (optional): -ExecutionPolicy Bypass -command "& \\woshub.com\SysVol\woshub.com\scripts\ShowReminder.ps1"run a powershell script via task sheduler
    You copy the file of your PS1 script to user computers using GPO or run it directly from the UNC path. In my example, I am running a PowerShell script that displays a pop-up notification from the SYSVOL directory on the domain controller. To bypass PowerShell script Execution Policy, I use the -ExecutionPolicy Bypass option.
  8. Restart a user’s computer to apply the GPO. Open the Task Scheduler (
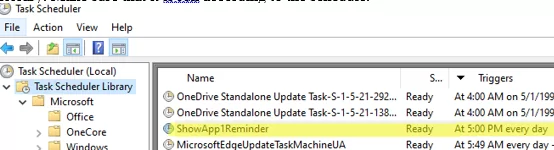
taskschd.msc) and make sure that a new task has appeared in the Task Scheduler Library. Make sure that it is run according to the schedule.
    New task appeared in Scheduler
You can run the scheduled task manually in PowerShell using this command:
Start-ScheduledTask YourTaskName1

Note that unlike GPO logon scripts you may configure it to be run only when a computer is started/shutdown or when a user logon/logout, scheduled tasks can be run at any time or after a specific trigger event occurs. See an example of how to run a script (do an action) when starting (exiting from) an app in Windows.

1 comment
2
Facebook Twitter Google + Pinterest
previous post
Enable HTTP/3 Support for IIS on Windows Server 2022
next post
Shutdown/Restart Windows using Command Prompt and PowerShell

Related Reading

How to Connect VPN Before Windows Logon

November 14, 2023

Using WPAD (Web Proxy Auto-Discovery Protocol) on Windows

November 7, 2023

Send Emails with Microsoft Graph API and PowerShell

November 6, 2023

Zabbix: How to Get Data from PowerShell Scripts

October 27, 2023

Tracking Printer Usage with Windows Event Viewer Logs

October 19, 2023

1 comment

Dk March 12, 2023 - 8:20 am

I have created a FailedLogon task in GPO. The task gets deployed if I run it as SYSTEM. But when trying to run it under a service account srv_tasks it doesn’t schedule the task. And in the event logs I see this:

The computer ‘FailedLogonTask’ preference item in the ‘FailedLogonTask’ Group Policy Object did not apply because it failed with error code ‘0x80070005 Access is denied.’ This error was suppressed

Reply

Leave a Comment Cancel Reply

Categories

  • Active Directory
  • Group Policies
  • Exchange Server
  • Microsoft 365
  • Azure
  • Windows 11
  • Windows 10
  • Windows Server 2022
  • Windows Server 2019
  • Windows Server 2016
  • PowerShell
  • VMWare
  • Hyper-V
  • Linux
  • MS Office

Recent Posts

  • How to Connect VPN Before Windows Logon

    November 14, 2023
  • Removing Azure Arc Setup Feature on Windows Server 2022

    November 9, 2023
  • Using WPAD (Web Proxy Auto-Discovery Protocol) on Windows

    November 7, 2023
  • Send Emails with Microsoft Graph API and PowerShell

    November 6, 2023
  • Zabbix: How to Get Data from PowerShell Scripts

    October 27, 2023
  • Tracking Printer Usage with Windows Event Viewer Logs

    October 19, 2023
  • PowerShell: Configure Certificate-Based Authentication for Exchange Online (Azure)

    October 15, 2023
  • Reset Root Password in VMware ESXi

    October 12, 2023
  • How to Query and Change Teams User Presence Status with PowerShell

    October 8, 2023
  • How to Increase Size of Disk Partition in Ubuntu

    October 5, 2023

Follow us

  • Facebook
  • Twitter
  • Telegram
Popular Posts
  • Configure Google Chrome Settings with Group Policy
  • Get-ADUser: Find Active Directory User Info with PowerShell
  • Allow Non-admin Users RDP Access to Windows Server
  • How to Find the Source of Account Lockouts in Active Directory
  • How to Disable or Enable USB Drives in Windows using Group Policy
  • Get-ADComputer: Find Computer Properties in Active Directory with PowerShell
  • Configuring Proxy Settings on Windows Using Group Policy Preferences
Footer Logo

@2014 - 2023 - Windows OS Hub. All about operating systems for sysadmins


Back To Top