RIn this guide, we’ll walk you through how to install and configure a DHCP server based on Windows Server 2019. We’ll cover both the usual way to configure DHCP server options through a GUI console and DHCP configuration from the PowerShell command line. This article describes the specifics of installing and configuring a DHCP role on Windows Server, creating DHCP scopes, configuring scope options, and reserving static IP addresses.
Installing DHCP Server Role on Windows Server 2019/2016
In this example, we will install a DHCP server on a Windows Server 2019 host with an IP address 192.168.13.4. You can use both Windows Server Core and Full GUI versions. In a small infrastructure, it is acceptable to install a DHCP server on a server with the role of an Active Directory domain controller.
Configure at least one static IP address on your computer before installing DHCP.
WARNING: The following recommended condition is not met for DHCP: No static IP addresses were found on this computer. If the IP address changes, clients might not be able to contact this server. Please configure a static IP address before installing DHCP Server.
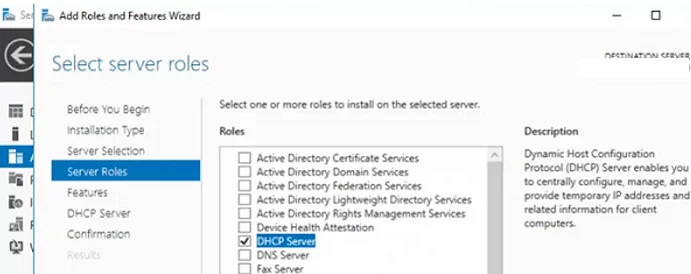
You can install the DHCP Server role from the Server Manager console (Add Roles and Features -> Server Roles).
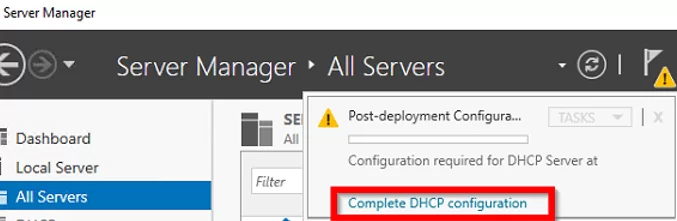
After installing the DHCP role, you need to perform post-deployment configuration. To do this, in the Server Manager console, click on the notification and select Complete DHCP configuration.
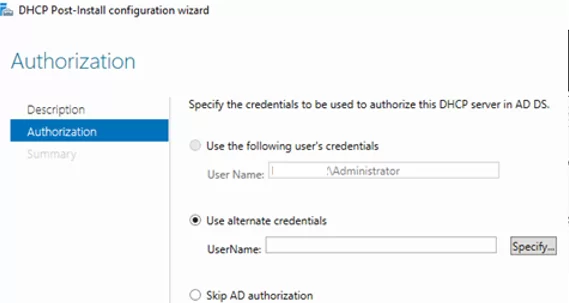
You will be prompted to authorize the new DHCP server in Active Directory (Authorization screen). To authorize the DHCP server in AD, your account must be a member of the Enterprise Admins domain group.
Set-ItemProperty -Path "HKLM:\SYSTEM\CurrentControlSet\Services\DHCPServer\Parameters" -Name DisableRogueDetection -Value 1 -Force
You can also use the following commands in the PowerShell console to install and configure the DHCP server role on Windows Server:
Install-WindowsFeature DHCP –IncludeManagementTools
Verify that the DHCP role and RSAT-DHCP management tools are installed:
Get-WindowsFeature -Name *DHCP*| Where Installed

Authorize the DHCP server in Active Directory (specify the DNS name of the server and the IP address that will be used by DHCP clients):
Add-DhcpServerInDC -DnsName hq-dc01.woshub.com -IPAddress 192.168.13.4
Create local security groups for the DHCP server:
Add-DhcpServerSecurityGroup
To stop Server Manager from displaying a notification that the DHCP role requires additional configuration, run the command:
Set-ItemProperty -Path HKLM:\SOFTWARE\Microsoft\ServerManager\Roles\12 -Name ConfigurationState -Value 2
Restart the DHCPServer service:
Restart-Service -Name DHCPServer -Force
The DHCP server database and logs are stored in %systemroot%\system32\dhcp:
- dhcp.mdb — DHCP server database file;
- j50.log – transaction log file (used when restoring DHCP configuration);
- j50.chk — checkpoint file;
- tmp.edb — DHCP server temporary working file.
Configuring DHCP Scopes on Windows Server 2019
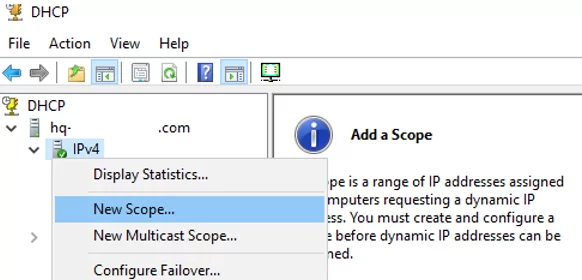
After installing the DHCP role, you need to create DHCP scopes that describe the IP address ranges and other parameters that the server assigns to clients.
The dhcpmgmt.msc console is used to manage the DHCP server (you can manage the DHCP server locally or from a remote computer with RSAT installed). Open the DHCP console, expand your server, right-click IPv4, then select New Scope.
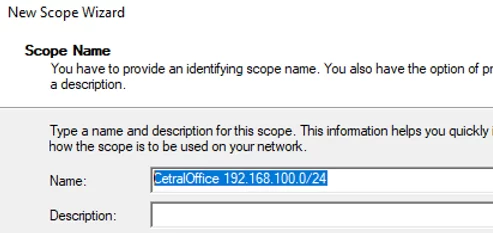
Set the name of the DHCP scope.
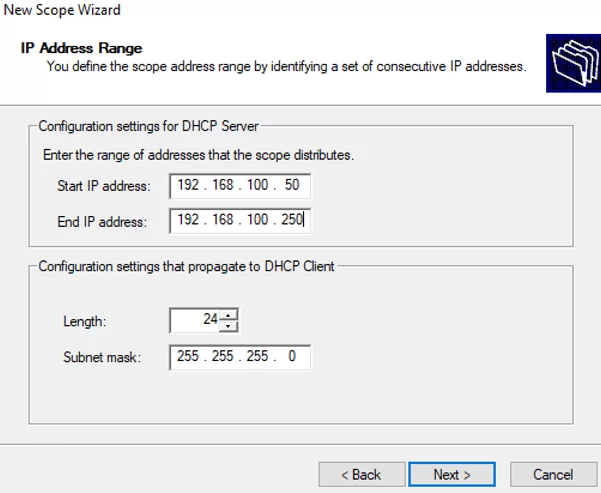
Specify the range of IP addresses that will be issued by this DHCP scope and the subnet mask. In this example, I want to use this DHCP scope for the 192.168.100.0/24 network. Within this network, the DHCP server will assign dynamic IP addresses from the range 192.168.100.50 - 192.168.100.250. In the next window, you can add exclusions to this range (Add Exclusions and Delay).
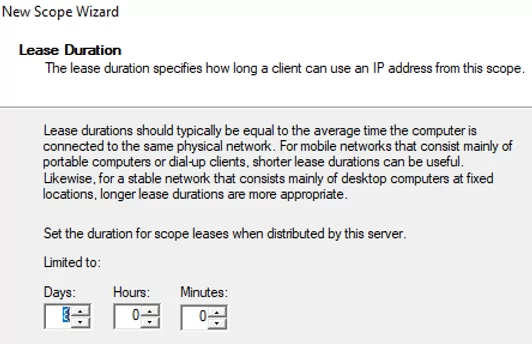
Next, you need to specify the lease duration of the DHCP client’s IP address (by default, it is 8 days, and you don’t need to change it without special need).
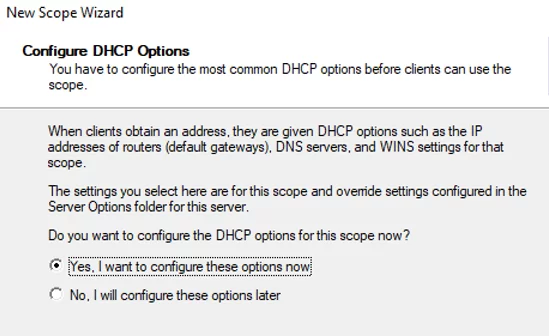
Select that you want to configure additional DHCP scope options.
 .
.
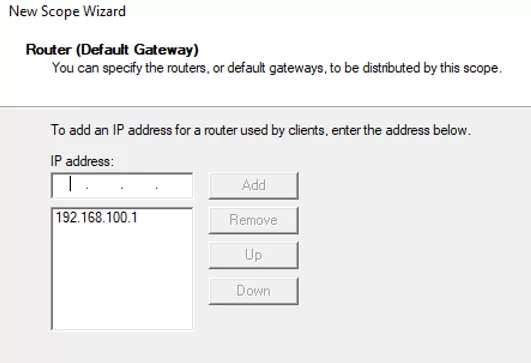
Specify the IP address of the default gateway in the network that should be assigned to clients (in our example, this is 192.168.100.1).
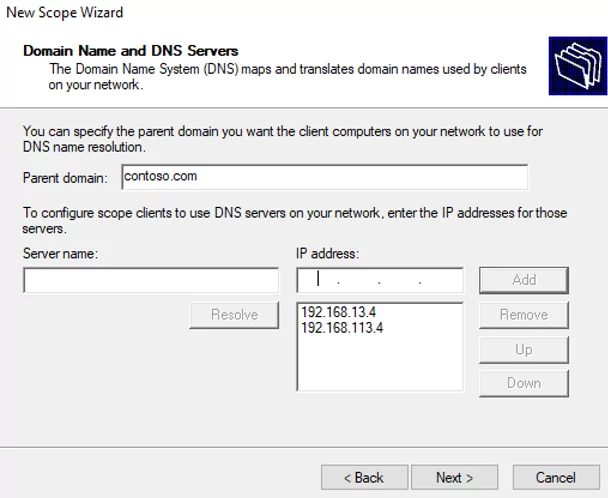
Then specify the domain name and DNS IP server addresses to be propagated to DHCP clients.
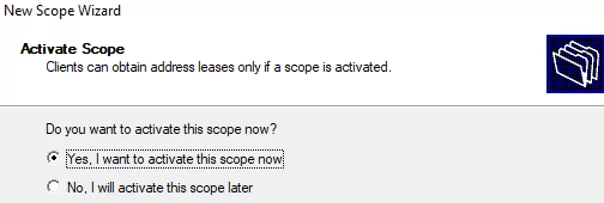
It remains to activate the DHCP scope (allow it to serve clients).
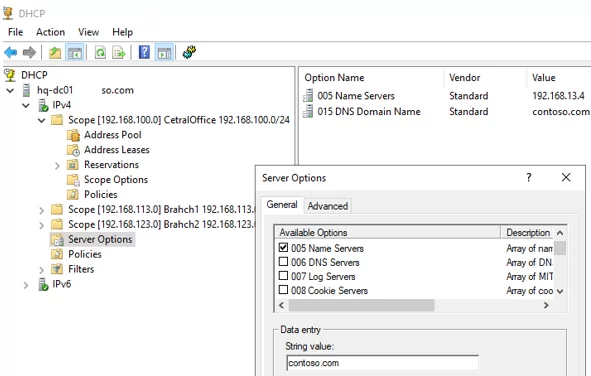
DHCP server can assign different settings to clients (except IP address). Scope Options are used for this.
In Windows Server DHCP, you can configure global scope settings or Scope Options for each scope.
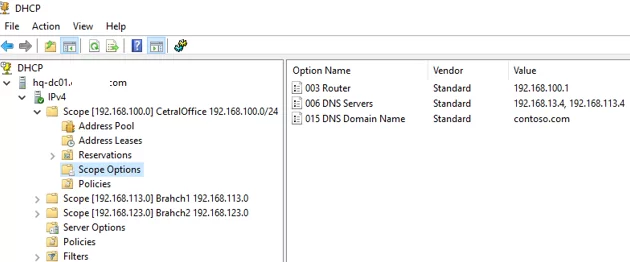
We have previously configured three scope options:
- 003 Router
- 006 DNS Server
- 015 DNS Domain Name
Other options can be added (NTP server, PXE settings, etc.).
In the Server Options section of the DHCP server, you can configure global options that will be inherited by all scopes. However, you can override the global settings in the settings of each scope (scope options take precedence over server options).
A single DHCP server can serve hundreds of subnets and VLANs. Thus, you can create multiple scopes on it. The main thing is that a DHCP relay agent must be configured on each of the subnets that forwards broadcast DHCP requests to your DHCP server. In Cisco terms, the DHCP relay is called ip helper. You can even configure DHCP Relay on the Windows Server host.
67 UDP, and back over UDP 68.Configuring IP Address Reservation on a DHCP Server
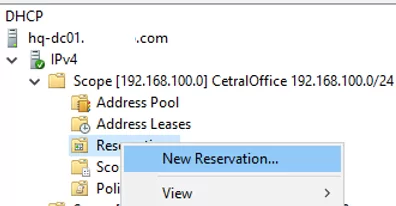
By default, the DCHP server leases dynamic addresses to clients. This means that the IP address of any client can change. If you want certain devices to always receive the same static IP address from the DHCP server, you can reserve it (for example, for network printers connected to users’ computers).
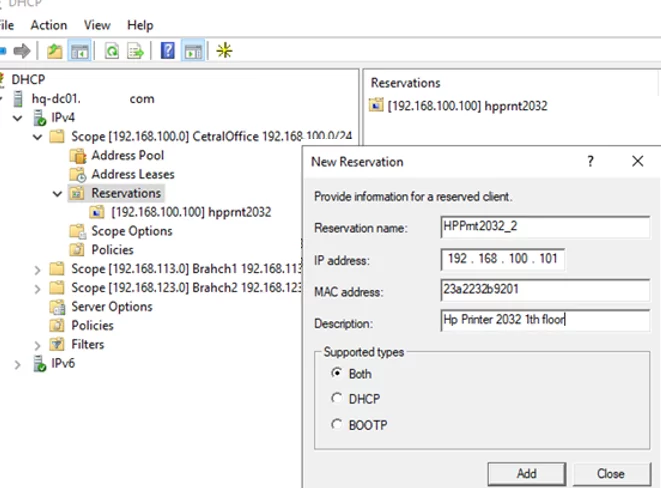
To create a DHCP reservation, select a scope and go to the Reservation section. Select New Reservation from the menu.
When creating a reservation, you need to specify the IP address you want to assign to the device and its unique MAC address. The MAC address in Windows can be obtained from the results of the ipconfig /all command or by using PowerShell (Get-NetAdapter | select Name, Macaddress). Optionally, you can specify the name and description of the device.
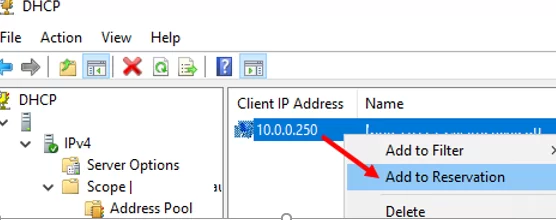
You can also reserve the current dynamic address for a device by finding it in the Address Leases section of the DHCP console. Click on the device and select Add to Reservation.
How to Configure and Manage DHCP Server with PowerShell?
You can perform all the operations for configuring and managing the DHCP server in Windows Server 2019/2016 from the PowerShell console. Let’s take a look at the basic DHCP management commands. The DHCPServer module is used for this. Import the module into the PowerShell session:
Import-Module DHCPServer
You can display a complete list of cmdlets in the DHCP module like this:
Get-Command -Module DHCPServer

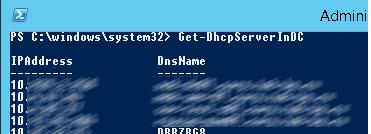
Let’s display the list of authorized DHCP servers in Active Directory:
Get-DhcpServerInDC
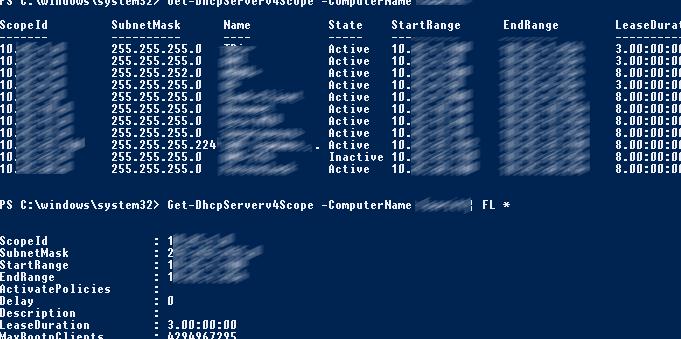
Get the list of DHCP scopes on the specified server:
Get-DhcpServerv4Scope –ComputerName be-dhcp1
If more scope displayed fields are required (Delay, Description, Name, etc.):
Get-DhcpServerv4Scope –ComputerName be-dhcp1| FL *
If the information about IPv6 scopes has to be displayed:
Get-DHCPServerv6Scope
Get the settings of a certain DHCP scope:
Get-DhcpServerv4Scope –ComputerName be-dhcp1 –ScopeID 192.168.12.0
Let’s create a new inactive DHCP scope with the IP address range from 192.168.113.50 to 192.168.113.250:
Add-DhcpServerv4Scope -Name “NY Branch1 192.168.113.0” -StartRange 192.168.113.50 -EndRange 192.168.113.250 -SubnetMask 255.255.255.0 -State InActive
Set the following DHCP scope options: DNS server, domain, and default gateway address:
Set-DhcpServerv4OptionValue -ScopeID 192.168.113.0 -DnsDomain woshub.com -DnsServer 192.168.13.4 -Router 192.168.113.1
Add exceptions to DHCP scope:
Add-DhcpServerv4ExclusionRange -ScopeID 192.168.113.0 -StartRange 192.168.113.90 -EndRange 192.168.113.100
Activate DHCP scope:
Set-DhcpServerv4Scope -ScopeID 192.168.113.0 -State Active

For convenience, you can use the following PowerShell command when creating a new scope:
$HashArgs = @{
 'Name' = 'NY Office Scope';
 'Description' = 'Workstations';
 'StartRange' = '192.168.120.10';
 'EndRange' = '192.168.120.200';
 'SubnetMask' = '255.255.255.0';
 'State' = 'Active';
 'LeaseDuration' = '7.00:00:00';
 }
 Add-DhcpServerv4Scope @HashArgs
You can add other DHCP server options (e. g., WPAD) as follows:
Add-DhcpServerv4OptionDefinition -ComputerName be-dhcp1 -Name WPAD -OptionId 252 -Type String
You can display a list of configured DHCP server options:
Get-DHCPServerv4OptionValue -ComputerName be-dhcp1 | Format-List
Display a list of configured scope options:
Get-DHCPServerv4OptionValue -ComputerName be-dhcp1 -ScopeId 192.168.12.0 | Format-List
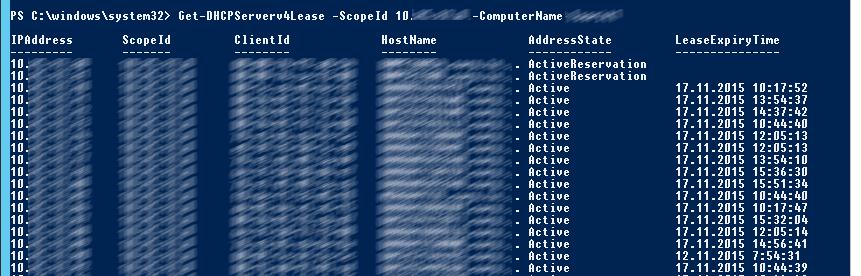
Show the current list of leased IP addresses for the DHCP scope 192.168.12.0:
Get-DHCPServerv4Lease -ScopeId 192.168.12.0 -ComputerName be-dhcp1
Create a DHCP reservation for a client who is assigned a dynamic IP address 192.168.12.88 (convert the leased IP address to a reserved one):
Get-DhcpServerv4Lease -ComputerName be-dhcp1 -IPAddress 192.168.12.88| Add-DhcpServerv4Reservation -ComputerName be-dhcp1
You can perform a bulk reservation of IP addresses for computers listed in a CSV file. To do it, create a text file in the following format:
ScopeId,IPAddress,Name,ClientId,Description
192.168.12.0,192.168.12.88,PC-be-s1,2a-a2-1c-39-42-1f,Reservation PC-be-s1
192.168.12.0,192.168.12.89,PC-be-s2,2a-a2-1c-59-22-2f,Reservation PC-be-s2
Save the file as c:\dhcp\DHCPReservations.csv and run the following command, which will import data from the CSV file and create DHCP reservations for clients:
Import-Csv –Path c:\dhcp\DHCPReservations.csv | Add-DhcpServerv4Reservation -ComputerName be-dhcp1
Deactivate a scope on a DHCP server:
Set-DhcpServerv4Scope -ComputerName be-dhcp1 -ScopeId 192.168.12.0 -State InActive
Remove a scope from a DHCP server:
Remove-DHCPServerv4Scope -ComputerName be-dhcp1 -ScopeId 192.168.12.0 -Force
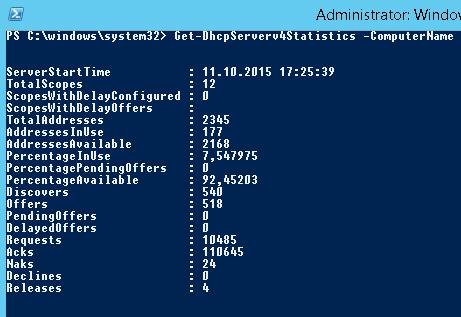
You can get DHCP server statistics (the number of scopes and reservations, the percentage of used addresses, etc.).
Get-DhcpServerv4Statistics -ComputerName be-dhcp1
The same information for a specific scope can be obtained using the Get-DhcpServerv4ScopeStatistics cmdlet.
DHCP server configuration can be exported to the XML file with the following command:
Export-DHCPServer -ComputerName be-dhcp1 -File C:\dhcp\dhcp-export.xml
Further, these DHCP server settings can be imported (transferred) to another DHCP server:
Import-DHCPServer -ComputerName be-dhcp2 -File C:\dhcp\dhcp-export.xml -BackupPath C:\dhcpbackup\