You can use the Import-CSV PowerShell cmdlet to read the contents of a CSV file. Once you load the contents of the CSV file, you get a PowerShell object in which each column from the CSV file is a separate property. This article discusses the specifics of reading data from CSV files by using the Import-CSV cmdlet.
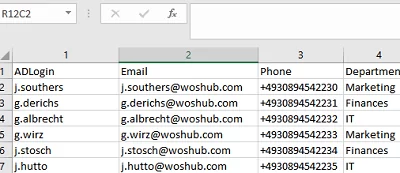
CSV files are used to store tabular data. For example, we have created a simple Excel spreadsheet containing AD user info with the following structure: ADlogin, Email, Phone, Department. Note that the first row of the spreadsheet contains the column names. In PowerShell, these will be available as object attributes in the array.
Our task is to import this CSV file into PowerShell and make changes to Active Directory for each user from the file.
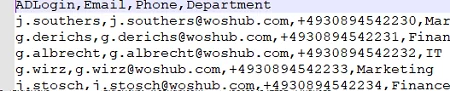
Save this Excel file as a CSV file with comma-separated values. The resulting text file should look like this:
Now, to import a CSV file into PowerShell, all you have to do is specify its name (path):
$ADUsers=Import-CSV -path C:\PS\my_ad_users.csv
The Import-CSV cmdlet converts data from a CSV file into a PowerShell array.
;) use the command:$ADUsers=Import-CSV -path C:\PS\my_ad_users.csv -Delimiter ";"
If you use a tab character as a delimiter in CSV, you can specify it as follows: -Delimiter `t
If you want to use a delimiter default in your system (depending on the language and regional Windows settings), use the -UseCulture flag.
Run this command to get your system-default delimiter in Windows:
(Get-Culture).TextInfo.ListSeparator
Now if you call the $ADUsers variable, it will display the contents of your CSV file. The cmdlet converts the contents of the file to an array. All the values from the CSV file are represented as rows.
Import-CSV -path C:\PS\my_ad_users.csv -Encoding UTF8
The list of available object properties can be displayed as follows:
$ADUsers|get-member
You can see that the array rows contain PSCustomObjects, the elements of which can be accessed by column names from your CSV file. 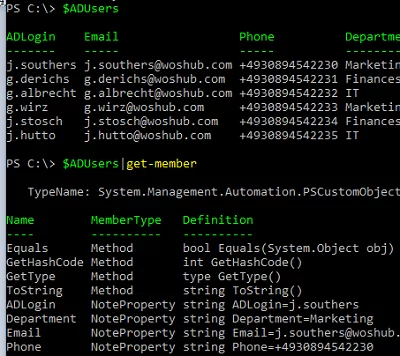
You can display all values from a certain column:
$ADusers.email
Or the specified object attributes:
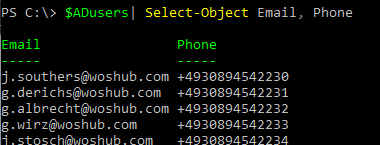
$ADusers| Select-Object Email, Phone
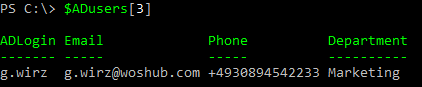
Another useful option is to access a specific object in the array directly. For example, run the following command to get the value of row 4 (numbering starts at 0):
$ADusers[3]
If you want to change the attributes of Active Directory users that you have specified in your CSV file, simply use the ForEach loop to iterate through all the rows in the $ADUsers array (we’ll use the Set-ADUser cmdlet from the AD PowerShell module to make the changes).
# Iterating over all the rows in the array one by one
 $ADUsers | ForEach-Object {
 # In this example, the $_. statement means we are accessing the current row of the array You can get the value of a particular column from the current row by accessing it by the column name. For example, to display the ADLogin value from the current line:
 Write-host $_.ADLogin
 # Now we search for a user in AD by the value of the ADLogin column and change its attribute values:
 Set-ADUser -Identity $_.AdLogin -MobilePhone $_.Phone –Department $_.Department –EmailAddress $_.Email
 }
You can replace this script with a more compact PowerShell one-liner:
Import-Csv C:\PS\my_ad_users.csv | foreach {Set-ADUser -Identity $_.AdLogin -MobilePhone $_.Phone –Department $_.Department –EmailAddress $_.Email}
$User variable we defined in the ForEach statement:ForEach ($User in $ADUsers){
$samaccountname = $User.ADlogin
$email = $user.Email
Write-host $samaccountname
Write-host $email
}
In some cases, when processing array elements from a CSV file, you may need to add an extra column to the array. For example, if you want to add the current date to the $ADUsers object:
$ADUsers | add-member -membertype NoteProperty -name Date -value (Get-Date -Format dd/MM/yyyy)

Here are more scenarios in which you can use the Import-CSV cmdlet to perform administrative operations on a large number of objects:
- Export the Exchange mailboxes to PST files:
Import-CSV "C:\ps\user_to_export_pst.csv" | ForEach {New-MailboxExportRequest -Mailbox $_.username -FilePath $_.UNCPathtoPst - Add users to an AD security group with PowerShell: I
mport-CSV .\users.csv -Header users | ForEach-Object {Add-AdGroupMember -Identity ‘TestADGroup’ -members $_.users}
Or a similar case of adding users to an Azure AD group:
Import-CSV "C:\PS\add_m365_members.csv" | ForEach-Object {
 Add-UnifiedGroupLinks –Identity it_dept –LinkType Members –Links $_.member
} - Get information about the user from AD:
Import-Csv c:\ps\usernsme_list.csv | ForEach {Or use Set-ADUser to change the attributes of specific users:
Get-ADUser -identity $_.user -Properties Name, telephoneNumber |
Select Name, telephoneNumber |
Export-CSV c:\ps\export_ad_list.csv -Append -Encoding UTF8
}Import-Csv "C:\ps\modifyad_users.csv" | foreach {Set-ADUser -Identity $_.SamAccountName –Title $_.Title -MobilePhone $_.MobilePhone}Update users’ photos in Active Directory:
Import-Csv C:\PS\import.csv |%{Set-ADUser -Identity $_.AD_username -Replace @{thumbnailPhoto=([byte[]](Get-Content $_.Photo -Encoding byte))}} - Create bulk users in Active Directory from a list in a CSV file.