Windows Task Scheduler allows you to run tasks both on schedule and when a certain event appears in the Event Viewer (using Windows Event Triggers). In this article, we’ll show you how to create a scheduled task that automatically runs after another task completes successfully.
Suppose you want to run a Pong scheduler task after the Ping job completes successfully.
- Open the Task Scheduler console (
Taskschd.msc) and find the Ping task; - Click the History tab on the bottom taskbar. It contains the complete history of events related to this scheduled task;
 If Task Scheduler only shows the History (Disabled) tab, you need to click Enable All Task History in the right Actions pane. After that, all task events will be displayed in the History tab.
 - We need the event with the Event ID 102 (
Task completed) which appears after the successful completion of the task (Task Scheduler successfully finished); - Open the properties of this event, go to the Details tab, and switch to the XML View of the event. We will use the following data from XML when building the condition statement for the new scheduled task:
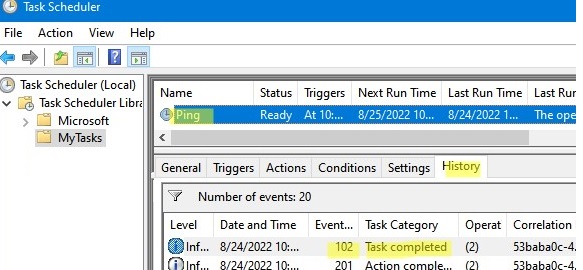
EventID: 102
Provider-Name: Microsoft-Windows-TaskScheduler
Channel: Microsoft-Windows-TaskScheduler/Operational
TaskName: \MyTasks\Ping

eventvwr.msc) and go to the Applications and Services Log -> Microsoft -> Windows -> Task Scheduler -> Operational. Right-click on the item and select the Enable Log option. 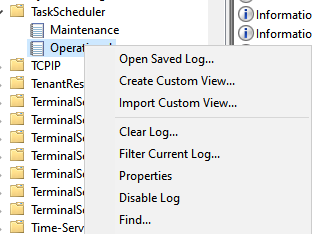
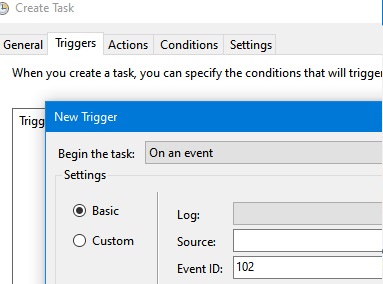
Now you can create a Pong scheduled task.
When you create a trigger for a Pong job, you must specify the condition for triggering the job when event 102 appears (New Trigger -> On an event). But the problem is that EventID 102 appears after any task is completed, not only the Ping task.
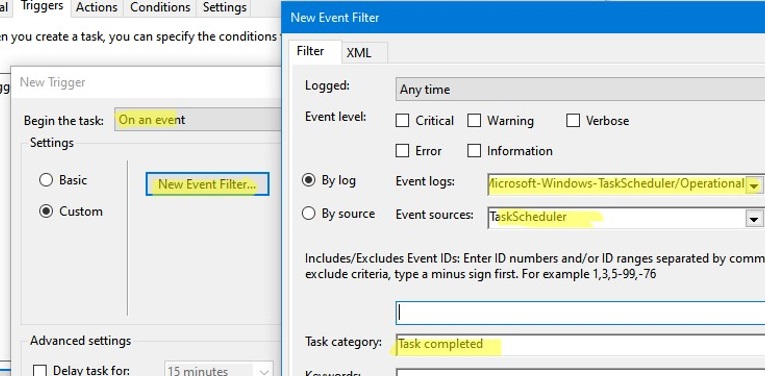
You can create more flexible conditions for selecting events (Custom) when the standard filter does not help you select an event accurately enough. Click on the New Event Filter button.
Create a new filter by specifying the previously retrieved data from the XML View of the event.
- Events Logs: Microsoft-Windows-TaskScheduler/Operational
- Event source: TaskScheduler
- Task category: Task completed
Click the XML tab. It will show the XML representation of your filter (XPath):
<QueryList>
<Query Id="0" Path="Microsoft-Windows-TaskScheduler/Operational">
<Select Path="Microsoft-Windows-TaskScheduler/Operational">*[System[Provider[@Name='Microsoft-Windows-TaskScheduler'] and Task = 102]]</Select>
</Query>
</QueryList>
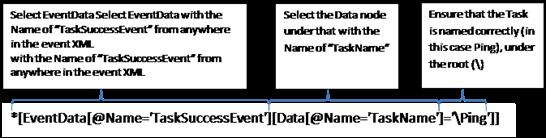
Check the Edit query manually option. You need to bind your filter to the \MyTasks\Ping task. To do this, replace the following line in the XML filter:
*[System[Provider[@Name='Microsoft-Windows-TaskScheduler'] and Task = 102]]
with:
*[EventData [@Name='TaskSuccessEvent'][Data[@Name='TaskName']='\MyTasks\Ping']]

Save your filter settings in the Triggers (Custom Event Filter) tab and save the Pong task.
Now try to run the Ping task (manually, scheduled, or using PowerShell: Start-ScheduledTask mytasks\ping). When the Ping task completes successfully, the Pong job will be started immediately.

The XPath format is shown below.
In this way, you can set up entire task chains, to run the scheduler tasks in sequence. Similarly, you can create any other dependencies in Windows Scheduler tasks. For example, if the backup job is completed successfully, you run one script, and if the backup fails, you need to run a script to clean up or fix the current state.
19 comments
Don’t work for me on Windows 10 x64
Do you have “All Tasks History” enabled for Task scheduler?
Also do you have Operational Event Lots Enabled?
This Superuser post has some screenshots superuser.com/a/1735734/140631
For the section “Change the XPath code” it looks like you pasted the wrong code for us to use.
XPath code example in plain text is wrong when correct code is showed in screenshot.
Of course XML code should reference the actual task name from which completion notification should be triggered:
*[EventData[@Name=’TaskSuccessEvent’][Data[@Name=’TaskName’]=’\ping’]]
You are right, the code is incorrect. This is an old wordpress problem with cutting out some special characters.
I still haven’t fixed it. Sorry.
This xPath code uses wrong kind of quotes. It didn’t work for me. So I used ‘ instead of ’ such in:
*[EventData[@Name=’TaskSuccessEvent’][Data[@Name=’TaskName’]=’\DBPopulations\test1′]]
Sorry but it seems that when copying the code here, the quotes change to the wrong kind.
Worked for me – this is my event trigger:
*[EventData[@Name=’ActionStart’][Data[@Name=’TaskName’]=’\Development\Start NI Error Reporting Service’]]
Hello!
Thanks for a good article!
I have one question:
Is there a way to prevent running next task when previous was cancelled by user ?
I tried this way, but to no avail (
*[EventData[@Name=’StoppedOnRequest’][Data[@Name=’TaskName’]=’\taskname’]]
_tag-start_Suppress Path=”Microsoft-Windows-TaskScheduler/Operational”_tag_end_*[EventData[@Name=’StoppedOnRequest’][Data[@Name=’TaskName’]=’\Trol\PostgreSQL 1C bases backup\ACC_C_30_GK’]]_tag_start_/Suppress_tag_end_
_tag-start_Suppress Path=”Microsoft-Windows-TaskScheduler/Operational”_tag_end_*[EventData[@Name=’StoppedOnRequest’][Data[@Name=’TaskName’]=’\Trol\PostgreSQL 1C bases backup\ACC_C_30_GK’]]_tag_start_/Suppress_tag_end_
This is awesome! Thank you so much…works like a charm!!
How would I change the above code to look for multiple successes?
Code below is not working.
*[EventData
[@Name=’TaskSuccessEvent’]
[Data[@Name=’TaskName’]=’\SQL\LoanTran\LoanTran (191 – 195)’]]
and
*[EventData
[@Name=’TaskSuccessEvent’]
[Data[@Name=’TaskName’]=’\SQL\LoanTran\LoanTran (196 – 200)’]]
Use “or” instead of “and”.
Tanks
It work for me nice and easy.
This works for me on first success – but when target task runs again next day it doesn’t trigger
does it work with a separate, test task? or on a different machine or VM?
Absolute lifesaver, thank you OP. Using Win2012 R2 server and mirrored on Win10 LTSC. I reached the 32 action limit for my task, and needed a reliable way to spread out the actions task so that I can have all the actions done in sequence. Time-based trigger wouldn’t be accurate, especially if you randomize [delay] task #1 trigger time. Task #2 and subsequent task can be daisy chained to And the author somehow accidentally copied the old custom xml for the new custom xml. The steps are correct; follow the screenshots carefully.
Also, others are correct that the comments here will change the type of apostrophe ‘ to a more slanted ‘.
*[EventData[@Name=’TaskSuccessEvent’][Data[@Name=’TaskName’]=’\!TriggerByEvent Test’]]
So if you are copying from comments (or anywhere really) you should copy it into a plain text editor and check/replace out all the ‘ first. Make sure the overall formatting matches the new custom xml screenshot.