Windows OS Hub
  • Windows Server
    • Windows Server 2022
    • Windows Server 2019
    • Windows Server 2016
    • Windows Server 2012 R2
    • Windows Server 2008 R2
    • SCCM
  • Active Directory
    • Active Directory Domain Services (AD DS)
    • Group Policies
  • Windows Clients
    • Windows 11
    • Windows 10
    • Windows 8
    • Windows 7
    • Windows XP
    • MS Office
    • Outlook
  • Virtualization
    • VMWare
    • Hyper-V
    • KVM
  • PowerShell
  • Exchange
  • Cloud
    • Azure
    • Microsoft 365
    • Office 365
  • Linux
    • CentOS
    • RHEL
    • Ubuntu
  • Home
  • About

Windows OS Hub

  • Windows Server
    • Windows Server 2022
    • Windows Server 2019
    • Windows Server 2016
    • Windows Server 2012 R2
    • Windows Server 2008 R2
    • SCCM
  • Active Directory
    • Active Directory Domain Services (AD DS)
    • Group Policies
  • Windows Clients
    • Windows 11
    • Windows 10
    • Windows 8
    • Windows 7
    • Windows XP
    • MS Office
    • Outlook
  • Virtualization
    • VMWare
    • Hyper-V
    • KVM
  • PowerShell
  • Exchange
  • Cloud
    • Azure
    • Microsoft 365
    • Office 365
  • Linux
    • CentOS
    • RHEL
    • Ubuntu

 Windows OS Hub / Windows 10 / Automatically Add Static Routes After Connecting to VPN

September 20, 2022 PowerShellWindows 10Windows Server 2019

Automatically Add Static Routes After Connecting to VPN

In the latest Windows 10 builds, you can automatically add static routes when establishing a VPN connection. When the VPN connection is terminated, the route is automatically removed from the Windows routing table. To add an IPv4 or IPv6 route for a VPN connection, the Add-VpnConnectionRoute PowerShell cmdlet is used.

Of course, you can manually add routes for your VPN connections via the command prompt, but they will be cleared after disconnecting from the VPN. So the next time you connect to VPN, you will have to manually add routes again.

Suppose, you want only traffic of two subnets (192.168.11.0/24 and 10.1.0.0/16) to be routed through your VPN connection, and other traffic to go through your provider (ISP).

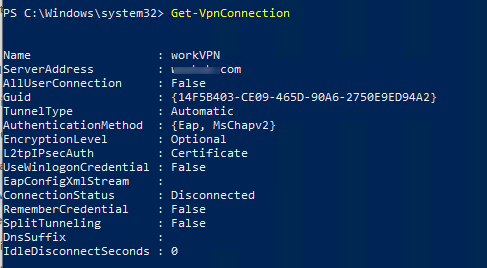
Open the PowerShell console and display the list of configured VPN connections in Windows:

Get-VpnConnection

powershell: Get-VpnConnection list on windows 10

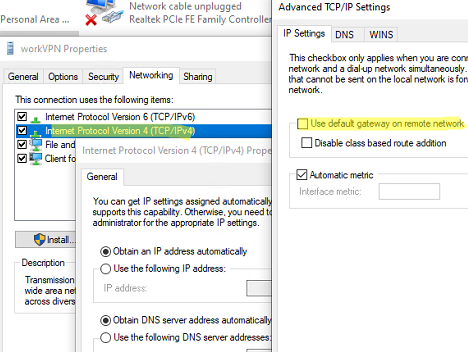
First of all, uncheck the Use default gateway in the remote network option. You can do it in the VPN connection properties in the Control Panel or using the PowerShell command Set-VpnConnection:

Set-VpnConnection –Name workVPN -SplitTunneling $True

Learn more about SplitTunneling in the article No Internet Connection After Connecting to VPN.

uncheck the option "Use default gateway in remote network" in the vpn connection ipv4 properties

Let’s add two static routes for our VPN connection:

Add-VpnConnectionRoute -ConnectionName workVPN -DestinationPrefix 192.168.11.0/24 –PassThru
Add-VpnConnectionRoute -ConnectionName workVPN -DestinationPrefix 10.1.0.0/16 –PassThru

In the DestinationPrefix option, specify a subnet or a host IP address you want to route traffic to through the VPN. To add a single host by IP address, use the following format: 10.1.1.26/32.

Add-VpnConnectionRoute -Adding route automatically after a successful VPN connection established

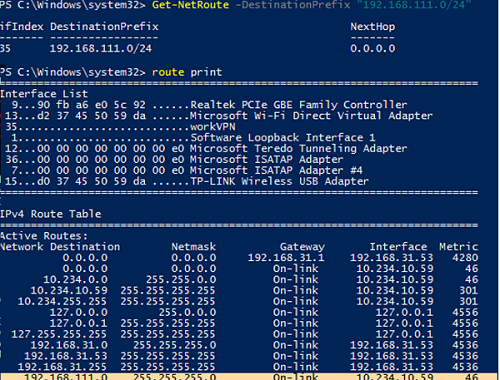
DestinationPrefix : 192.168.11.0/24
InterfaceIndex :
InterfaceAlias : workVPN
AddressFamily : IPv4
NextHop : 0.0.0.0
Publish : 0
RouteMetric : 1

If your VPN connection is active, you will need to reconnect so that new routes are added to the routing table.

show VPN connection custom route

New routes are bound to the VPN connection and are added only when the connection is established. When you disconnect from the VPN server, the routes are automatically removed.

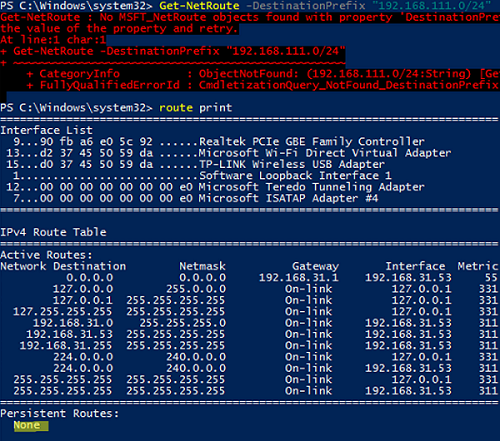
Disconnect from the VPN and check the routing table. The route to your remote network has been removed automatically, and Get-NetRoute returns that the route was not found:

Get-NetRoute : No MSFT_NetRoute objects found with property 'DestinationPrefix' equal to '192.168.11.0/24'. Verify the value of the property and retry. CmdletizationQuery_NotFound_DestinationPrefix,Get-NetRoute

vpn route is automatically deleted after disconnect

To completely remove a static route for a VPN connection, use the command:
Remove-VpnConnectionRoute -ConnectionName workVPN -DestinationPrefix 192.168.111.0/24 -PassThru

If you want to change the order of DNS name resolution with an active VPN connection, read this article.

In previous Windows versions (Windows 7/ Windows Server 2008R2), to dynamically add routes after establishing a VPN connection, you had to use the CMAK and various scripts with add route commands.

For example, you can create a batch file vpn_route.netsh to add some static routes.

interface ipv4
add route prefix=192.168.11.24 interface="workVPN" store=active
add route prefix=10.1.0.0/16 interface="workVPN" store=active
exit

You can run this file using the Task Scheduler that triggers after the VPN connection is established (the RasMan 20225 event in the Event Viewer).

schtasks /create /F /TN "Add VPN routes" /TR "netsh -f C:\PS\vpn_route.netsh" /SC ONEVENT /EC Application /RL HIGHEST /MO "*[System[(Level=4 or Level=0) and (EventID=20225)]] and *[EventData[Data='My VPN']]"

0 comment
3
Facebook Twitter Google + Pinterest
previous post
How to Connect to Azure AD Using PowerShell?
next post
How to Backup (Export) and Restore Device Drivers on Windows 10?

Related Reading

How to Connect VPN Before Windows Logon

November 14, 2023

Using WPAD (Web Proxy Auto-Discovery Protocol) on Windows

November 7, 2023

Send Emails with Microsoft Graph API and PowerShell

November 6, 2023

Zabbix: How to Get Data from PowerShell Scripts

October 27, 2023

Tracking Printer Usage with Windows Event Viewer Logs

October 19, 2023

Leave a Comment Cancel Reply

Categories

  • Active Directory
  • Group Policies
  • Exchange Server
  • Microsoft 365
  • Azure
  • Windows 11
  • Windows 10
  • Windows Server 2022
  • Windows Server 2019
  • Windows Server 2016
  • PowerShell
  • VMWare
  • Hyper-V
  • Linux
  • MS Office

Recent Posts

  • How to Connect VPN Before Windows Logon

    November 14, 2023
  • Removing Azure Arc Setup Feature on Windows Server 2022

    November 9, 2023
  • Using WPAD (Web Proxy Auto-Discovery Protocol) on Windows

    November 7, 2023
  • Send Emails with Microsoft Graph API and PowerShell

    November 6, 2023
  • Zabbix: How to Get Data from PowerShell Scripts

    October 27, 2023
  • Tracking Printer Usage with Windows Event Viewer Logs

    October 19, 2023
  • PowerShell: Configure Certificate-Based Authentication for Exchange Online (Azure)

    October 15, 2023
  • Reset Root Password in VMware ESXi

    October 12, 2023
  • How to Query and Change Teams User Presence Status with PowerShell

    October 8, 2023
  • How to Increase Size of Disk Partition in Ubuntu

    October 5, 2023

Follow us

  • Facebook
  • Twitter
  • Telegram
Popular Posts
  • Configuring Port Forwarding in Windows
  • Manage Windows Updates with PSWindowsUpdate PowerShell Module
  • Start Menu or Taskbar Search Not Working in Windows 10/11
  • Get-ADUser: Find Active Directory User Info with PowerShell
  • Adding Drivers into VMWare ESXi Installation Image
  • How to Hide Installed Programs in Windows 10 and 11
  • Configuring SFTP (SSH FTP) Server on Windows
Footer Logo

@2014 - 2023 - Windows OS Hub. All about operating systems for sysadmins


Back To Top