Windows File Recovery (winfr.exe) is a new free Microsoft tool to recover deleted files on different types of media. The tool is available since Windows 10 2004 (May 2020 Update) and works only in the console mode of the command prompt. You can install WINFR on Windows 10 from the Microsoft Store. The tool allows you to scan a file system and find deleted files. Several scan modes are supported (MFT tables, known file type signatures or segment mode). Windows File Recovery supports NTFS, ReFS, FAT, exFAT and can recover deleted files from locally connected devices: USB flash drives, HDDs, SSDs (you have to note some aspects when you try to recover deleted files from a Trim-enabled SSD).
In this article we’ll show you how to use Windows File Recovery in Windows 10 to restore accidentally (or deliberately) deleted files.
Open Microsoft Store (or go to https://www.microsoft.com/en-us/p/windows-file-recovery/9n26s50ln705?rtc=1) and install the Windows File Recovery (you can find it in Utilities & tools -> File managers).
Open the command prompt or the PowerShell console and run this command:
winfr
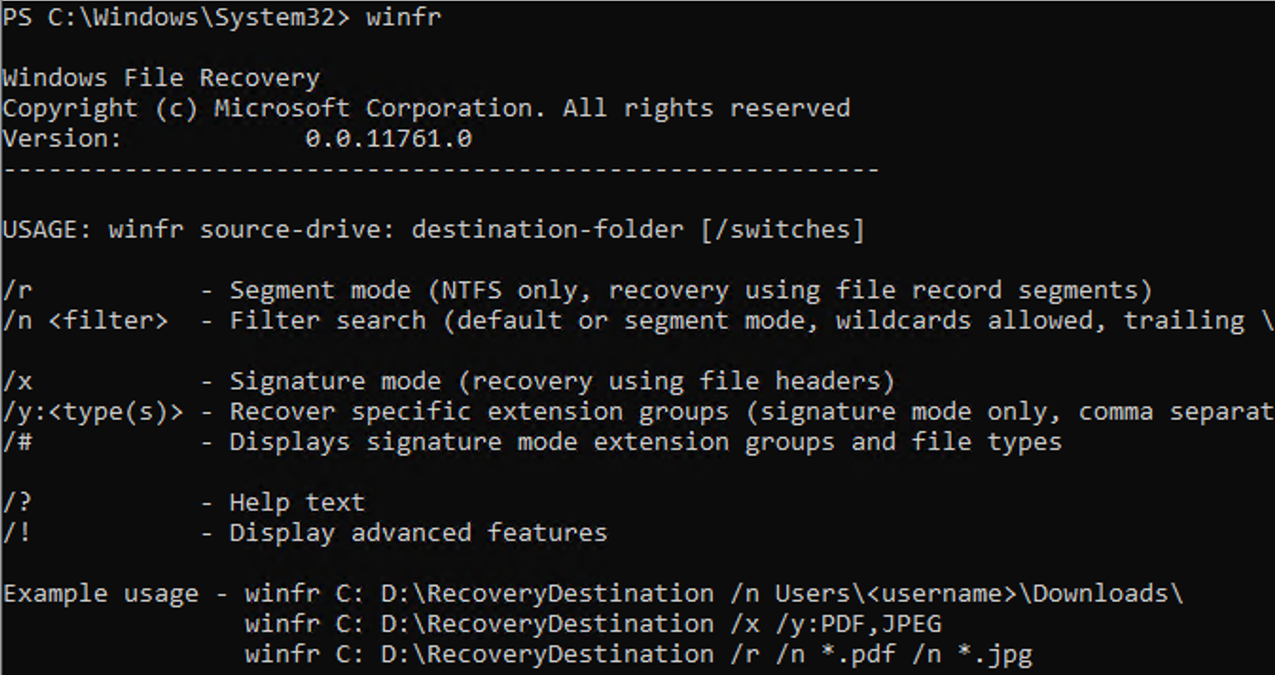
The main Windows File Recovery options are available in the console.
Here is the typical syntax:
winfr source-drive: destination-drive: [/switches]
Let’s try to learn how to use Windows File Recovery on Windows 10 based on some examples.
winfr.exe can work in 3 modes:
- Standard mode uses an MFT table to search deleted files. It is effective if file record segments (FRS) still exist on a disk;
- Segment mode is used to search different NTFS segments on a disk instead of searching the MFT table. Segments are different file attributes on a disk, like name, size, type, date, etc;
- Signature mode – the tool searches the disk for signatures of different file types (winfr has several built-in signatures for popular file types). This mode is not suitable to find small files. It is the only mode supporting drives with file systems other than NTFS.
Let’s try to recover a recently deleted file on Windows 10 using the Windows File Recovery.
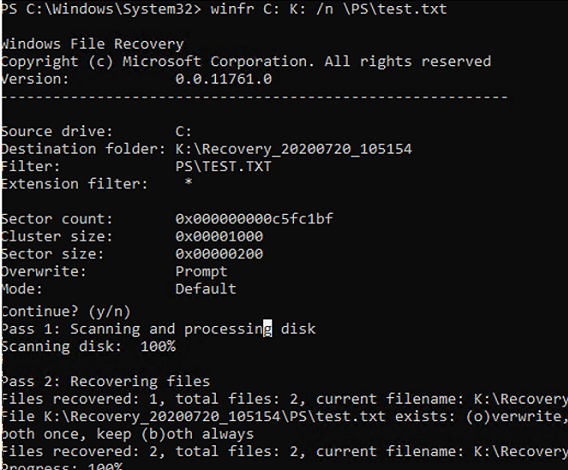
Suppose, you know an exact name of the deleted file and the directory it was located in. The following command will search deleted files on drive C: using the \PS\test.txt filter and recover the files it finds to a separate drive K: (I removed the file permanently using shift+delete). This command is run in the standard winfr mode, wildcards (*) are allowed (the file path is specified without the disk name, it is supposed you have already specified the source-drive):
winfr C: K: /n \PS\test.txt
The tool scans the disk (Pass 1: Scanning and processing disk) and recovers the files it finds to the specified directory (Pass 2: Recovering files).
In this example, 2 deleted files with the same name appeared in the specified directory. The tool asked what to do with the files it had found:
File K:\Recovery_20210316_105053\PS\test.txt exists: (o)verwrite, (s)kip, (a)lways overwrite, (n)ever overwrite, (k)eep both once, keep (b)oth always
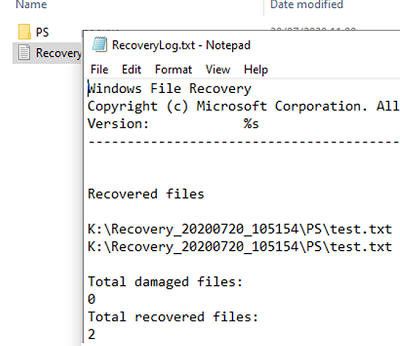
After you have made your choice, press Y. A directory with the recovery log and restored files will open automatically.
If you know only the name of the folder in which the deleted files are stored, use this command:
winfr C: K: /n \PS\
\) at the end of the folder name.After scanning for the removed files, all found elements will be recovered to a target folder. The tool will automatically order the files by their names and types.
The commands shown above are effective if a file has been deleted recently. If the file was a long time ago, or the source drive was formatted, it is recommended to use a segment mode with /r option (for NTFS drives only).
For example, you want to deeply scan a directory to find files with the specific extensions (Excel files: xls and xlsx). Use this command:
winfr C: P: /r /n \Sales\*.xls /n \Sales\*.xlsx
You can specify a part of a file name:
winfr C: P: /r /n *annual*
A signature mode is used to find deleted files on a disk with a file system other than NTFS. Typically, it is used to search removed files on USB flash drives, SD cards of phones or cameras. The /x option is used to perform a signature scan.
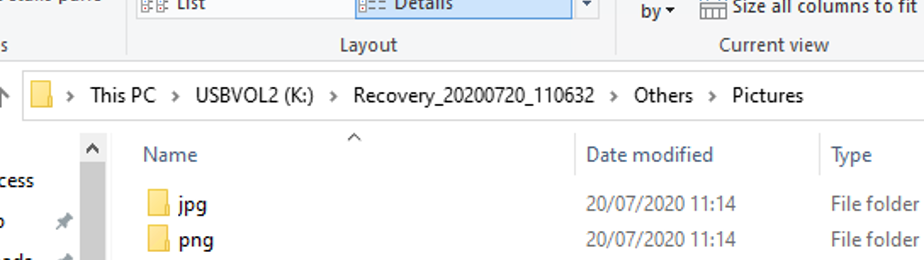
For example, you want to find deleted files on an SD card by JPEG or PNG signatures.
winfr E: K: /x /y:JPG,PNG /n \DCIM\
The table below shows the list of signatures available in Windows File Recovery and file types that belong to each signature.
| Signature Name | File Types |
| ASF | wma, wmv, asf |
| JPEG | jpg, jpeg, jpe, jif, jfif, jfi |
| MP3 | mp3 |
| MPEG | mpeg, mp4, mpg, m4a, m4v, m4b, m4r, mov, 3gp, qt |
| PNG | png |
| ZIP | zip, docx, xlsx, pptx, odt, ods, odp, odg, odi, odf, odc, odm, ott, otg, otp, ots, otc, oti, otf, oth |
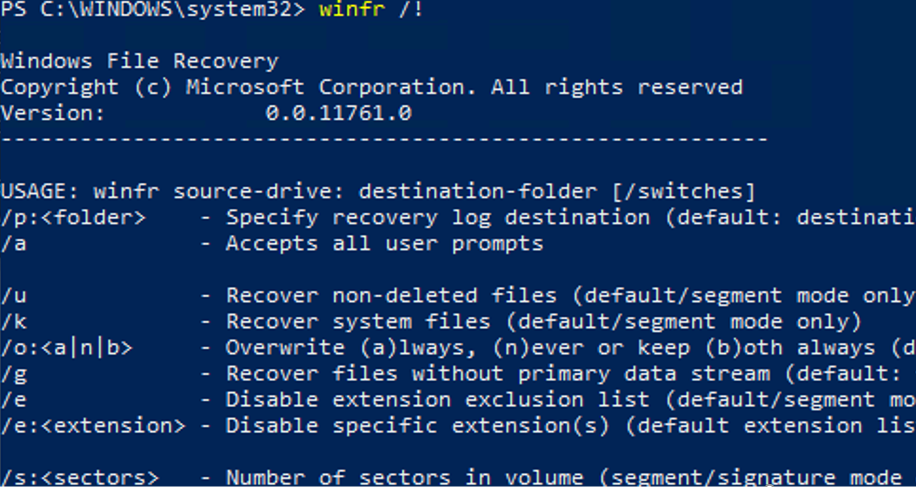
You can get some help on the advanced Windows File Recovery options as follows:
/p:<folder> - Specify recovery log destination (default: destination folder)
/a - Accepts all user prompts
/u - Recover non-deleted files (default/segment mode only)
/k - Recover system files (default/segment mode only)
/o:<a|n|b> - Overwrite (a)lways, (n)ever or keep (b)oth always (default/segment mode only)
/g - Recover files without primary data stream (default: false, default/segment mode only)
/e - Disable extension exclusion list (default/segment mode only)
/e:<extension> - Disable specific extension(s) (default extension list no longer applies) (default/segment mode only)
/s:<sectors> - Number of sectors in volume (segment/signature mode only)
/b:<bytes> - Number of bytes in cluster (segment/signature mode only)
/f:<sector> - First sector to scan (segment/signature mode only)
The built-in Windows File Recovery is quite a simple and effective tool to find and recover deleted files in Windows 10. If you have accidentally deleted an important file, now you don’t need to look for and install a third-party software (commercial as a rule) to scan your drive. Just install the tool winfr.exe from Windows Store or add it into your deployment Windows 10 image.
2 comments
Great article! Thanks
Perfect! thank you so much!