Windows OS Hub
  • Windows Server
    • Windows Server 2022
    • Windows Server 2019
    • Windows Server 2016
    • Windows Server 2012 R2
    • Windows Server 2008 R2
    • SCCM
  • Active Directory
    • Active Directory Domain Services (AD DS)
    • Group Policies
  • Windows Clients
    • Windows 11
    • Windows 10
    • Windows 8
    • Windows 7
    • Windows XP
    • MS Office
    • Outlook
  • Virtualization
    • VMWare
    • Hyper-V
    • KVM
  • PowerShell
  • Exchange
  • Cloud
    • Azure
    • Microsoft 365
    • Office 365
  • Linux
    • CentOS
    • RHEL
    • Ubuntu
  • Home
  • About

Windows OS Hub

  • Windows Server
    • Windows Server 2022
    • Windows Server 2019
    • Windows Server 2016
    • Windows Server 2012 R2
    • Windows Server 2008 R2
    • SCCM
  • Active Directory
    • Active Directory Domain Services (AD DS)
    • Group Policies
  • Windows Clients
    • Windows 11
    • Windows 10
    • Windows 8
    • Windows 7
    • Windows XP
    • MS Office
    • Outlook
  • Virtualization
    • VMWare
    • Hyper-V
    • KVM
  • PowerShell
  • Exchange
  • Cloud
    • Azure
    • Microsoft 365
    • Office 365
  • Linux
    • CentOS
    • RHEL
    • Ubuntu

 Windows OS Hub / Windows Server 2016 / Replacing a Failed Physical Disk in Storage Spaces Direct on Windows Server 2016

August 6, 2018 Windows Server 2016

Replacing a Failed Physical Disk in Storage Spaces Direct on Windows Server 2016

In the last article we told about a new technology of the distributed storage that appeared in Windows Server 2016 – Storage Spaces Direct (S2D). S2D allows to create a network failover distributed virtual data storage on the local disks of cluster servers (see the article). In this article, we’ll show you how to detect and replace a failed physical disk in an S2D cluster.

I remind you that in S2D you can create a Mirror type storage (similar to RAID 1): in a 2-disk configuration (not recommended), this storage can survive a failure of any disk, and if there are 3 or more disks in a pool, 2 disks may fail without any consequences. The second type of the array is Parity (similar to RAID 5). In the configuration consisting of three disks, an array can lose one disk without any consequences, if there are seven disks, 2 of them may fail at a time.

You can check the status of the storage subsystem of an S2D cluster using this command:

Get-StorageSubSystem *Cluster* | Get-StorageJob

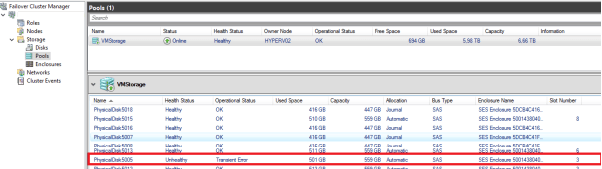
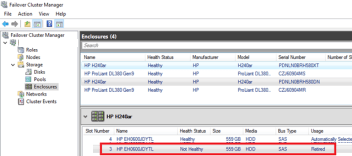
You can find a fault with one of the disks in a storage pool using the GUI in the Failover Cluster Manager (Storage ->Storage Pool). As you can see, one of the physical disks in the pool is in the Unhealthy state.

s2d unhealthy failed drive on windows server 2016

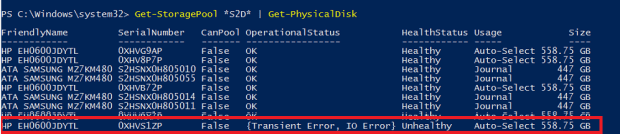
You can get the information about the status of the disks in a pool using PowerShell:

Get-StoragePool *S2D* | Get-PhysicalDisk

StoragePool get failed drive

Save the object of the problem disk into a variable, for example, like this:

$Disk = Get-PhysicalDisk |? OperationalStatus -Notlike ok

Get-PhysicalDisk Notlike ok

Prevent further write attempts to this disk:

Set-PhysicalDisk -InputObject $Disk -Usage Retired

deny write to failed disk in Storage Spaces Direct (S2D) cluster

Try to remove the failed disk from the storage pool:

Get-StoragePool *S2D* | Remove-PhysicalDisk –PhysicalDisk $Disk

Soon a warning will appear that this device doesn’t respond.

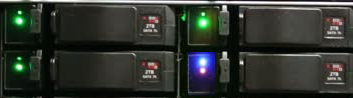
To make it easier to identify a disk in a server rack, enable LED light of a disk:

Get-PhysicalDisk |? OperationalStatus -Notlike OK | Enable-PhysicalDiskIdentification

Note. Disk identification using LED light appeared in Windows Server 2016, but the support of SCSI Enclosure Storage (SES) is required on the side of a physical server.

Now go to the server room and find a problem disk using the backlight enabled earlier.

LED disk identifying with SES support

Replace a failed disk with a new one.

You can now turn off the backlight:

Get-PhysicalDisk |? OperationalStatus -like OK | Disable-PhysicalDiskIdentification

Make sure that the OS has detected the new disk:

$Disk = Get-PhysicalDisk | ? CanPool –eq True

detect a new disk in cluster

Note. In case of some low-end servers, you have to restart the server to identify the disk correctly.

Add the new disk to a pool:

Get-StoragePool *S2D* | Add-PhysicalDisk –PhysicalDisks $Disk –Verbose

add new disk to the storagepool

This is all, S2D will automatically start the data redistribution between the disks in a cluster (in Windows Server 2012 Storage Spaces, you had to run the command Repair-VirtualDisk manually). The synchronization time depends on the disk capacity and the pool load (it took about 30 minutes in my test stand). After that you can check the pool status again.

1 comment
1
Facebook Twitter Google + Pinterest
previous post
Fixing High CPU Usage and Memory Leak Issue by Svchost.exe (wuauserv)
next post
Windows XP Can’t RDP to Windows 10 / Server 2012R2/2016 RDS

Related Reading

Redirect HTTP to HTTPS in IIS (Windows Server)

September 7, 2023

Add an Additional Domain Controller to an Existing...

September 6, 2023

How to Install an SSL Certificate on IIS...

September 5, 2023

Fix: Remote Desktop Licensing Mode is not Configured

August 24, 2023

Extending a Disk Volume (Partition) in Windows

August 10, 2023

1 comment

Nick S N April 11, 2021 - 5:01 pm

I have a 2 node s2d cluster with 2 NVME cache disks and 28 3TB SAS HDDs per node. I have added 4 2.4TB NVME SSDs to each node that I would like to add as a performance tier. I have set the nodes not to automaticlly add new disks to prevent these from being added as cache drives. How can I add these drives as part of the performance tier and not as cache disks? Thanks

Reply

Leave a Comment Cancel Reply

Categories

  • Active Directory
  • Group Policies
  • Exchange Server
  • Microsoft 365
  • Azure
  • Windows 11
  • Windows 10
  • Windows Server 2022
  • Windows Server 2019
  • Windows Server 2016
  • PowerShell
  • VMWare
  • Hyper-V
  • Linux
  • MS Office

Recent Posts

  • How to Connect VPN Before Windows Logon

    November 14, 2023
  • Removing Azure Arc Setup Feature on Windows Server 2022

    November 9, 2023
  • Using WPAD (Web Proxy Auto-Discovery Protocol) on Windows

    November 7, 2023
  • Send Emails with Microsoft Graph API and PowerShell

    November 6, 2023
  • Zabbix: How to Get Data from PowerShell Scripts

    October 27, 2023
  • Tracking Printer Usage with Windows Event Viewer Logs

    October 19, 2023
  • PowerShell: Configure Certificate-Based Authentication for Exchange Online (Azure)

    October 15, 2023
  • Reset Root Password in VMware ESXi

    October 12, 2023
  • How to Query and Change Teams User Presence Status with PowerShell

    October 8, 2023
  • How to Increase Size of Disk Partition in Ubuntu

    October 5, 2023

Follow us

  • Facebook
  • Twitter
  • Telegram
Popular Posts
  • Managing Printers and Drivers with PowerShell in Windows 10 / Server 2016
  • Windows Server Licensing for Virtual Environments
  • Installing a Free Let’s Encrypt TLS/SSL Certificate on IIS Web Server / RDS
  • “Downloading updates 0%” Issue on Windows Server 2016 and Windows 10
  • Restricting Group Policy with WMI Filtering
  • The Disk is Offline Because of Policy Set by an Administrator
  • RDP Authentication Error: CredSSP Encryption Oracle Remediation
Footer Logo

@2014 - 2023 - Windows OS Hub. All about operating systems for sysadmins


Back To Top