In this article we’ll show you how to restrict network data transfer rate to/from Windows Server 2016 and Windows 10 using built-in and third-party tools. You may know that Windows apps use the most of the available network interface bandwidth by default. It may result in some issues if a task (mostly SMB shared network folders) use all available bandwidth of a network adapter. You can restrict the maximum file copy rate from a network shared folder, thus providing users of other apps with guaranteed network adapter resources.
Configuring QoS Group Policy on Windows
You can manage traffic priority in Windows using QoS GPO settings. In this scenario, I will restrict the data transfer rate for all outbound connections. (The policy will be applied even when users copy files from your server.) Using this example, you can restrict the rate for any app, port or host/site.
QoS Group Policies are supported in:
- Windows Server 2008 or higher
- Windows Vista or higher
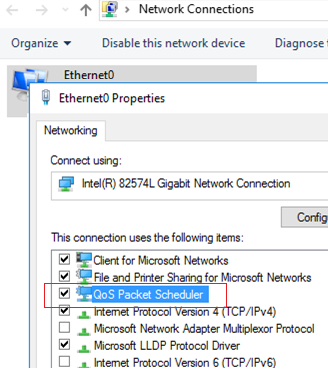
First of all, check your network adapter settings to make sure that the Qos Packet Scheduler option is enabled.
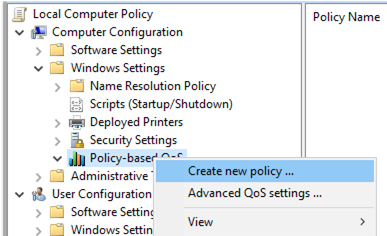
- Run the Local Group Policy Editor console (
gpedit.msc), go to Computer Configuration -> Windows Settings -> Policy-based QoS and click Create new policy;
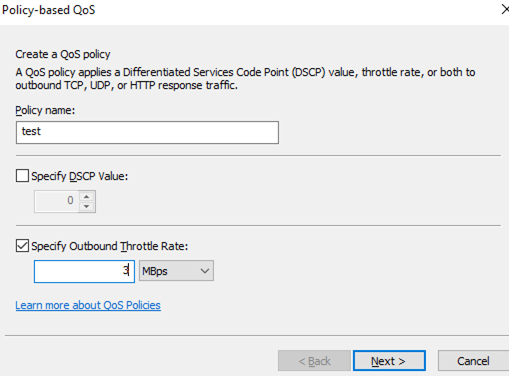
- Specify the policy name, check the option Specify Outbound Throttle Rate and set the Throttle Rate. It is the rate in MBps/KBps you want to restrict the rate of outbound traffic to;Note. You can also set the DSCP value. DSCP (Differenciated Services Code Point) may be used on advanced routers like Cisco/Mikrotik. Depending on the DSCP value of a network packet, the routers will set the priority for it. Don’t use this option if you are unsure of the DSCP QoS settings on your routers.
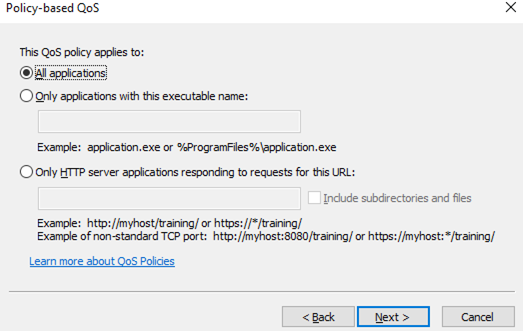
- Then you may select a process/app (an executable file .exe) or an IIS http(s) site the policy will be applied to. I left All applications option checked;
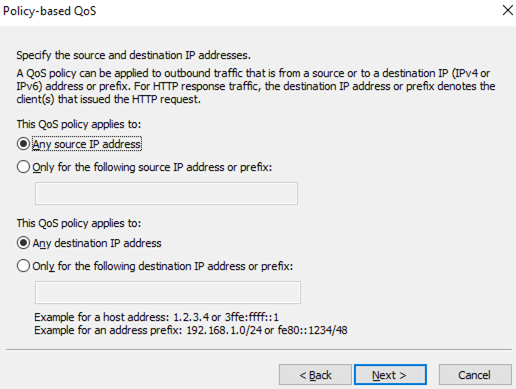
- You can specify the IP interface on your computer the policy will be applied to. You may need it if you have multiple network adapters or IP aliases;
- You can also set the destination IP address to restrict the transfer rate for it;
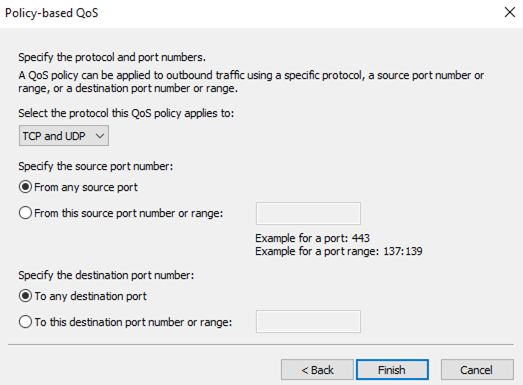
- Then specify a protocol the policy will be applied to (TCP, UDP, or TCP and UDP). You can also select a source and a target port. If you are not sure what protocol your app is using, select TCP and UDP. If you want to restrict the access rate to shared files in the SMB folder, select TCP and Port 445.
QoS policy in Windows is configured. You don’t need to reboot your computer, the data transfer rate in the network will be shaped right after you apply the changes. Note that the Throttle Rate is displayed in kilobytes in the policy editor, even if you have selected MB as its value.

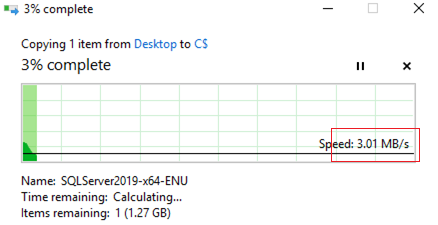
Since I have selected all apps and all ports, the policy throttles the maximum network file transfer rate to 3 MB (including file copy using File Explorer — explorer.exe). In the screenshot below, you can see that the configured QoS policy slow the network file transfer rate on Windows.
Also, there are Advanced QoS policies available only in the Computer Configuration Group Policy section. You can restrict the inbound TCP traffic in the Inbound TCP Traffic tab (the DSCP Marking Override tab refers to DSCP settings, we won’t discuss it here).
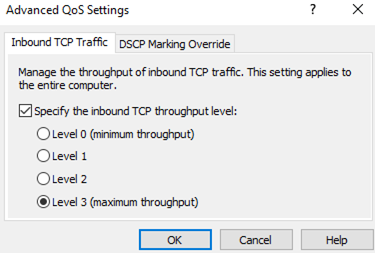
As you can see, there are 4 levels of traffic restriction. The following table shows the levels and their rates.
| Inbound TCP throughput level | Maximum Transfer Rate |
| 0 | 64 KB |
| 1 | 256 KB |
| 2 | 1 MB |
| 3 | 16 MB |
Managing Windows Network QoS Policies via PowerShell
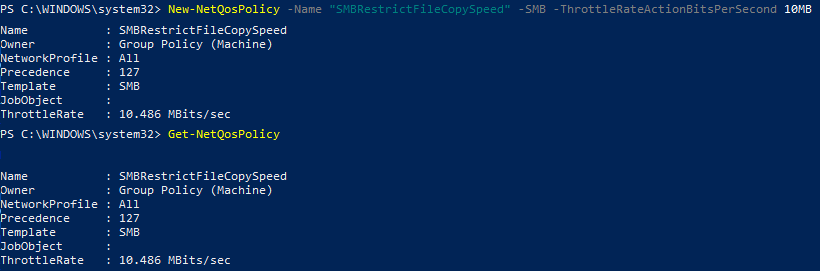
You can use PowerShell to create and manage network QoS policies. For example, to create a QoS policy that restrict the bandwidth for SMB (shared file) traffic, use the following command:
New-NetQosPolicy -Name "SMBRestrictFileCopySpeed" -SMB -ThrottleRateActionBitsPerSecond 10MB
Name : SMBRestrictFileCopySpeed
Owner : Group Policy (Machine)
NetworkProfile : All
Precedence : 127
Template : SMB
JobObject :
ThrottleRate : 10.486 MBits/sec
To display a list of applied QoS policies on a computer, run this command:
Get-NetQosPolicy
To edit or remove a QoS policy, Set-NetQosPolicy and Remove-NetQosPolicy cmdlets are used.
Remove-NetQosPolicy -Name SMBRestrictFileCopySpeed
Set-SmbBandwidthLimit: Configure SMB Bandwidth Limit with PowerShell
The Set-SmbBandwidthLimit cmdlet allows to restrict the file transfer rate over the SMB protocol. First of all, install the Windows Server component SMB Bandwidth Limit using PowerShell:
Add-WindowsFeature -Name FS-SMBBW
Or you can install it from the graphical Server Manager (Add Windows Feature -> SMB Bandwidth Limit).
Usually this module is used to configure bandwidth limit for Hyper-V Live Migration. For example, the following command will restrict the maximum virtual machine migration speed to 100 MB/s.
Set-SmbBandwidthLimit -Category LiveMigration -BytesPerSecond 100MB

You can also use the -Category Default parameter to restrict common file transfer traffic over SMB.
Set-SmbBandwidthLimit -Category Default -BytesPerSecond 10MB
Throttling File Transfer Bandwidth in Robocopy
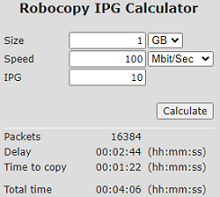
When working with robocopy, you can also use a special parameter to limit the speed of copying/moving files over the network. It is /ipg (Inter packet Gap). The key sets a gap between packages in milliseconds and is used to reduce the network load when copying files over low-speed channels. Robocopy transmits data over a network in 64 KB blocks. Thus if you know the bandwidth of your network link, you can count the relevant /ipg value based on the transfer rate requirements.
If you don’t want to go deep into formulas, you can use a ready Robocopy IPG Calclator: http://www.zeda.nl/index.php/en/robocopyipgcalculator-en-2
Traffic Shaping Using Third-Party Tools
The most popular commercial solution to limit throughput in Windows depending on a port, app or destination is NetLimiter. The most popular free tool is TMeter Free.
It is also worth to mention:
- Glasswire – also includes a firewall and a network monitor;
- NetBalancer – network monitoring and setting traffic rules;
- cFosSpeed – can configure traffic priorities for apps;
- Net Peeker – like Glasswire, it has firewall features and may set traffic priorities.
Windows QoS policies can limit the data transfer rate in the network well, so if you want to do it, try QoS first of all. Like any other policy, you can configure them on the domain level with the gpmc.msc console.
Third-party software has more features and a graphical interface, but these apps are mostly commercial.
2 comments
I use an alternative to Robocopy called Gs Richcopy 360, it has an option to throttle the connection while transferring to the clouds, it is really a very helpful tool
Thanks for this article and to LINO, I was searching for a solution to control the speed while syncing to Azure blob and Gs Richcopy 360 really did the job, keep going