Windows OS Hub
  • Windows Server
    • Windows Server 2022
    • Windows Server 2019
    • Windows Server 2016
    • Windows Server 2012 R2
    • Windows Server 2008 R2
    • SCCM
  • Active Directory
    • Active Directory Domain Services (AD DS)
    • Group Policies
  • Windows Clients
    • Windows 11
    • Windows 10
    • Windows 8
    • Windows 7
    • Windows XP
    • MS Office
    • Outlook
  • Virtualization
    • VMWare
    • Hyper-V
    • KVM
  • PowerShell
  • Exchange
  • Cloud
    • Azure
    • Microsoft 365
    • Office 365
  • Linux
    • CentOS
    • RHEL
    • Ubuntu
  • Home
  • About

Windows OS Hub

  • Windows Server
    • Windows Server 2022
    • Windows Server 2019
    • Windows Server 2016
    • Windows Server 2012 R2
    • Windows Server 2008 R2
    • SCCM
  • Active Directory
    • Active Directory Domain Services (AD DS)
    • Group Policies
  • Windows Clients
    • Windows 11
    • Windows 10
    • Windows 8
    • Windows 7
    • Windows XP
    • MS Office
    • Outlook
  • Virtualization
    • VMWare
    • Hyper-V
    • KVM
  • PowerShell
  • Exchange
  • Cloud
    • Azure
    • Microsoft 365
    • Office 365
  • Linux
    • CentOS
    • RHEL
    • Ubuntu

 Windows OS Hub / Windows 10 / How to Deploy Windows 10 (11) with PXE Network Boot

June 8, 2023 Windows 10Windows 11

How to Deploy Windows 10 (11) with PXE Network Boot

In this article, we will look at how to deploy Windows 10 or 11 over the network without using local installation media (USB flash drive, DVD, ISO image) and without USB ports. We will use a small portable Tiny PXE Server to boot a computer over the network via PXE. This guide will help you to deploy Windows on devices both with UEFI and BIOS firmware.

Contents:
  • Creating a Windows PE Boot Image Using ADK
  • How to Configure a TinyPXE Network Installation Server?
  • Using PXE Server to Install Windows 10 or 11 Over the Network

We will need:

  • An installation Windows 10 or 11 ISO image (it is easier to create it using Windows Media Creation Tool according to the post: https://woshub.com/how-to-create-uefi-bootable-usb-drive-to-install-windows-7/);
  • A Windows PE image — you can use your own WinPE image, extract it from an MS DART recovery image, get an original WinPE using Windows Assessment and Deployment Kit (Windows ADK), or use a pre-built image like Hiren’s BootCD PE;
  • A Tiny PXE Server (http://reboot.pro/files/file/303-tiny-pxe-server/).
In corporate networks, Windows Deployment Services (WDS) or Microsoft Deployment Toolkit (MDT) with more features are used to deploy Windows images to user computers over a network. In this article, we’ll show how to quickly start a PXE server on any computer (no matter if it is running Windows or Linux) and use it to deploy Windows OS on the computers in the same LAN using simple tools.

Creating a Windows PE Boot Image Using ADK

Download Windows ADK for Windows 11 and Windows PE add-on for the Windows ADK following the links at https://docs.microsoft.com/en-us/windows-hardware/get-started/adk-install.

download adk for windows 11

When installing the Windows AD, select the Deployment Tools only.

install deployment tools from windows adk

Then install the Windows PE add-on for Windows ADK in the same way.

install Windows Preinstallation Envirinment in ADK

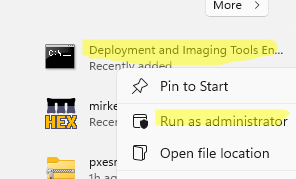
After the installation is over, run the Deployment and Imaging Tool from the Windows Start menu. Or use the command:

"C:\Program Files (x86)\Windows Kits\10\Assessment and Deployment Kit\Deployment Tools\DandISetEnv.bat"

run Deployment and Imaging Tool command prompt

Then copy files for WinPE to your target folder:

copype amd64 C:\tools\winpe

In this case, I’m creating environment files for WinPE x64. You can use other options depending on your architecture: x86, arm, or arm64.

copy winpe environment files

Then generate a bootable WinPE ISO image:

MakeWinPEMedia /ISO C:\tools\winpe c:\tools\WinPE.iso

generate WimPE image with ADK -> MakeWinPEMedia

In some cases you may need to add additional drivers to boot.wim image as described here: Add Drivers to Windows Install Image.

How to Configure a TinyPXE Network Installation Server?

Then configure your PXE server:

  1. Extract pxesrv.zip to C:\tools\pxesrv;
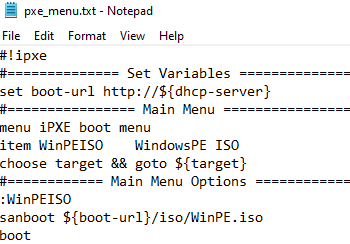
  2. Go to C:\tools\pxesrv and create a text file pxe_menu.txt with the following contents:
    #!ipxe
    set boot-url http://${dhcp-server}
    #================ Main Menu =================
    menu iPXE boot menu
    item WinPEISO WindowsPE ISO
    choose target && goto ${target}
    #============ Main Menu Options =============
    :WinPEISO
    sanboot ${boot-url}/iso/WinPE.iso
    boot

    pxe server config file fow WinPE

  3. Copy the WinPE.iso file you got earlier to C:\tools\pxesrv\files\iso;
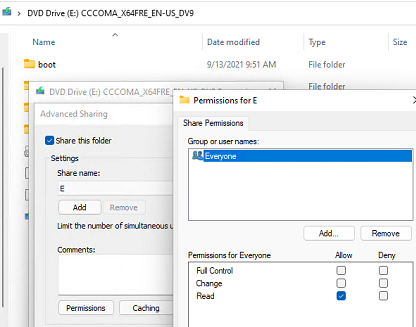
  4. Mount the Windows install ISO image to your virtual drive Windows and share it on the network (if you want, you may allow anonymous access to it, but it is optional);
    share windows install image over a network
  5. Run pxesrv.exe as administrator;
  6. Enable the HTTPd option;
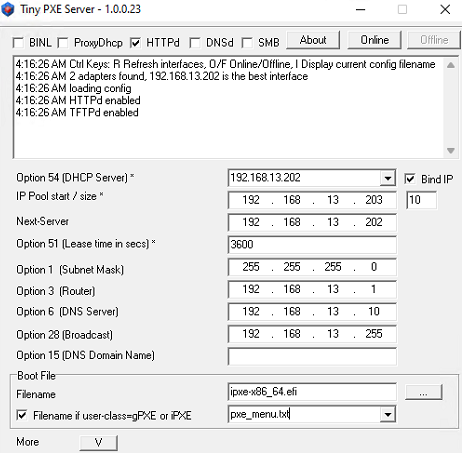
  7. If you want your computer to assign IP addresses on the local network via DHCP (Tiny PXE can do this), disable the ProxyDHCP option. Make sure that the IP address of your computer is specified in the Option 54 DHCP Server and Next-Server fields. The IP Pool start field shows the beginning of the DHCP range, so make sure that the range is not busy in your network;
  8. In the Boot File section, specify ipxe.pxe (for BIOS devices) or ipxe-x86_64.efi (for UEFI devices);
  9. In the Filename if user-class=gPXE or IPXE field, enter the name of the menu file you created earlier: pxe_menu.txt;
  10. Start your PXE server by clicking Online.
    configure and start tinypxe server on windows 10

So, your PXE server is up and running. If a firewall is enabled in Windows, disable it or allow inbound traffic for pxesrv.exe over DHCP, PXE, HTTP, TFTPS, and SMB protocols.

Using PXE Server to Install Windows 10 or 11 Over the Network

Then you must boot the computer on which you want to install Windows from a PXE server. The computer must be in the same local network (VLAN) as the PXE server host.

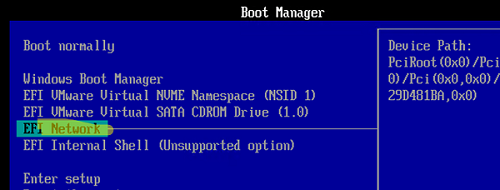
Select PXE as a primary boot device in BIOS/UEFI settings of the computer.

boot computer over a network with pxe boot in bios/uefi

After running PXE, the computer will find the DHCP server in the network, get an IP address and available options in the iPXE menu.

Run Windows PE from PXE boot

The computer will boot over the network in the WinPE environment.

When I tested booting from a PXE server on a VMWare virtual machine with UEFI, an error appeared:

Could not describe SAN devices: Operation not supported
Could not boot image: Operation not supported https://ipxe.org/err/3c2220

As it turned out, there was a bug in the virtual machine UEFI firmware on my VMware ESXi host:

This error indicates that your UEFI firmware has a bug that prevents the installation of the iSCSI boot firmware table (iBFT). Switch to booting in “legacy” BIOS mode rather than UEFI mode.

I had to switch the VM to BIOS mode and start the PXE server with the ipxe.pxe option. Then the Windows is normally deployed over the network.

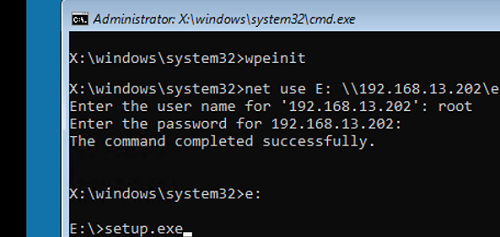
Now you need to map a shared folder with your Windows 11 ISO image using the SMB protocol.

Initialize the environment using the wpeinit command and mount the shared folder with Windows installation files:

Net use E: \\192.168.103.202\E

(192.168.103.202 is the name of the computer the installation image is located on, and E is the name of the shared folder).
Enter the user credentials that are allowed to access the Windows host with the PXE server.
wpeninit mount source windows installation folder

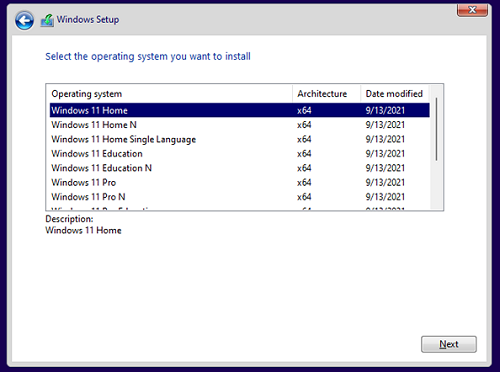
Run Windows Setup with the setup.exe command.

install windows 10/11 over a network via pxe boot

When you install Windows 11, remember that the computer must meet some hardware requirements. However, you can install Windows 11 without TPM, Secure Boot, or other checks.

1 comment
1
Facebook Twitter Google + Pinterest
previous post
Checking Windows Activation Status on Active Directory Computers
next post
How to Access VMFS Datastore from Linux, Windows, or ESXi

Related Reading

How to Connect VPN Before Windows Logon

November 14, 2023

Using WPAD (Web Proxy Auto-Discovery Protocol) on Windows

November 7, 2023

Zabbix: How to Get Data from PowerShell Scripts

October 27, 2023

Tracking Printer Usage with Windows Event Viewer Logs

October 19, 2023

How to Use Ansible to Manage Windows Machines

September 25, 2023

1 comment

Pankaj September 7, 2022 - 7:32 pm

Thanks for providing valuable information.
I have one query. above solution can work for secure boot enable.
How we sign image for Secure boot environment for windows 11.

Reply

Leave a Comment Cancel Reply

Categories

  • Active Directory
  • Group Policies
  • Exchange Server
  • Microsoft 365
  • Azure
  • Windows 11
  • Windows 10
  • Windows Server 2022
  • Windows Server 2019
  • Windows Server 2016
  • PowerShell
  • VMWare
  • Hyper-V
  • Linux
  • MS Office

Recent Posts

  • How to Connect VPN Before Windows Logon

    November 14, 2023
  • Removing Azure Arc Setup Feature on Windows Server 2022

    November 9, 2023
  • Using WPAD (Web Proxy Auto-Discovery Protocol) on Windows

    November 7, 2023
  • Send Emails with Microsoft Graph API and PowerShell

    November 6, 2023
  • Zabbix: How to Get Data from PowerShell Scripts

    October 27, 2023
  • Tracking Printer Usage with Windows Event Viewer Logs

    October 19, 2023
  • PowerShell: Configure Certificate-Based Authentication for Exchange Online (Azure)

    October 15, 2023
  • Reset Root Password in VMware ESXi

    October 12, 2023
  • How to Query and Change Teams User Presence Status with PowerShell

    October 8, 2023
  • How to Increase Size of Disk Partition in Ubuntu

    October 5, 2023

Follow us

  • Facebook
  • Twitter
  • Telegram
Popular Posts
  • How to Allow Multiple RDP Sessions on Windows 10 and 11
  • How to Repair EFI/GPT Bootloader on Windows 10 or 11
  • How to Restore Deleted EFI System Partition in Windows
  • Network Computers are not Showing Up in Windows 10/11
  • How to Run Program without Admin Privileges and Bypass UAC Prompt
  • Fix: BSOD Error 0x0000007B (INACCESSABLE_BOOT_DEVICE) on Windows
  • Fixing ‘The Network Path Was Not Found’ 0x80070035 Error Code on Windows
Footer Logo

@2014 - 2023 - Windows OS Hub. All about operating systems for sysadmins


Back To Top