Windows OS Hub
  • Windows Server
    • Windows Server 2022
    • Windows Server 2019
    • Windows Server 2016
    • Windows Server 2012 R2
    • Windows Server 2008 R2
    • SCCM
  • Active Directory
    • Active Directory Domain Services (AD DS)
    • Group Policies
  • Windows Clients
    • Windows 11
    • Windows 10
    • Windows 8
    • Windows 7
    • Windows XP
    • MS Office
    • Outlook
  • Virtualization
    • VMWare
    • Hyper-V
    • KVM
  • PowerShell
  • Exchange
  • Cloud
    • Azure
    • Microsoft 365
    • Office 365
  • Linux
    • CentOS
    • RHEL
    • Ubuntu
  • Home
  • About

Windows OS Hub

  • Windows Server
    • Windows Server 2022
    • Windows Server 2019
    • Windows Server 2016
    • Windows Server 2012 R2
    • Windows Server 2008 R2
    • SCCM
  • Active Directory
    • Active Directory Domain Services (AD DS)
    • Group Policies
  • Windows Clients
    • Windows 11
    • Windows 10
    • Windows 8
    • Windows 7
    • Windows XP
    • MS Office
    • Outlook
  • Virtualization
    • VMWare
    • Hyper-V
    • KVM
  • PowerShell
  • Exchange
  • Cloud
    • Azure
    • Microsoft 365
    • Office 365
  • Linux
    • CentOS
    • RHEL
    • Ubuntu

 Windows OS Hub / PowerShell / Running Simple HTTP Web Server Using PowerShell

April 14, 2023 PowerShellWindows 10Windows Server 2019

Running Simple HTTP Web Server Using PowerShell

For testing purposes or as a simple stub at the service deployment stage, I regularly need to run a simple web server on Windows. To avoid a full-featured IIS installation, you can run a simple HTTP web server directly from your PowerShell console. You can run such a web server on any TCP port using the built-in System.Net.HttpListener .NET class.

Open your PowerShell console and create an HTTP listener:

$httpListener = New-Object System.Net.HttpListener

Then specify the port to listen. In this example, I want to run an HTTP web server on Port 9090.

$httpListener.Prefixes.Add("http://localhost:9090/")

  • Make sure that this port is not being used by other processes. You can find out which process is listening on a TCP or UDP on Windows.
  • In order to listen in all network interfaces, use the http://+:9090/ address.

Start the listener:

$httpListener.Start()

You can use different authentication types (Basic, Digest, Windows, Negotiate, or NTLM) in your HttpListener object or bind an SSL certificate to implement HTTPS.

If you run this code, a separate process waiting for connection on port 9090 appears in Windows. Check it using the command:

nestat –na 9090

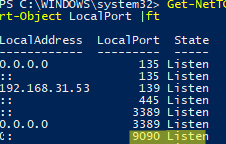
or display a list of open ports using PowerShell:

Get-NetTCPConnection -State Listen | Select-Object -Property LocalAddress, LocalPort, State | Sort-Object LocalPort |ft

powershell: run http listener

Remember to open this port in Windows Defender Firewall. You can quickly create a rule to open a firewall port by using the PowerShell command:

New-NetFirewallRule -DisplayName "AllowTestWebServer" -Direction Inbound -Protocol TCP –LocalPort 9090 -Action Allow

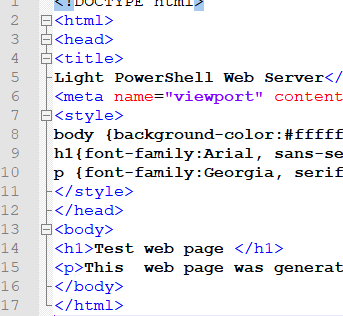
Now create a text file on your hard drive with the HTML you want your webserver to display. For example:

<!DOCTYPE html>
<html>
<head>
<title>
Lightweight PowerShell Web Server</title>
<meta name="viewport" content="width=device-width, initial-scale=1">
<style>
body {background-color:#ffffff;background-repeat:no-repeat;background-position:top left;background-attachment:fixed;}
h1{font-family:Arial, sans-serif;color:#000000;background-color:#ffffff;}
p {font-family:Georgia, serif;font-size:14px;font-style:normal;font-weight:normal;color:#000000;background-color:#ffffff;}
</style>
</head>
<body>
<h1>Test web page </h1>
<p>This web page was generated by PowerShell using the System.Net.HttpListener class</p>
</body>
</html>

HTML file for display on HTTP web server with PowerShell

I saved this HTML code to C:\PS\testwebpage.html with UTM-8 encoding.

Then run the following commands to read your HTML file and send a response to a user’s browser.

$context = $httpListener.GetContext()
$context.Response.StatusCode = 200
$context.Response.ContentType = 'text/HTML'
$WebContent = Get-Content  -Path "C:\PS\testwebpage.html" -Encoding UTF8
$EncodingWebContent = [Text.Encoding]::UTF8.GetBytes($WebContent)
$context.Response.OutputStream.Write($EncodingWebContent , 0, $EncodingWebContent.Length)
$context.Response.Close()

Run simple Web Server using PowerShell

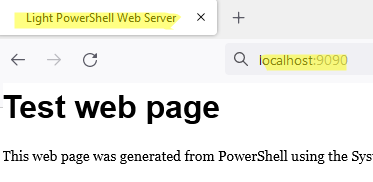
Open the URL address of your HTTP server in a browser (http://localhost:9090) or use PowerShell to get the content of a web page. The script returns an HTML code only once, after which your listener will be stopped automatically (only one user request is processed).

Free the TCP port:

$httpListener.Close()

If you want the HTTP server to keep returning your page, you need to add PowerShell code to the loop. The following example starts an HTTP server in a loop that ends when any key is pressed in the PowerShell console.

write-host "Press any key to stop the HTTP listener after next request"
while (!([console]::KeyAvailable)) {
$context = $httpListener.GetContext()
$context.Response.StatusCode = 200
$context.Response.ContentType = 'text/HTML'
$WebContent = Get-Content -Path "C:\PS\testwebpage.html" -Encoding UTF8
$EncodingWebContent = [Text.Encoding]::UTF8.GetBytes($WebContent)
$context.Response.OutputStream.Write($EncodingWebContent , 0, $EncodingWebContent.Length)
$context.Response.Close()
Write-Output "" # Newline
}
$httpListener.Close()

A PowerShell HTTP server remains alive until you close the PowerShell console or end the session by using the .Close method.

You can run this PowerShell script as a Windows service.

You can run such a lightweight web server on any Windows host without Internet Information Services or other third-party software installation. No administrator privileges are required. You may use this HTTPListener as a simple REST server or to get information from a remote computer via HTTP.

0 comment
2
Facebook Twitter Google + Pinterest
previous post
Turn Linux Computer into Wi-Fi Access Point (Hotspot)
next post
Configuring DNS Conditional Forwarding and DNS Policies on Windows Server

Related Reading

How to Connect VPN Before Windows Logon

November 14, 2023

Using WPAD (Web Proxy Auto-Discovery Protocol) on Windows

November 7, 2023

Send Emails with Microsoft Graph API and PowerShell

November 6, 2023

Zabbix: How to Get Data from PowerShell Scripts

October 27, 2023

Tracking Printer Usage with Windows Event Viewer Logs

October 19, 2023

Leave a Comment Cancel Reply

Categories

  • Active Directory
  • Group Policies
  • Exchange Server
  • Microsoft 365
  • Azure
  • Windows 11
  • Windows 10
  • Windows Server 2022
  • Windows Server 2019
  • Windows Server 2016
  • PowerShell
  • VMWare
  • Hyper-V
  • Linux
  • MS Office

Recent Posts

  • How to Connect VPN Before Windows Logon

    November 14, 2023
  • Removing Azure Arc Setup Feature on Windows Server 2022

    November 9, 2023
  • Using WPAD (Web Proxy Auto-Discovery Protocol) on Windows

    November 7, 2023
  • Send Emails with Microsoft Graph API and PowerShell

    November 6, 2023
  • Zabbix: How to Get Data from PowerShell Scripts

    October 27, 2023
  • Tracking Printer Usage with Windows Event Viewer Logs

    October 19, 2023
  • PowerShell: Configure Certificate-Based Authentication for Exchange Online (Azure)

    October 15, 2023
  • Reset Root Password in VMware ESXi

    October 12, 2023
  • How to Query and Change Teams User Presence Status with PowerShell

    October 8, 2023
  • How to Increase Size of Disk Partition in Ubuntu

    October 5, 2023

Follow us

  • Facebook
  • Twitter
  • Telegram
Popular Posts
  • Fix: Remote Desktop Licensing Mode is not Configured
  • Configuring Port Forwarding in Windows
  • Manage Windows Updates with PSWindowsUpdate PowerShell Module
  • Start Menu or Taskbar Search Not Working in Windows 10/11
  • How to Install Remote Server Administration Tools (RSAT) on Windows
  • How to Delete Old User Profiles in Windows
  • Adding Drivers into VMWare ESXi Installation Image
Footer Logo

@2014 - 2023 - Windows OS Hub. All about operating systems for sysadmins


Back To Top