In this article we will discuss how to check the performance of a disk or storage array in Linux. IOPS (input/output operations per second) is the number of input-output operations a data storage system performs per second (it may be a single disk, a RAID array or a LUN in an external storage device). In general, IOPS refers to the number of blocks that can be read from or written to a media.
Most disk manufacturers specify nominal IOPS values, but in fact these are not guaranteed. To understand the performance of your storage subsystem prior to starting a project, it is worth getting the maximum IOPS values your storage can handle.
Using FIO (Flexible I/O) Tool for Storage Benchmarking
To measure disk IOPS performance in Linux, you can use the fio (the tool is available for CentOS/RHEL in EPEL repository). So, to install fio in RHEL or CentOS, use the yum (dnf) package manager:
# yum install epel-release -y
 # yum install fio -y
Or apt-get in Debian or Ubuntu:
# apt-get install fio
Then you to identify the disks to test. The test is done by performing read/write operations in the directory your disk or LUN is mounted to.
Let’s do several types of disk IOPS performance tests in various disk load scenarios (a test mode you select depending on a hosted app logic and general infrastructure of a project).
Random Read/Write Operation Test
When running the test, an 8 GB file will be created. Then fio will read/write a 4KB block (a standard block size) with the 75/25% by the number of reads and writes operations and measure the performance. The command is as follows:
# fio --randrepeat=1 --ioengine=libaio --direct=1 --gtod_reduce=1 --name=fiotest --filename=testfio --bs=4k --iodepth=64 --size=8G --readwrite=randrw --rwmixread=75
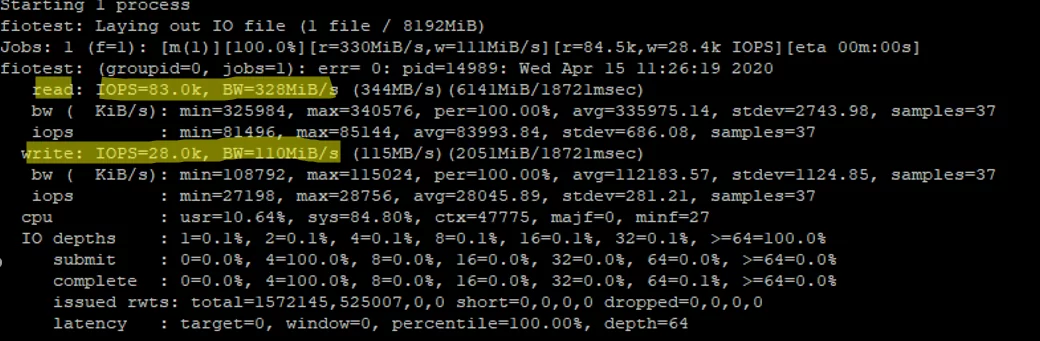
I ran my first test on an array that consisted of two SSDs and got good results:
- Read: 3280MiB/s, IOPS avg 83000
- Write: 110MiB/s, IOPS avg 28000
Since we have run a combined read/write test, the values for the separate tests will be higher.
In comparison, I measured the performance on a SATA drive:
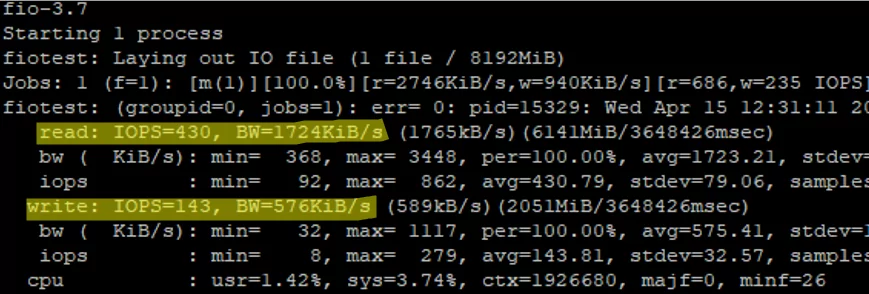
- Read: IOPS=430, BW=1.7 MiB/s
- Write: IOPS=143, BW= 0.6 MiB/s
Of course, the HDD results are worse than those of the SSD.
Random Read Operation Test
To measure disk performance for random read operations only, run the following command:
# fio --randrepeat=1 --ioengine=libaio --direct=1 --gtod_reduce=1 --name=fiotest --filename=testfio --bs=4k --iodepth=64 --size=8G --readwrite=randread
The final part of the command was changed to —readwrite=randread.
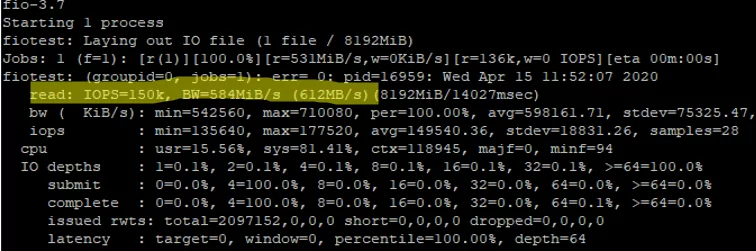
As I told earlier, the read/write performance will be higher if measured separately:
READ: IOPS=150k, BW=584MiB/s (612MB/s)
Random Write Operation Test
To measure disk performance for random write operations, run this command:
# fio --randrepeat=1 --ioengine=libaio --direct=1 --gtod_reduce=1 --name=fiotest --filename=fiotest --bs=4k --iodepth=64 --size=8G --readwrite=randwrite
WRITE: IOPS=84.7k, BW=331MiB/s (347MB/s)
Write operation performance on good SSDs is also very high. Like in read operation test, the difference as compared to a mixed test reaches 200-250 MiB/s and 50000 IOPS.
If you refer to the official manufacturer documentation (these are Intel SSDs), it is safe to say that the values are true.
Fio Config File Examples
Fio allows to check disk performance using interactive commands and with configuration files prepared in advance for testing. To use the this option, create a file:
# nano read.fio
And add the following contents into it:
[global]
rw=randread
size=8G
filename=/tmp/testfio
ioengine=libaio
iodepth=4
invalidate=1
direct=1
[bgread]
rw=randread
iodepth=64
Then start the test:
# fio read.fio
The test will measure the read performance of a disk. To test write performance, use the following config file:
[global]
rw=randwrite
size=8G
filename=/tmp/testfio
ioengine=libaio
iodepth=4
invalidate=1
direct=1
[bgwrite]
rw=randwrite
iodepth=64
Measuring Disk Latency Using Ioping
Besides IOPS, there is another important parameter that characterizes the quality of your storage: it is latency. Latency is an input/output request delay that determines the time of access to a storage (measured in milliseconds). The higher the latency is, the more your app has to wait till it gets data from your disk. The latency values over 20 ms for typical data storage systems are considered poor.
To check disk latency in Linux, the ioping tool is used:
# yum install ioping -y
# apt-get install ioping
Run the latency test for your disk (20 requests are run):
# ioping -c 20 /tmp/
4 KiB <<< /tmp/ (ext4 /dev/md126p5): request=1 time=1.55 ms (warmup)
......................
4 KiB <<< /tmp/ (ext4 /dev/md126p5): request=19 time=176.3 us (fast)
4 KiB <<< /tmp/ (ext4 /dev/md126p5): request=20 time=356.9 us
--- /tmp/ (ext4 /dev/md126p5) ioping statistics ---
19 requests completed in 5.67 ms, 76 KiB read, 3.35 k iops, 13.1 MiB/s
generated 20 requests in 19.0 s, 80 KiB, 1 iops, 4.21 KiB/s
min/avg/max/mdev = 176.3 us / 298.7 us / 368.9 us / 45.7 us
The average value is 298.7 us (microseconds), so the average latency in our case is 0.3 ms, that is excellent.
So you can perform a storage load test on your server prior to launching a project and check the highest performance values. However, the test doesn’t guarantee that your disk array or disk will show the same performance constantly, but it is worth to take the test on the initial stage of a project. Learn how to test IOPS in Windows in this article.