The Set-ADComputer cmdlet allows you to change the attributes of a computer account object in Active Directory. In this article, we’ll show how to add current logged-in username and IP address to the computer properties in AD using the Set-ADComputer cmdlet. This PowerShell script may be useful when you need to find in the domain the computer on which the specific user is logged-in.
Using Set-ADComputer to Change Computer Attributes in Active Directory
The Set-ADComputer cmdlet is a part of the PowerShell Active Directory module. This module must be installed (as a part of RSAT) and imported to your PowerShell session. Let’s see on how to use the Set-ADComputer cmdlet to update computer account properties.
Let’s try to add your company and a department name to the computer properties in AD. Firstly, check what is specified in the Company, Department and Description fields of your domain computer using the Get-ADComputer cmdlet.
Get-ADComputer lon-man01 -properties *|select-object dNSHostName,operatingSystem,company,department, description|ft -wrap -auto

As you can see, the Description, Company and Department fields are empty for this computer object.
Let’s try to change the computer description using the command:
Set-ADComputer -Identity LON-MAN01 -Add @{"description"="Infrastructure management server"}
You can specify the computer location:
Set-ADComputer –Identity LON-MAN01 –Location “UK/London”
If you want to set multiple computer parameters, use the following PowerShell code:
$Server = Get-ADComputer -Identity LON-MAN01
 $Server.company = "Woshub"
 $Server.department = "IT"
 Set-ADComputer -Instance $Server
Make sure that the computer attributes have changed:
Get-ADComputer LON-MAN01 -properties *|select-object dNSHostName,operatingSystem,company,department, description|ft -wrap -auto
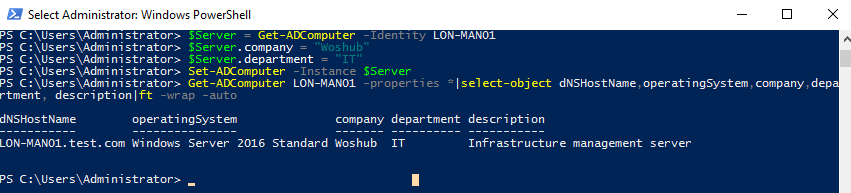
As you can see, the computer attributes contain the information we need. Then we will be able to select computers in AD based on these attribute values. For example, I would like to find all computers of the IT department for the Woshub company. The PS command to find all computer by these criteria may look like this:
Get-ADComputer -Filter {(company -eq 'Woshub') -and (department -like 'IT')} -properties *|select-object dNSHostName,operatingSystem,company,department, description|ft -wrap -auto
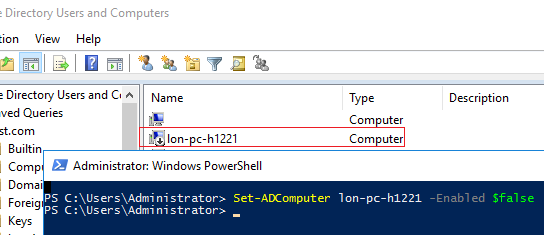
The Set-ADComputer cmdlet also allows you to disable/enable a computer object account in AD:
Set-ADComputer lon-pc-h1221 -Enabled $false
How to Add Logged-in User Name to the AD Computer Properties?
Let’s consider a more interesting and useful example of using Set-ADComputer. Suppose, you have decided to write the current computer IP address and the name of the last logged-in user to the attributes of each computer in Active Directory.
We’ll use the description attribute to store the IP address of the computer, and the ManagedBy attribute for the user name who is currently logged on this computer.
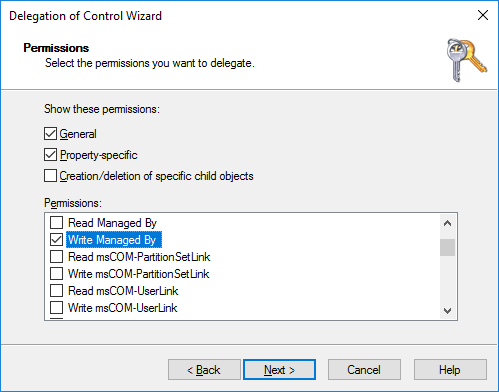
First of all, you must delegate the specific AD permissions for the Domain Users group (or another user security group) on the OU containing user computers. Allow users to change the values of the following fields for Computers objects: ManagedBy and Description (grant Write Description and Write Managed By permissions).
Then create a new Group Policy containing the following PowerShell logon script (User Configuration -> Policies -> Windows Settings -> Scripts -> Logon) to be run when a user logs on to the computer:
$curhostname=$env:computername
 $env:HostIP = (
 Get-NetIPConfiguration |
 Where-Object {
 $_.IPv4DefaultGateway -ne $null -and
 $_.NetAdapter.Status -ne "Disconnected"
 }
 ).IPv4Address.IPAddress
 $currus_cn=(get-aduser $env:UserName -properties *).DistinguishedName
 $ADComp = Get-ADComputer -Identity $curhostname
 $ADComp.ManagedBy = $currus_cn
 $ADComp.description = $env:HostIP
 Set-ADComputer -Instance $ADComp
This PowerShell script is run under a user account and detects the IP address of the current computer and current user CanonicalName (CN). Then script writes this data to the computer account object in AD.
You must link this GPO to the OU with the computers and enable the policy Configure user Group Policy Loopback Processing mode (check the article).
Now, when a user logs on to a computer, the logon PowerShell script is run and it updates the computer description in AD.
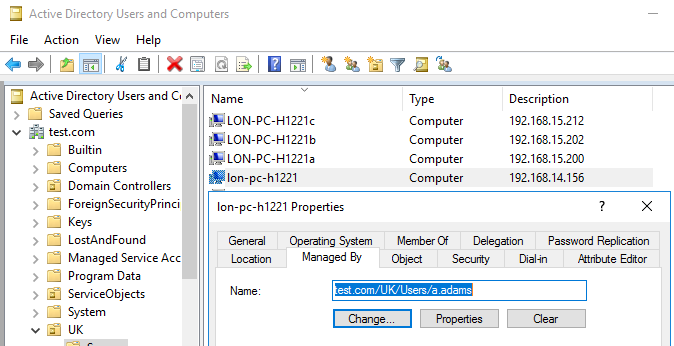
You can check the IP addresses of the computers in the Active Directory Users and Computers (ADUC) console. The Managed By tab of the computer properties contains an active link to the account of the user last logged-in to this computer.
Now you can quickly find the computers in the domain by their IP addresses:
get-adcomputer -filter {description -like "192.168.15.*"} -properties *|select name,description,managedBy
Or you can find all computers in the domain the specific user is logged on (Get-ADUser is used to get the user DistinguishedName):
$user='a.adams'
 $user_cn=(get-aduser $user -properties *).DistinguishedName
 Get-ADComputer -Filter "ManagedBy -eq '$user_cn'" -properties *|select name,description,managedBy|ft

In the same way you can save any information about a workstation or a user to the computer account properties in AD and use it to search computers in AD.