In this article we will consider a step-by-step configuration of a transparent SSO (Single Sign-On) authentication for Zabbix 4.0 (or newer) in Active Directory using Kerberos.
The end result is that a user is automatically authenticated on Zabbix frontpage without entering credentials. To do it, a user must be logged in to Windows under Active Directory domain account specified in Zabbix. In addition, the user must configure the browser (Kerberos support must be enabled and trusted intranet sites must be set in IE).
A showcase:
- Ubuntu Server 18.04 LTS;
- Active Directory domain with functional level 2008 (or higher)
- Zabbix Server 4.0.11, Apache2 as a web server (guide on Zabbix installation)
Zabbix LDAP Authentication on Active Directory
First of all, you have to bind domain users to Zabbix. To do it, it is enough to create a user in Zabbix with the same login as they have in the AD domain. For example, if your login (sAMAccountName attribute) is user_5, a user in Zabbix must have the same login.
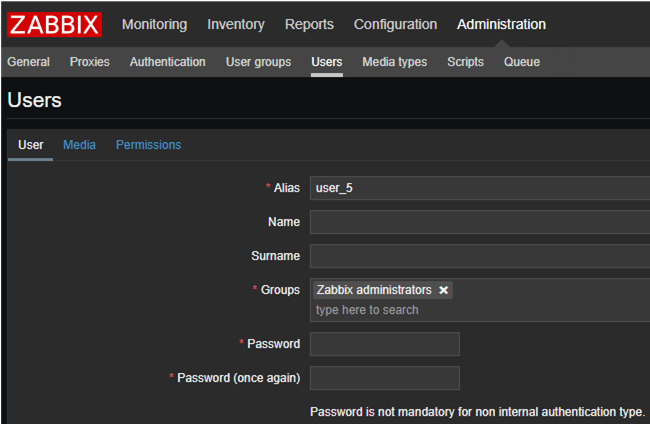
Do it for each user who will be using Zabbix.
Then create a separate user account in Active Directory to bind Zabbix to your domain. In practice, you can use any domain account, but it is better to create a separate service account. In my case, it will be zabbix_admin. To create a user in AD, I will use the PowerShell cmdlet New-ADUser:
New-ADUser -Name "zabbix_admin" -GivenName "zabbix_admin" -Surname "zabbix_admin" -SamAccountName "zabbix_admin" -AccountPassword (Read-Host -AsSecureString "Password:") -DisplayName "zabbix_admin" -Enabled $true
Run the command shown above in the PowerShell console and set a user password. Your new user will be located under the Users container in the root of your domain.
Let’s configure LDAP authentication in Zabbix. In Zabbix frontend go to LDAP settings tab in Administration -> Authentication. Check Enable LDAP authentication and fill in the following fields:
- LDAP host:
ldap://dc1.domain.local - Port:
389 - Base DN:
DC=domain, DC=local - Search attribute:
sAMAccountName - Bind DN:
CN=zabbix_admin,OU=Users,DC=domain,DC=local
You can read the description of any parameter in the LDAP authentication section of Zabbix documentation: https://www.zabbix.com/documentation/current/manual/web_interface/frontend_sections/administration/authentication.
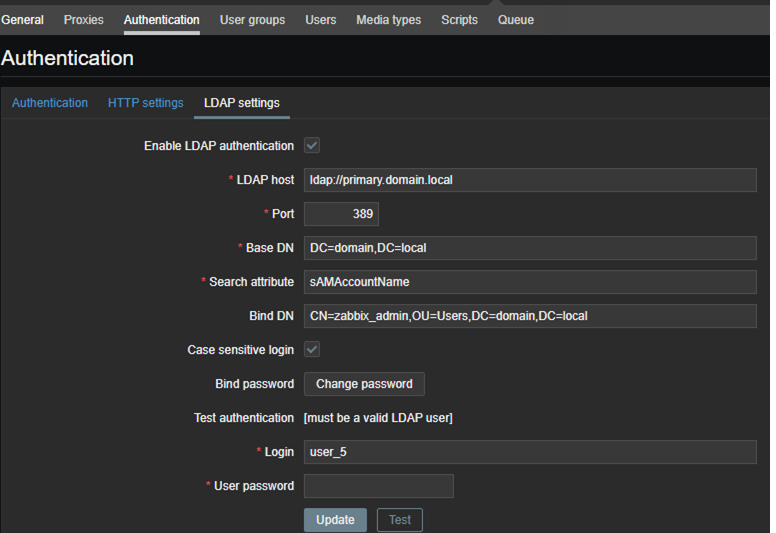
Before completing the configuration, make sure that your settings are valid by doing a test login (the Test button). Specify a user name (we created the account earlier) and AD password.
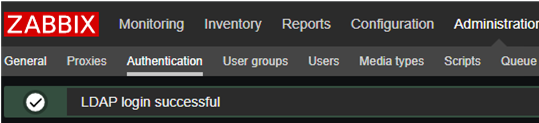
If the test has been successful, save your settings and change the authentication type in Zabbix from Internal to LDAP.

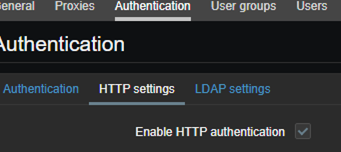
Enable HTTP authentication (HTTP Settings -> Enable HTTP authentication).
LDAP authentication is configured.
update zabbix.config set authentication_type='0' where configid='1';
Configure a Transparent (Single Sign On) Authentication in Zabbix (Apache2, krb5-user)
First of all, specify the FQDN name of your server in /etc/hostname that must match the DNS record in your domain. In my case, it is zabbix.domain.local.
Also write the FQDN of your server for the local IP address and the IP address of your server in /etc/hosts.
127.0.0.1 localhost zabbix.domain.local
10.1.1.10 zabbix.domain.local
In order Kerberos authentication to work correctly, synchronize time with your domain controller. Install the ntpdate package and bind it to the domain controller.
apt-get install ntp ntpdate
 ntpdate dc.domain.local
Now you need to generate a keytab file on a domain controller. Keytab is a file that contains SPN and encrypted keys. Keytab is used for Kerberos-based authentication.
- Log in on your domain controller and run the command prompt as an administrator. Go to C:\.
- Enter the following:
ktpass -princ HTTP/[email protected] -mapuser zabbix_admin -pass STRONGPASS -crypto ALL -ptype KRB5_NT_PRINCIPAL -out zabbix.keytab -setupn –setpass - Copy C:\zabbix.keytab file to /etc/apache2/ directory on your Zabbix server.
Install Kerberos packages and a module for apache2:
#apt install krb5-user libapache2-mod-auth-kerb
Configure krb5-user. Edit /etc/krb5.cnf:
[logging]
default = FILE:/var/log/krb5libs.log
kdc = FILE:/var/log/krb5kdc.log
admin_server = FILE:/var/log/kadmind.log
[libdefaults]
default_realm = DOMAIN.LOCAL
default_keytab_name = /etc/apache2/zabbix.keytab
dns_lookup_kdc = false
dns_lookup_realm = false
forwardable = true
ticket_lifetime = 24h
[realms]
DOMAIN.LOCAL = {
kdc = dc.domain.local
default_domain = DOMAIN.LOCAL
admin_server = dc.domain.local
}
[domain_realm]
.domain.local = DOMAIN.LOCAL
domain.local = DOMAIN.LOCAL
Specify your domain. In some places the domain name is written in upper case, follow this rule.
chown www-data:www-data /etc/apache2/zabbix.keytabMake sure that Kerberos authentication is working in Linux:
kinit -kV -p HTTP/zabbix.domain.local –t /etc/apache2/zabbix.keytab

You may see this error:
kinit: Client 'HTTP/[email protected]’ not found in Kerberos database while getting initial credentials
In this case, try to authenticate using credentials of another user:
kinit -pV LOGIN
If the authentication is successful, the problem is with your keytab file. Make sure that you have generated it correctly. Check if you entered the correct command to create a keytab file.
Make sure that an SPN record for your Zabbix service account exists in AD. Enter the following command on the domain controller:
setspn -l zabbix_admin
You will see a message like this. It must be in HTTP/zabbix.domain.local format. If there is no record, add it.
setspn -a HTTP/zabbix.domain.local zabbix_admin

Make sure that the user login name changed to HTTP/zabbix.domain.local.
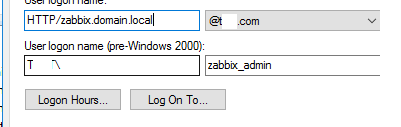
If it hasn’t, change it manually.
Then edit the apache2 configuration file — /etc/apache2/sites-available/000-default.conf.
Add the following under the ServerName zabbix.domain.local line:
<Location />
AuthType Kerberos
AuthName "Kerberos authenticated"
KrbAuthRealms DOMAIN.LOCAL
#KrbServiceName HTTP/zabbix.domain.local
KrbServiceName Any
Krb5Keytab /etc/apache2/zabbix.keytab
KrbMethodNegotiate On
KrbSaveCredentials on
KrbLocalUserMapping on
Require valid-user
</Location>
If KrbServiceName doesn’t match the name specified in the keytab file, an error occurs. So you can set Any value while testing. After making sure that the system is working, specify the valid service name. You can check it using:
klist -le /etc/apache2/zabbix.keytab
How to Configure Browsers for Kerberos Authentication?
For Internet Explorer to use Kerberos authentication on Zabbix, you will have to add its URL to Local Intranet sites. Google Chrome uses Internet Explorer settings, so you do not need to configure it separately.
Open Options -> Security in the IE.

Click Sites in the Local intranet, check the options shown in the screenshot below and click Advanced.
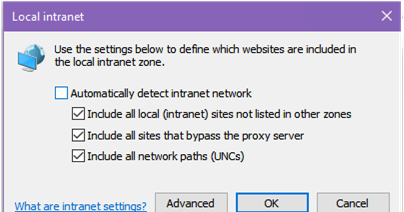
Enter your Zabbix server URL.

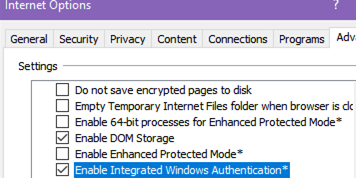
Go to the Advanced tab and check Enable Integrated Windows Authentication.
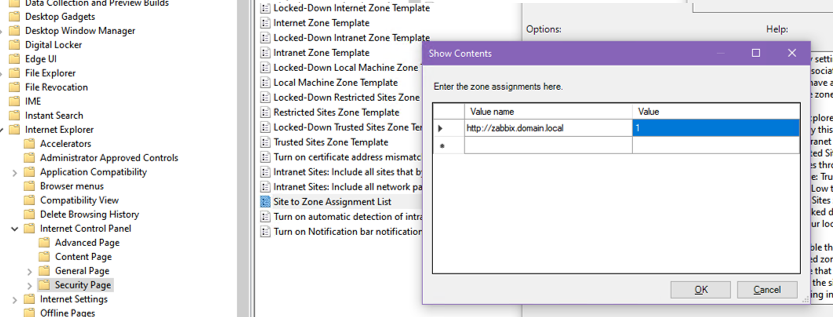
Also, you can also put Zabbix URL to the Local Intranet zone using the Group Policies (Computer Configuration -> Administrative Templates -> Windows Components -> Internet Explorer -> Internet Control Panel -> Security Page -> Site to Zone Assignment List. Use zone code 1 for intranet sites).
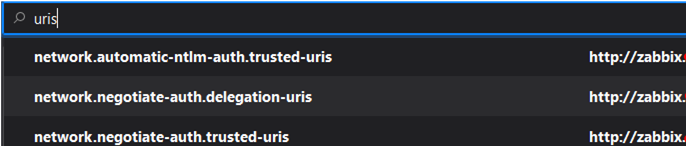
Add the URL of your Zabbix server to the following parameters of about:config for your Mozilla Firefox:
network.automatic-ntlm-auth.trusted-uris
network.negotiate-auth.delegation-uris
network.negotiate-auth.trusted-uris
After that the configuration is over. If you try to access your Zabbix server URL, you will be authenticated automatically and won’t be prompted to enter your password.
Kerberos Authentication Debugging & Troubleshooting in Apache
If you have any issues, enable debug mode in apache2:
Enter the following before the closing </VirtualHost> tag in /etc/apache2/sites-available/000-defaults.conf:
LogLevel trace8

Restart apache, and check Kerberos module error in the error.log file.
To make it more convenient, use this command to filter the entries by the IP address:
tail -f /var/log/apache2/error.log | grep ‘Your IP address’
To work with and diagnose Kerberos, you can use kinit and klist commands.
kinit is a tool to get and cache Kerberos tickets, for example:
kinit –V -k -t /etc/apache2/zabbix.keytab –p HTTP/[email protected]
If you have generated your keytab file correctly, the command will run, and you will get a message that the authentication has been successful.
Using klist, you can view cached Kerberos tickets:
klist -a