One of the main tasks of a WSUS administrator (Windows Server Update Services) is to manage the approval of updates to be installed on Windows computers and servers. In this article, we’ll show you how to manually approve updates, configure auto-approval rules, and decline assigned updates using the WSUS console and PowerShell.
Configure Target Computer Groups in WSUS
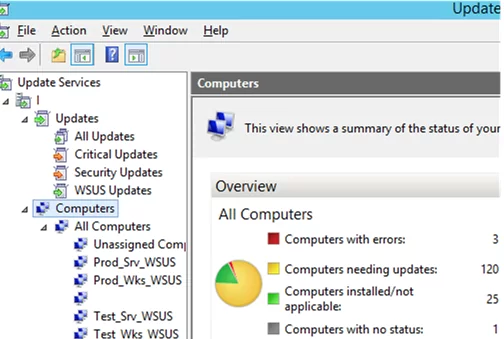
The WSUS service on Windows Server once installed and configured, begins regularly downloading updates for selected products from Microsoft Update servers. Before computers on your network can download and install new updates, they must be approved (or declined) by the WSUS administrator.
To organize testing and installation of updates on domain computers and servers, a WSUS administrator must create target computer groups. Depending on business tasks, types of user workstations and servers, you can create different groups of computers. In general, in the WSUS console in the Computers -> All computers section, it makes sense to create the following computer groups:
- Test_Srv_WSUS — a group of test servers (non-business-critical servers or dedicated servers with the test environment identical to the production one);
- Test_Wks_WSUS — test workstations;
- Prod_Srv_WSUS — production Windows servers;
- Prod_Wks_WSUS — all user workstations.
You can add computers or servers to WSUS groups manually, or you can assign computers and servers to WSUS groups using the Enable client-side targeting Group Policy option.
After you create WSUS groups, you can approve updates for them. There are two ways to approve updates for installation on computers: manually or automatically.
How to Manually Approve and Deploy Updates in WSUS?
Open the WSUS (Update Services) console and select the Updates section. It displays a summary report of all available updates. By default, there are 4 subsections: All Updates, Critical Updates, Security Updates, and WSUS Updates. You can approve the installation of the specific update by finding it in one of these sections (you can search it by KB name in the update search console or sort updates by the release date).
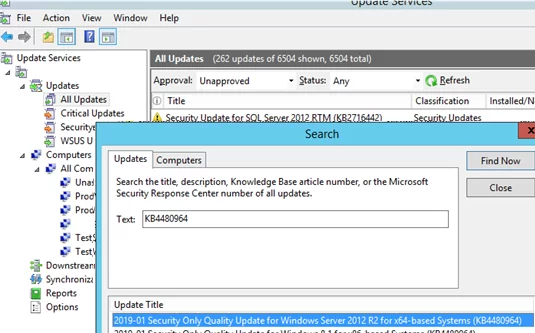
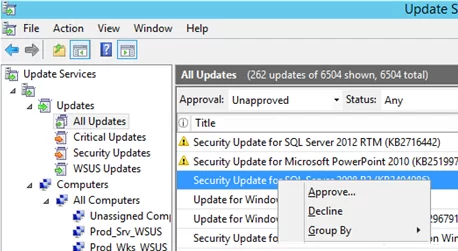
You can apply various filters in the WSUS console. Display a list of updates not yet approved (use the filter: Approval=Unapproved, Status=Any). Find the update you need, right-click on it, and select Approve from the menu.
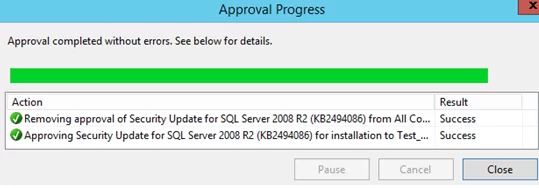
Select the WSUS computer group for which you want to approve update installation (for example, Test_Srv_WSUS). Select Approve for Install. You can approve an update for all computer groups at once by selecting All Computers, or for each group individually. For example, you can approve the update installation on a test group, and after 4-7 days, approve it on all computers if no problems occurred.
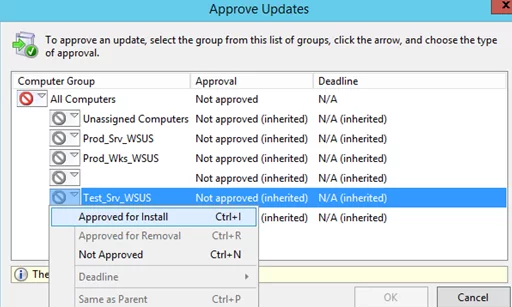
A window with the update approval results appears. If the update has been approved successfully, the message Result: Success will be displayed. Close this window.
As you can see, this is how a specific update is manually approved. This takes quite a long time since you have to approve each update individually. If you don’t want to manually approve updates, you can create auto-approval for updates.
Configure Automatic Update Approval Rules in WSUS
Automatic approval allows you to approve new updates that appeared on your WSUS server and assign them for installation on the target computers automatically without administrator intervention. Automatic approval of WSUS updates is based on approval rules.
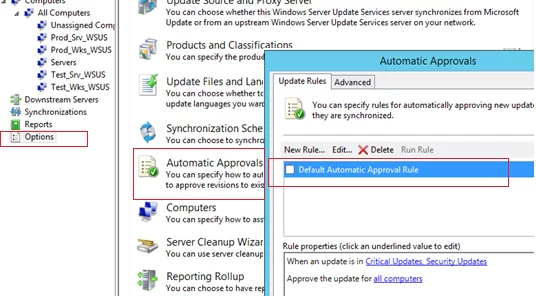
In the WSUS management console, go to Options and select Automatic Approvals.
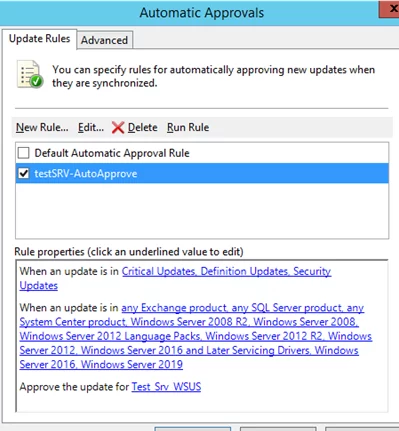
In the next window, there is only one rule with the name Default Automatic Approval Rule (it is disabled by default) on the Update Rules tab.
To create a new rule, click New Rule.
The approval rule consists of 3 steps. You must select the update properties, the target group of WSUS computers you want to install the update on, and the rule name.

If you click a blue link, the corresponding property window will appear.
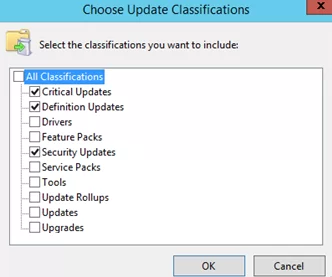
For example, you can enable automatic security update approval for your test servers. To do this, select Critical Updates, Security Updates, Definition Updates under Choose Update Classifications section (uncheck all other options). Then select the WSUS group named Test_Srv_WSUS in the Approve the update for dialog
The Set a deadline for the approval option allows you to specify whether this update should be forcibly installed on target computers (regardless of Windows Update settings). In this case, computers can be automatically rebooted regardless of whether the GPO option ‘No auto-restart with logged-on users for scheduled automatic updates installations’ is enabled.
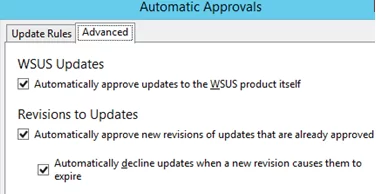
On the Advanced tab, you can choose whether to automatically approve updates for WSUS itself and whether to additionally approve updates that have been changed by Microsoft. It is recommended to enable all the checkboxes on this tab.
Now, when your WSUS server downloads new updates on the next second Tuesday of the month (or if you import them manually), they will be approved and automatically installed on the test computer group.
By default, Window clients scan your WSUS server for new updates every 22 hours. To ensure that critical devices receive new updates as quickly as possible, you can increase the frequency of synchronization using the Automatic Update Detection Frequency Group Policy parameter (see the case WSUS error: Exceeded max server round trips). You can also scan for updates manually using the PSWindowsUpdate PowerShell module.
After you’ve installed and tested the updates on your groups of test computers and verified that there are no issues (usually the testing takes 3-6 days), you can approve the new updates on production computers.
How to Decline and Remove Updates on a WSUS Server?
If one of the approved updates has caused any problems on computers or servers, a WSUS administrator can decline it. To do this, find the update in the WSUS console, right-click it, and select Decline.

Then select the WSUS group you want to cancel installation for and select Approved for Removal. After a while, the update will be removed on WSUS clients (the process is described in more detail in the article “How to Uninstall Windows Updates?”).
Approving WSUS Updates with PowerShell
You can use PowerShell to manage the approval of WSUS updates. In order to connect to the WSUS host from the PowerShell console, you can use the following code:
$WsusServerFqdn='mont-wsus.woshub.com'
 [void][reflection.assembly]::LoadWithPartialName( «Microsoft.UpdateServices.Administration)
 $wsus = [Microsoft.UpdateServices.Administration.AdminProxy]::getUpdateServer( $WsusServerFqdn, $False, '8530')
You can now perform various operations on your WSUS server. For example, to run update synchronization:
$wsus.GetSubscription().StartSynchronization();
List of WSUS computer groups:
$wsus.GetComputerTargetGroups()
Select a specific group of computers:
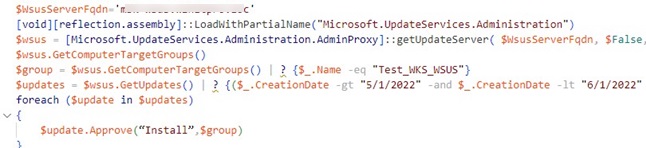
$group = $wsus.GetComputerTargetGroups() | ? {$_.Name -eq "Test_WKS_WSUS"}
You can use the GetUpdates method to get a list of the latest updates. For example, you want to select the latest Windows and Office security updates in a specific time range:
$updates = $wsus.GetUpdates() | ? {($_.CreationDate -gt "6/1/2022" -and $_.CreationDate -lt "7/1/2022" -and $_.Title -notmatch ".net Framework" -and $_.PublicationState -ne "Expired" ) -and ($_.ProductFamilyTitles -eq "Windows" -or $_.ProductFamilyTitles -eq "Office") -and ($_.UpdateClassificationTitle -eq "Security Updates" -or $_.UpdateClassificationTitle -eq "Critical Updates")}
You can now approve the selected updates for installation on the specified WSUS group:
foreach ($update in $updates)
 {
 $update.Approve("Install",$group)
 }
You can also use the UpdateServices module to manage WSUS.

For example, you can use the following PowerShell script to approve the latest security updates for a target group:
$data = (Get-Date).adddays(-30)
 $wsus= Get-WSUSServer -Name wsusservername -Port 8530
 Get-WsusUpdate -UpdateServer $wsus -Approval Unapproved -Status Needed
 Get-WsusUpdate -Classification All -Approval Unapproved | Where-Object { ($_.Update.CreationDate -lt $data) -and ($_.update.isdeclined -ne $true) and {$_.update.title -ilike "*Windows*" -or $_.update.title -ilike "*Office*"} | | Approve-WsusUpdate -Action Install -TargetGroupName "Test_WKS_WSUS"
How to Copy Approved Updates Between WSUS Target Groups?
Unfortunately, you won’t be able to copy approved updates from one WSUS computer group to another using the WSUS console. You can search for new updates one by one and manually approve them for installation on production groups of servers and computers. It’s time-consuming.
I wrote a simple PowerShell script that collects a list of approved updates for the test group and automatically approves the same updates for the production computer group. I run the script 7 days after the updates have been installed on the test groups.
$WsusServerFqdn='mont-wsus.woshub.com'
 $WsusSourceGroup = 'Workstation_Test'
 $WsusTargetGroup = 'WorkstationProduction'
 [void][reflection.assembly]::LoadWithPartialName( “Microsoft.UpdateServices.Administration”)
 $wsus = [Microsoft.UpdateServices.Administration.AdminProxy]::getUpdateServer( $WsusServerFqdn, $False, ‘8530’)
 $Groups = $wsus.GetComputerTargetGroups()
 $WsusSourceGroupObj = $Groups | Where {$_.Name -eq $WsusSourceGroup}
 $WsusTargetGroupObj = $Groups | Where {$_.Name -eq $WsusTargetGroup}
 $Updates = $wsus.GetUpdates()
 $i = 0
 ForEach ($Update in $Updates)
 {
 if ($Update.GetUpdateApprovals($WsusSourceGroupObj).Count -ne 0 -and $Update.GetUpdateApprovals($WsusTargetGroupObj).Count -eq 0)
 {
 $i ++
 Write-Host (“Approving ” + $Update.Title)
 $Update.Approve(‘Install’,$WsusTargetGroupObj) | Out-Null
 }
 }
 Write-Output (“Approved {0} updates for target group {1}” -f $i, $WsusTargetGroup)
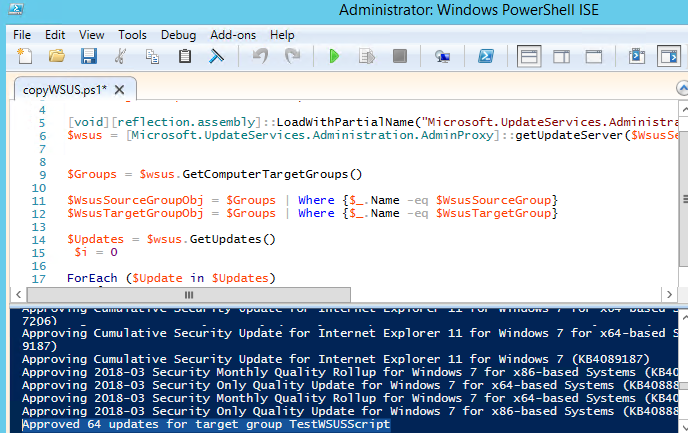
This PowerShell script loops through all approved updates in the source WSUS group and approves the installation if the update is not approved in the target group. This sample logs approved updates directly to the PowerShell console. You can output the PowerShell script log to a text file.