Windows OS Hub
  • Windows Server
    • Windows Server 2022
    • Windows Server 2019
    • Windows Server 2016
    • Windows Server 2012 R2
    • Windows Server 2008 R2
    • SCCM
  • Active Directory
    • Active Directory Domain Services (AD DS)
    • Group Policies
  • Windows Clients
    • Windows 11
    • Windows 10
    • Windows 8
    • Windows 7
    • Windows XP
    • MS Office
    • Outlook
  • Virtualization
    • VMWare
    • Hyper-V
    • KVM
  • PowerShell
  • Exchange
  • Cloud
    • Azure
    • Microsoft 365
    • Office 365
  • Linux
    • CentOS
    • RHEL
    • Ubuntu
  • Home
  • About

Windows OS Hub

  • Windows Server
    • Windows Server 2022
    • Windows Server 2019
    • Windows Server 2016
    • Windows Server 2012 R2
    • Windows Server 2008 R2
    • SCCM
  • Active Directory
    • Active Directory Domain Services (AD DS)
    • Group Policies
  • Windows Clients
    • Windows 11
    • Windows 10
    • Windows 8
    • Windows 7
    • Windows XP
    • MS Office
    • Outlook
  • Virtualization
    • VMWare
    • Hyper-V
    • KVM
  • PowerShell
  • Exchange
  • Cloud
    • Azure
    • Microsoft 365
    • Office 365
  • Linux
    • CentOS
    • RHEL
    • Ubuntu

 Windows OS Hub / Windows 10 / Configure Remote SSH Connections in Visual Studio Code

July 12, 2023 LinuxWindows 10Windows 11

Configure Remote SSH Connections in Visual Studio Code

Visual Studio Code is a very feature-rich and versatile text editor that can benefit both developers and system administrators. You can use VS Code to edit your PowerShell scripts, configuration files, and run console commands. The Remote SSH extension allows you to connect to remote computers via SSH and edit files, scripts, configurations, or execute commands on remote Windows or Linux hosts directly from VS Code installed on your computer.

Here’s how to configure a Visual Studio Code SSH client to connect to remote hosts.

Run VS Code and go to Extensions ( Ctrl + Shift + X ). Now find and install the Remote SSH extension.

vs code install remote ssh extension

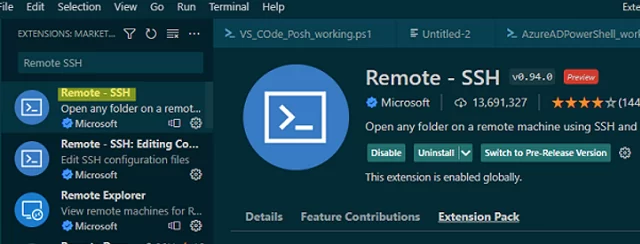
This automatically installs the following Remote SSH add-ons: Editing Configuration Files and Remote Explorer (Extension Pack tab).

Select Remote Explorer in the left panel of VSCode to create a new SSH connection. The connection wizard will prompt you to enter:

  • SSH connection string: [email protected]
  • the path to the configuration file containing the settings for this connection (by default, it’s C:\Users\%username%\.ssh\config ).
You can also create a new connection by pressing CTRL + SHIFT + P and selecting Remote-SSH: Connect to Host.

Visual Studio code - connect to remote ssh host

Once this is done, you can now connect to the remote host via SSH. Select the host from the list and click Connect.

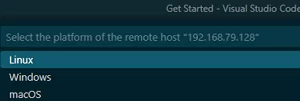
The first time you connect, VSCode prompts you for the platform type on the remote SSH host (Linux/Windows/macOS) and the connection password:

select ssh platform

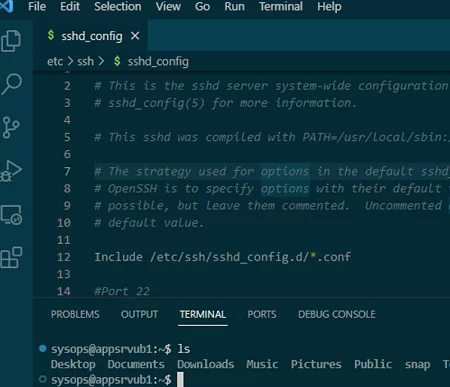
Once connected to the remote SSH host, you can edit any text files directly from the VSCode editor and execute shell commands as if you were connected via an SSH client (click Terminal -> New Terminal to open a console prompt).

Edit config file on remote Linux host from VSCode

If you try to save a file in VSCode that cannot be edited by a non-root user (without sudo), you will get the following error::

Failed to save 'sshd_config': Unable to write file 'vscode-remote://ssh-remote+192.168.79.128/etc/ssh/sshd_config' (NoPermissions (FileSystemError): Error: EACCES: permission denied, open '/etc/ssh/sshd_config').

(NoPermissions (FileSystemError): Error: EACCES: permission denied

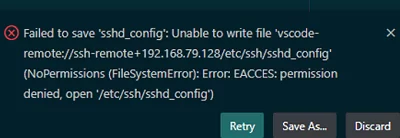
One solution to this problem is to use the VSCode extension Save as Root in Remote – SSH. Once this extension is installed, you can save the file in sudo mode using the Save as Root command.

Both password and SSH key-based authentication are supported in Remote SSH.

Let’s try to configure SSH key-based authentication on a remote Windows host:

  1. Generate an SSH key pair on the client: ssh-keygen -t ed25519
    In this example, Windows 10 with the built-in SSH client is used.
  2. Copy the public key file C:\Users\%username%\.ssh\id_ed25519 into the file C:\Users\user1\.ssh\authorized_keys on your remote host (here, user1 is the user name you will connect with);
  3. Check that the following option is enabled in the OpenSSH server configuration file on Windows:
    PubkeyAuthentication yes
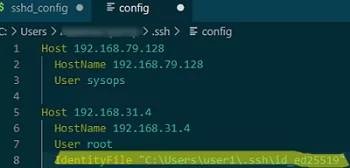
  4. Now open the file C:\Users\%username%\.ssh\config which contains the VSCode connection settings for SSH hosts. Find the host and add the IdentityFile parameter with the path to your private key file:
Host 192.168.31.4
  HostName 192.168.31.4
  User root
  IdentityFile "C:\Users\user1\.ssh\id_ed25519"

VScode SSH key-based auth

A quick way to open the config file is to press F1 -> Remote-SSH: Open SSH Configuration File.

remote ssh config file

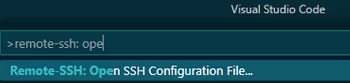
Now the connection to the SSH host will be done with key-based authentication (no password required).

You can use the LocalForward directive to configure SSH tunnels and port forwarding. Or you might want to use the ForwardAgent and ProxyJump directives instead:

Host PublicJumpServer1
  HostName public.woshub.com
  User user1
  ForwardAgent yes

Host PrivateServer1
  HostName private.contoso.com
  User user1
  ProxyJump PublicJumpServer1
You can also connect to and develop in MS SQL Server with VS Code.

0 comment
3
Facebook Twitter Google + Pinterest
previous post
Configuring Azure AD Password Policy
next post
How to Fix ‘An Operating System Wasn’t Found’ Error on Windows

Related Reading

How to Connect VPN Before Windows Logon

November 14, 2023

Using WPAD (Web Proxy Auto-Discovery Protocol) on Windows

November 7, 2023

Zabbix: How to Get Data from PowerShell Scripts

October 27, 2023

Tracking Printer Usage with Windows Event Viewer Logs

October 19, 2023

How to Increase Size of Disk Partition in...

October 5, 2023

Leave a Comment Cancel Reply

Categories

  • Active Directory
  • Group Policies
  • Exchange Server
  • Microsoft 365
  • Azure
  • Windows 11
  • Windows 10
  • Windows Server 2022
  • Windows Server 2019
  • Windows Server 2016
  • PowerShell
  • VMWare
  • Hyper-V
  • Linux
  • MS Office

Recent Posts

  • How to Connect VPN Before Windows Logon

    November 14, 2023
  • Removing Azure Arc Setup Feature on Windows Server 2022

    November 9, 2023
  • Using WPAD (Web Proxy Auto-Discovery Protocol) on Windows

    November 7, 2023
  • Send Emails with Microsoft Graph API and PowerShell

    November 6, 2023
  • Zabbix: How to Get Data from PowerShell Scripts

    October 27, 2023
  • Tracking Printer Usage with Windows Event Viewer Logs

    October 19, 2023
  • PowerShell: Configure Certificate-Based Authentication for Exchange Online (Azure)

    October 15, 2023
  • Reset Root Password in VMware ESXi

    October 12, 2023
  • How to Query and Change Teams User Presence Status with PowerShell

    October 8, 2023
  • How to Increase Size of Disk Partition in Ubuntu

    October 5, 2023

Follow us

  • Facebook
  • Twitter
  • Telegram
Popular Posts
  • Fixing ‘The Network Path Was Not Found’ 0x80070035 Error Code on Windows
  • Recovering Files from BitLocker Encrypted Drive
  • How to Access VMFS Datastore from Linux, Windows, or ESXi
  • Using iPerf to Test Network Speed and Bandwidth
  • Installing an Open Source KMS Server (Vlmcsd) on Linux
  • Monitoring Domain Name Expiration Date with Zabbix
  • How to Enable Two-Factor Authentication (2FA) for SSH on Linux
Footer Logo

@2014 - 2023 - Windows OS Hub. All about operating systems for sysadmins


Back To Top