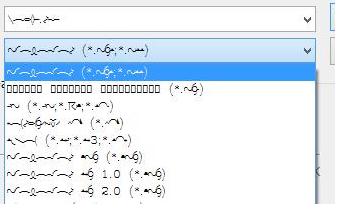
If you accidentally deleted or replaced one or more system fonts in Windows, you can try to restore the default fonts. The issue of missing fonts can appear as follows: in system dialog boxes (and some other windows) instead of normal characters, you can see strange or unreadable symbols. In our example, these are hieroglyphs and squares. This problem can occur after a third-party app is uninstalled, which also deleted several system default font files (up to complete cleaning the font files folder C:\Windows\Fonts). Also, the problem with fonts can occur when a certain program replaces one of the default fonts with its own one during installation.
In this article, we’ll discuss ways to restore corrupted system fonts in Windows 10 and Windows 11 to a clean system state.
How to Restore Default System Font Settings in Windows?
Firstly, you should try to restore the default fonts in Windows 10 or 11 using the built-in feature. To do it:
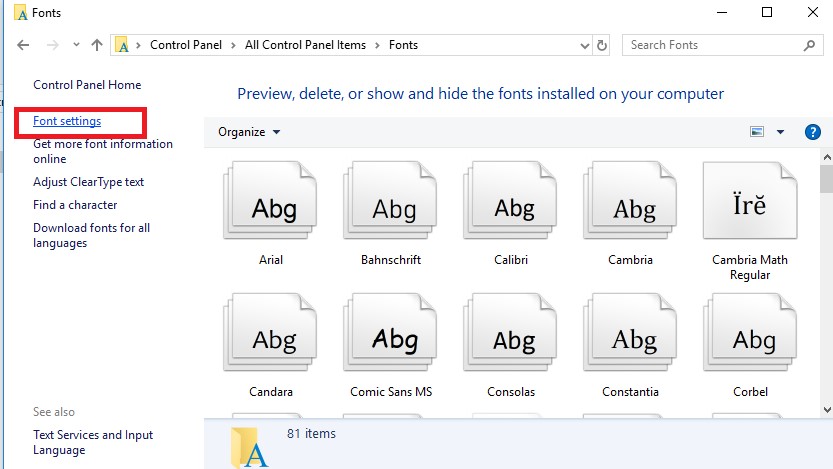
- Go to the Control Panel -> Appearance and Personalization -> Fonts. This Control Panel item can be opened by running the command:
control fonts - Select Font settings in the left pane;

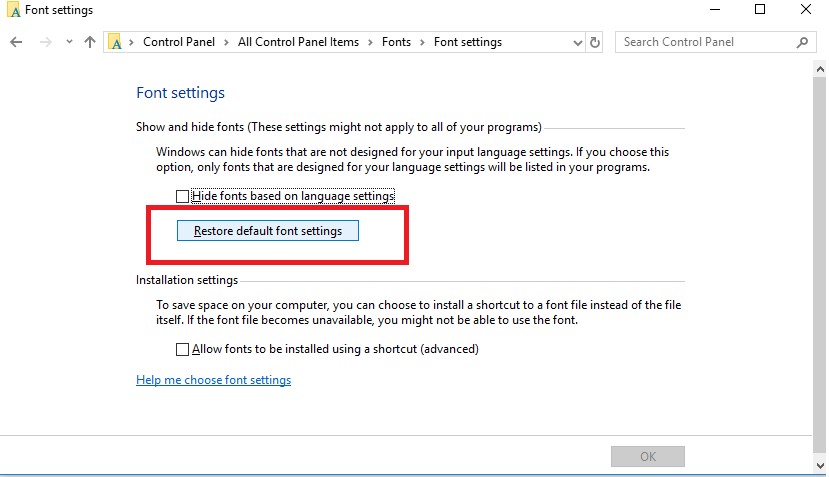
- In the next window click the Restore default font settings button.

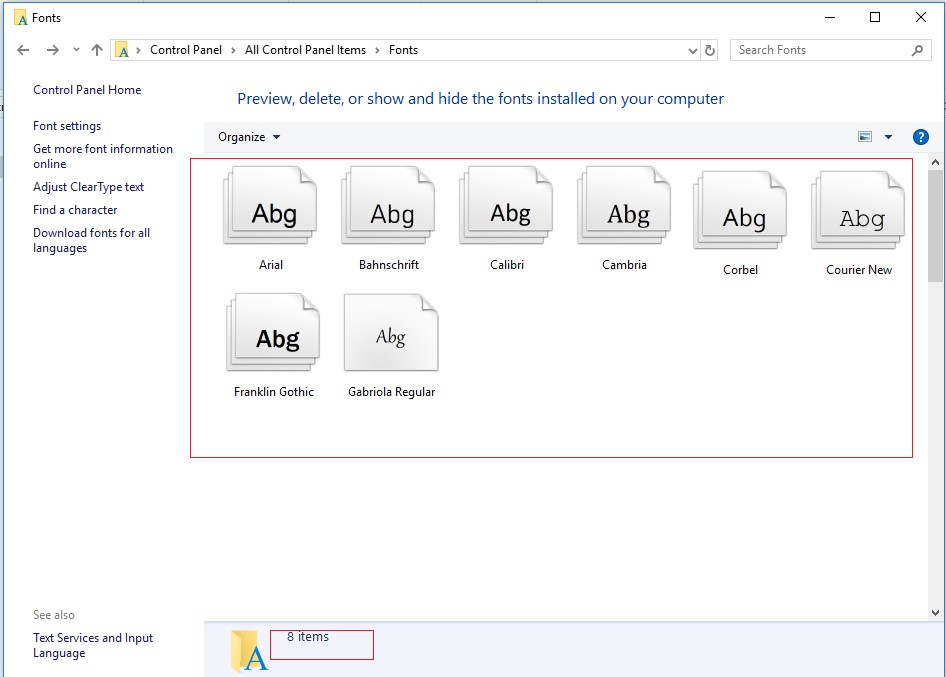
This option allows you to remove all third-party fonts, leaving only the standard Windows fonts. However, if the desired font file (*.fon or *.ttf) was deleted or replaced, the reset feature won’t help.
To restore the needed font, you can copy the specific font file from the Windows distribution (or from another computer), or download and install the font file manually or through the GPO (note that Windows 10 has a feature that blocks the installation of third-party fonts, which may prevent new fonts from being installed).
Extract Default Font Files from a Windows 10 or 11 Installation Image
The font files in Windows are stored in the C:\Windows\Fonts directory. Try to open this folder in File Explorer. If you see only a few font files with the *.FON and *.TTF extensions in this directory, then the default font files have been deleted and reset by the built-in tools (as described above) won’t help.
The missing font files can be copied from any computer running the same OS version or extracted from the installation disk or an ISO/WIM image of Windows 10 (11 or 8.1).
Let’s consider the second case. To do this, we need a Windows 10/11 installation media. The easiest way to create a Windows installation ISO image using the Media Creation Tool. Mount the ISO image into a virtual drive (suppose letter H: is assigned to it).
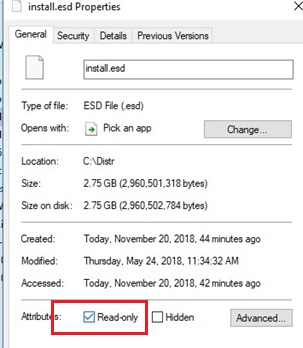
Open the PowerShell command prompt as an administrator and copy the H:\sources\install.wim or H:\sources\install.esd file into the C:\Distr\ directory:
Copy-Item H:\sources\install.wim C:\Distr\
dism /export-image /SourceImageFile:c:\distr\install.esd /SourceIndex:1 /DestinationImageFile: c:\distr\install.wim /Compress:max /CheckIntegrity
Mount the Windows 10 installation image file (install.wim) to the C:\Distr\wim directory:
dism /mount-wim /wimfile:c:\Distr\install.wim /index:1 /mountdir:C:\Distr\wim
Dism /Get-WimInfo /WimFile:C:\Distr\install.wim

Copy the original fonts files from the C:\Distr\wim\Windows\Fonts to the C:\Windows\Fonts directory with the replacement of files in the target directory. Use this PowerShell command:
Copy-Item -path C:\Distr\wim\Windows\Fonts -Destination C:\Windows -recurse –container -force
The font files will be replaced with the original ones. Some system fonts that are currently used won’t be replaced; a number of errors in the console window will indicate this.
Now you can unmount the source Windows image:
dism /unmount-wim /mountdir:C:\Distr\wim /discard
Restart your computer and check if the font problem persists.
Clear Font Cache in Windows
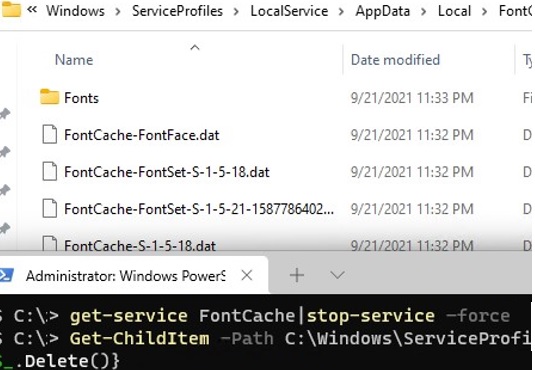
Windows font caching is enabled by default (similar to icon caching). This allows loading fonts faster in Windows apps and dialogs. The font cache is located in the %WinDir%\ServiceProfiles\LocalService\AppData\Local\FontCache folder. If the font cache is corrupted, it can also cause font display issues in Windows. We recommend that you manually reset the current Windows font cache. For this you need:
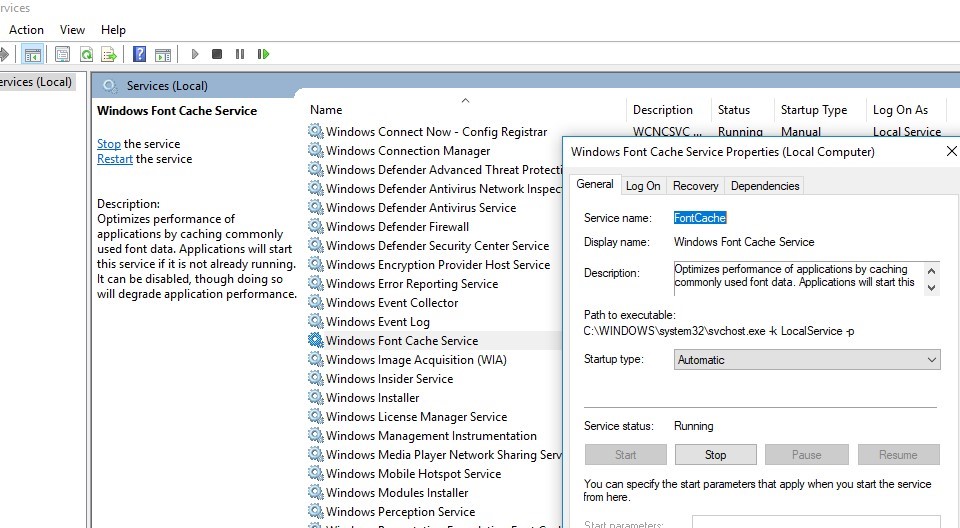
- Open the service management console (
services.msc); - Stop the Windows Font Cache Service in the console or using a PowerShell command:
Get-Service FontCache|Stop-Service –force
- Clean up the font cache folder:
Get-ChildItem -Path C:\Windows\ServiceProfiles\LocalService\AppData\Local\FontCache -File | foreach { $_.Delete()} - Delete the file FNTCACHE.DAT:
Remove-Item c:\Windows\System32\FNTCACHE.DAT
- Run the FontCache service and reboot your device.
Download and Restore Default Fonts on Windows 10 and 11
If you don’t have a Windows 10 (Windows 11 or Windows 8.1) installation image, you can copy the directory with the original font files from another computer running the same OS version, or use ready font archives that can be downloaded from the links below:
- Default fonts for Windows 8 – DefaultFontsWin8.zip (197 MB);
- Default fonts for Windows 8.1 – DefaultFontsWin8-1.zip (258 MB);
- Original fonts for Windows 10 21H1 (suitable for other Windows 10 builds) — DefaultFonts-Win10-21H1.zip (189 MB);
- Original fonts for Windows 11 – DefaultFonts-Win11.zip (190 MB).
Download and unzip the archive for your Windows version. Copy the archive contents to the C:\Windows\Fonts folder with the replacement.
Then download and apply registry files with default font settings for your version of Windows:
- Windows 10 — win10-default-fonts-reg.zip
- Windows 11 — win11-default-fonts-reg.zip
Each archive contains three REG files:
- win_10_fonts.reg – contains a list of default fonts registered in the system registry (
HKLM\SOFTWARE\Microsoft\Windows NT\CurrentVersion\Fonts); - win_10_FontSubstitutes.reg – contains font association settings (
HKLM\SOFTWARE\Microsoft\Windows NT\CurrentVersion\FontSubstitutes); - win_restore_default_user_font_settings.reg – restores default font settings in user registry hive (
HKCU\Software\Microsoft\Windows NT\CurrentVersion\Font Management).
Unzip the archive and apply (double click) each reg file.

Restart your computer. The problem with the fonts should be gone!
If all else fails and the fonts are displayed incorrectly, try to check and repair your Windows image using the commands:
sfc /scannow
 DISM /Online /Cleanup-Image /RestoreHealth
18 comments
There is no Control Panel any more!
The Control Panel IS still there
go to Start, All Apps, Windows System, Control Panel.
Right Click it and pin it to your Start Menu, for ease of access.
I’m having difficulty copying the “Fonts” folder to my system installation drive..
I extracted the “esd” file and converted it to a “wim” file, mounted it to the “C:\Distr\wim” folder with no issues, but when I try copy the “Fonts” folder to “C:\Windows” I get the following message for every file:
Copy-Item : Access to the path ‘C:\Windows\Fonts\8514fix.fon’ is denied.
At line:1 char:1
+ Copy-Item -path C:\Distr\wim\Windows\Fonts -Destination C:\Windows -r …
+ ~~~~~~~~~~~~~~~~~~~~~~~~~~~~~~~~~~~~~~~~~~~~~~~~~~~~~~~~~~~~~~~~~~~~~
+ CategoryInfo : PermissionDenied: (8514fix.fon:FileInfo) [Copy-Item], UnauthorizedAccessException
+ FullyQualifiedErrorId : CopyFileInfoItemUnauthorizedAccessError,Microsoft.PowerShell.Commands.CopyItemCommand
I’m running PowerShell as administrator, so I don’t understand why it’s complaining about access permissions here?
However, I actually came right by simply navigated to the “wim” folder that I mounted the “install.wim” image to, selected all the fonts in “C:\Distr\wim\Windows\Fonts\” and selected “Install” from the context menu.
Perhaps you should update that step in the guide to list this as an alternative if that PS command fails?
Had corrupted fonts in certain places. Like someone else I was getting “UnauthorizedAccessException” during the Copy-Item command for all of the fonts. Problem wasn’t fixed. But right clicking on the fonts and pressing “install” fixed it for me.
Some of the font files can be used right now, and you can replace them in the Safe Mode or with the LiveCD.
Very good text ! Thank you !
I have searched this information and these downloads, you helped me !
a square is showing in my time instead of colon, this happened after i changed my font
plz help me to fix this
Hi Bandana, did you ever get this resolved? I too have the same issue now.
Thanks, this helps me a lot !
Great guide!! This is the first guide that has actually worked to solve a problem for me in ages! Wow, thanks. Stupid squares are goneeee.
I got to a point and this did not work for me, but i found an alternative method that did work. Using 7zip, I extracted the fonts from the wim file and dropped them into my fonts folder. It was much simpler.
Thanks alot to you 🤍 It really worked
Thank you very much! I was having a problem with fonts for a very long time. Most of the programs were working fine but for some reason in the Beckhoff TwinCAT 2 PLC Control program the font was unreadable. After competing the Download and Restore Default Fonts on Windows 10 guide the font in that program became readable. Again thanks a lot!
Sadly this did not work for me. I’ve been having issues with some website, some emails on Gmail and Epic Games Store, all show these weird symbols instead of text. And they started to have these problems right after went from Win10 to Win11 last summer (clean install thou). So something is definitely broken within Win11 itself so that some programs can’t get specific fonts loaded up.
Thanks, this solved my problem of missing fonts (accidentally deleted) by extracting from ISO file and reinstalling.
This is a working method. Thanks for your help and support.
Thanks for providing this useful information and associated files. They simplified restoring Windows fonts.