In some cases Windows 10, 8.1 and 7 may recognize an internal SSD or SATA drive as a removable device (media). Consequently, the safe removal icon appears for the disk in the system tray (as if it is a common USB flash drive).
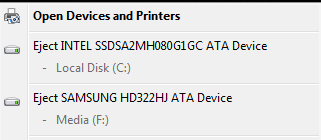
Of course, you won’t be able to eject the SATA drive, on which Windows is installed, on the fly, but you may accidentally remove the additional SATA disk. Another disadvantage of such “Removable” drives is that in Windows 7 and 8.1 you cannot create a multiple partitions on it (this is possible only in Windows 10 1703 or newer).
This problem is related to the using of common driver both for internal SATA and external eSATA hard drives in Windows — Standard SATA AHCI controller. When connecting these drives, the operating system checks if HotPlug mode (hot drive removal) is supported. This feature is always supported if the controller works in the AHCI mode. Theoretically, SATA drives working in this mode are to be displayed in the Safely Remove Hardware icon on the taskbar. However, most chipset vendors integrate the feature of automatic hiding of internal SATA drives either in their drivers or in the additional software.
Installing SATA Controller Driver
If your internal SATA/SSD is displayed in the Safely Remove Hardware list, you should try to install a more suitable controller driver. Try to find the latest version of a hard drive controller driver on the website of your motherboard or computer manufacturer. Also install the native driver for you motherboard chipset (Intel Rapid, RST and AHCI Driver, Intel Matrix Storage Manager, etc.).
SATA Controller Settings in BIOS
In the advanced settings of some BIOS/UEFI versions, you can disable HotSwap or HotPlug mode for the controller. Make sure if this feature is available for your computer. Also, you can change the controller mode from AHCI to IDE, but then you will lose all the AHCI advantages.
TreatAsInternalPort: How to Configure SATA Mode via the Registry?
You can disable Safe Removal of the internal drives on the NVidia controllers through the registry. Run the regedit.exe and go to the registry key HKEY_LOCAL_MACHINE\SYSTEM\CurrentControlSet\Services\nvata. Create a DWORD parameter with the name DisableRemovable and the value 1 (note that instead the nvata there may be the nvatabus reg key).
Also, there is an universal way to set the “Internal Port” disk attribute for the specific controller port in the registry.
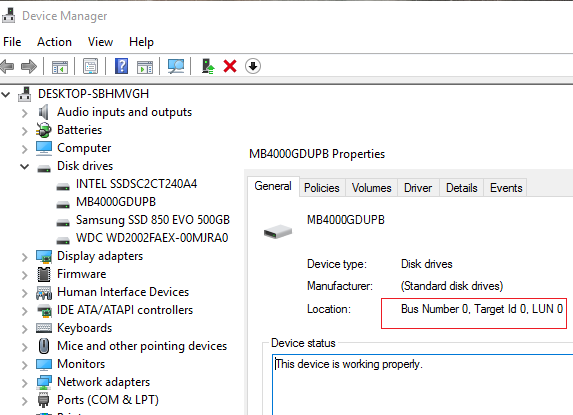
First of all, you have to detect the bus number of the controller that uses your hard drive. To do it, open the Device Manager (devmgmt.msc), find your drive in the list of Disk drives and open its properties. Remember the Bus Number and port number of your disk (Target ID). In my example, the bus and port numbers is 0.
In Windows 7, you can mark the controller port as internal using the TreatAsInternalPort registry parameter. To do it, run the regedit.exe and go to the reg key HKLM\SYSTEM\CurrentControlSet\Services\msahci\Controller(n)\Channel(N), where (n) is the number of the controller the drive is connected through and (N) is the number of the controller channel (port).
In this registry key, create a DWORD parameter with the name TreatAsInternalPort and value 1.
This should be done for all SATA drives that you want to mark as internal ones. For example, you have 2 drive controllers in your computer. The first one has two SATA drives connected, and one more SATA drive is connected to the second controller. To mark them as internal drives, run these commands:
reg add "HKLM\SYSTEM\CurrentControlSet\Services\msahci\Controller0\Channel0" /f /v TreatAsInternalPort /t REG_DWORD /d 0x00000001
 reg add "HKLM\SYSTEM\CurrentControlSet\Services\msahci\Controller0\Channel1" /f /v TreatAsInternalPort /t REG_DWORD /d 0x00000001
 reg add "HKLM\SYSTEM\CurrentControlSet\Services\msahci\Controller1\Channel0" /f /v TreatAsInternalPort /t REG_DWORD /d 0x00000001
After making the changes, you need to restart the computer.
In Windows 10/8.1, the StorAHCI driver is used instead of MSAHCI, so the location of TreatAsInternalPort parameter in registry is different. Go to the key HKLM\SYSTEM\CurrentControlSet\Services\storahci\Parameters\Device, create a multi-string parameter (REG_MULTI_SZ) TreatAsInternalPort and in each string specify the port number of your SATA controller you want to mark as internal. For example, to mark all drives from 0 to 3 as internal, set the following value of the TreatAsInternalPort parameter:
0
 1
 2
 3
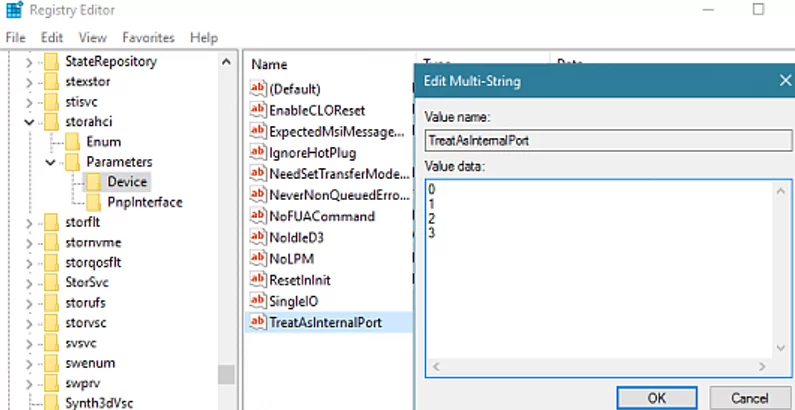
Then restart your computer and all SATA/SSD drives with port numbers from 0 to 3 will be hidden from the Safe Removal list and will no longer be displayed as removable.
1 comment
Great Tutorial But. I just reinstalled W10 Pro on an SSD in RAID not ahci because I also have 2 Single TB HDD in RAID 1 for storage.
Tried the above solution but NOJOY using the W10 ……storahci method. Is there a different Regedit location for RAID than storahci?
I do have an OLD Motherboard with only BIOS not UEFI (ASUS P6T Deluxe). Greatly appreciate any comments on a rather COMPLICATED issue. Jaime