Managed Service Account (MSA) is a special type of Active Directory account that can be used to securely run services, applications, and scheduled tasks. The basic idea is that the password for these accounts is completely managed by Active Directory. A complex password with a length of 240 characters is automatically generated for them, which changes automatically (by default, every 30 days). Only Kerberos is used for authentication (no NTLM security issues), interactive logon isn’t allowed, the password is not known to anyone and is not stored on the local system (you cannot extract the password from the LSASS system process with mimikatz or similar tools). This way, to start a service or unattended jobs, you don’t need to create individual service users in AD and manage their passwords.
Managed Service Accounts were introduced in Windows Server 2008 R2 (object type msDS-ManagedServiceAccount). Their main limitation is that such an account can only be used on one server (they cannot be used in cluster and NLB services). Therefore, Windows Server 2012 introduced Group Managed Service Accounts/gMSA (type msDS-GroupManagedServiceAccount). gMSA accounts can be used simultaneously on multiple hosts.
Let’s consider the features of using MSA and gMSA to launch services and tasks on servers and workstation in Active Directory.
- Create the Key Distribution Service (KDS) Key
- How to Create a Managed MSA Account in Active Directory
- Create a Group Managed Service Account (gMSA) in Active Directory
- Installing Group Managed Service Account on Windows
- How to Run a Windows Service under a Managed Service Account?
- Running Scheduled Task with Managed Service Account/gMSA
Requirements for using MSA/gMSA service accounts:
| Managed Service Account | Group Managed Service Account | |
| AD domain and forest functional level | Windows Server 2008 R2 or newer | Windows Server 2012 or newer |
| KDC | Domain controller with Microsoft Key Distribution Service (KdsSvc) enabled | |
| PowerShell | To create and manage service AD accounts, you need to install the Active Directory module for Windows PowerShell | |
| .Net Framework | .NET Framework 3.5 or newer must be installed on the server | |
| Supported Windows versions | Windows 7/Windows Server 2008 R2 or newer | Windows Server 2012/Windows 8 or newer |
Create the Key Distribution Service (KDS) Key
Before you start creating an MSA/gMSA account, you must to perform a one-time operation and create a KDS root key. To do it, run the following PowerShell command on the domain controller (Microsoft Key Distribution Services has to be installed and running):
Add-KdsRootKey –EffectiveImmediately
In this case the key is created and becomes available in 10 hours after the AD replication is over.
Add-KdsRootKey –EffectiveTime ((get-date).addhours(-10))Make sure that the KDS root key has been created successfully:
Get-KdsRootKey
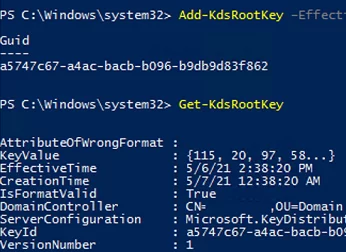
Use the command to check the KDS key:
Test-KdsRootKey -KeyId (Get-KdsRootKey).KeyId

How to Create a Managed MSA Account in Active Directory
To create a new MSA managed account in AD, use the command:
New-ADServiceAccount -Name msaMunSrv1 –RestrictToSingleComputer
By default, MSA and gMSA are created in the container CN=Managed Service Accounts, but you can change the OU using the Path parameter.
Link your MSA service account to the target computer:
$Identity = Get-ADComputer -identity mun-srv01
 Add-ADComputerServiceAccount -Identity $identity -ServiceAccount msaMunSrv1
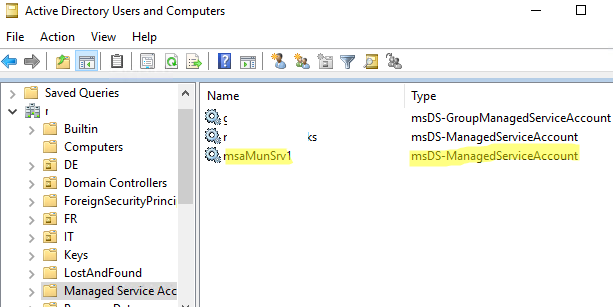
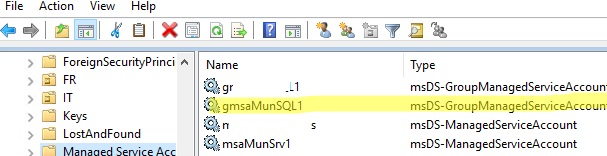
Open the ADUC (Active Directory Users and Computers) console and make sure that a new account of type msDS-ManagedServiceAccount has appeared in Managed Service Accounts container (OU).
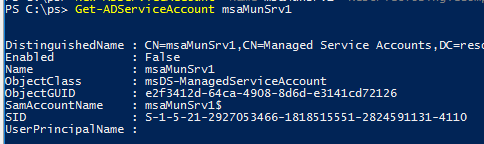
You can get the MSA account info using the command:
Get-ADServiceAccount msaMunSrv1
Create a Group Managed Service Account (gMSA) in Active Directory
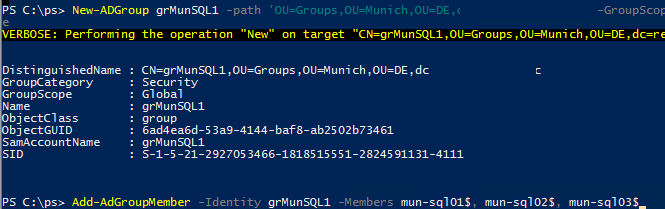
Before creating the gMSA account, create a domain security group and add servers to it that will be allowed to use the password for this group service account. The easiest way to create and populate a group is using PowerShell:
New-ADGroup grMunSQL1 -path 'OU=Groups,OU=Munich,OU=DE,dc=woshub,DC=com' -GroupScope Global -PassThru –Verbose
 Add-AdGroupMember -Identity grMunSQL1 -Members mun-sql01$, mun-sql02$, mun-sql03$
To create a Group Managed Service Account (gMSA), use the command:
New-ADServiceAccount -name gmsaMunSQL1 -DNSHostName gmsaMunSQL1.woshub.com -PrincipalsAllowedToRetrieveManagedPassword grMunSQL1 –verbose

The gMSA account is also created by default in the Managed Service Accounts OU.
Installing Group Managed Service Account on Windows
To use MSA / gMSA service accounts on target servers or workstations, you first need to install the Active Directory PowerShell module:
Add-WindowsFeature RSAT-AD-PowerShell
Install the MSA (gMSA) service account on the server:
Install-ADServiceAccount -Identity gmsaMunSQL1
Check if the service account is installed correctly:
Test-ADServiceAccount gmsaMunSQL1
If the command returns True, everything is configured correctly.

False, most likely the MSA account is not installed on the server or this computer doesn’t have permissions to use it:
WARNING: Test failed for Managed Service Account gmsaMunSQL1. If standalone Managed Service Account, the account is linked to another computer object in the Active Directory. If group Managed Service Account, either this computer does not have permission to use the group MSA or this computer does not support all the Kerberos encryption types required for the gMSA.
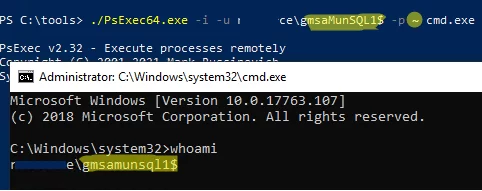
You cannot use standard RunAs to verify that your services and scripts can run under the MSA service account. Use the PsExec tool instead (we previously showed you how to use psexec to run the command prompt on behalf of NT Authority\System).
- Open the command prompt as administrator;
- Run the command:
PsExec64.exe -i -u woshub\gmsaMunSQL1$ -p ~ cmd.exeReplace the password with ~. This means that the password must be obtained from AD. - In the cmd window that opens, run the
whoamicommand to make sure that the console is running under the gMSA account;
- Verify that scripts, programs, or services are running correctly under a Managed Service Account.
Now it remains to configure the necessary Windows services, task scheduler tasks, IIS pools, etc., to run as MSA/gMSA user.
How to Run a Windows Service under a Managed Service Account?
You can now configure the required Windows service to run under a MSA/gMSA account.
- Open the service management console (
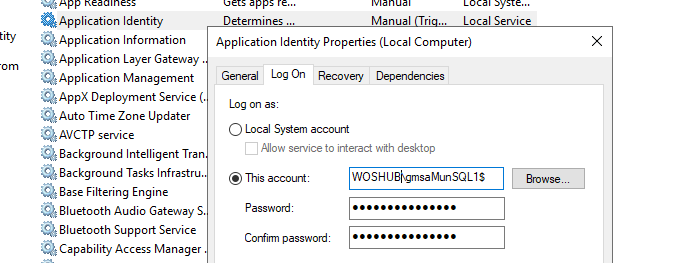
services.msc); - Open the properties of the required service and go to the “Log On” tab;
- Select the This account option and enter the name of the MSA account. Be sure to add the $ symbol at the end of the account name (you don’t need to enter the account password);
- The MSA service account will be automatically granted Log On As a Service permissions;
- After saving the changes, the service must be restarted.
Running Scheduled Task with Managed Service Account/gMSA
You can configure Windows Task Scheduler to run jobs under the gMSA service account. This is convenient because the passwords for the gMSA account are not stored in scripts, you don’t need to encrypt or protect them. When the password changes, you don’t have to reconfigure the task.
You can configure the task to run as the gMSA account using PowerShell. For example, the following script will create a new scheduled task that runs a PowerShell script every day at 11:00 pm to backup the database:
$action = New-ScheduledTaskAction -Execute powershell.exe  -Argument "-file C:\PS\Scripts\DBBackup.ps1 -executionpolicy bypass -NoProfile"
 $trigger = New-ScheduledTaskTrigger -At 23:00 -Daily
 $principal = New-ScheduledTaskPrincipal -UserID woshub\gmsaMunSQL1$ -LogonType Password
 Register-ScheduledTask DBBackup –Action $action –Trigger $trigger –Principal $principal
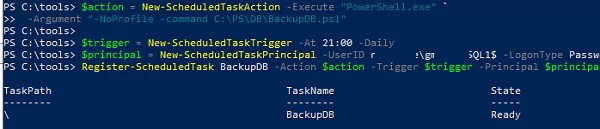
The ‘-LogonType Password‘ argument specifies that the password for this gMSA account will be retrieved from the domain controller.
You can also create a scheduled job with the desired settings using the taskschd.msc GUI. Then you can reconfigure it using the schtasks.exe tool to run under a managed service account:
schtasks /Change /TN BackupDB /RU "woshub\gmsaMunSQL1$" /RP ""
5 comments
Your comment about changing the password interval is incorrect according to the Microsoft Documentation for the CMDlet (https://docs.microsoft.com/en-us/powershell/module/activedirectory/set-adserviceaccount). Running get-help for Set-ADServiceAccount also does not show this parameter in the syntax. The proper way would be to use the -Replace parameter and to specify @{‘msDS-ManagedPasswordInterval’=’60’}; however, you then get an error “The attribute cannot be modified because it is owned by the system”. This can be further verified under the technical specification for the attribute (https://msdn.microsoft.com/en-us/library/cc220154.aspx).
It seems the only way to achieve a different password interval is to recreate the service account. If you do this, you’ll need to make sure that you replace any references to this account as recreating it will break any prior usage of an account with a similar name.
I believe this statement in the beginning is false: “Only Kerberos is used for authentication (no NTLM security issues)”.
I’m able to pass-the-hash with my gMSA account in to a machine where my gMSA is admin, and the 4624 event reveals it is a NTLMv2 logon.
This manual is great! Thank you very much.
In my case i couldnt use the following command in powershell on the target server: “Install-ADServiceAccount -Identity gmsaMunSQL1”
I fixed this, after logging in, as domain administrator on the target server.
What kind of rights does my serveradministrator need, to do this command? I have local adminrights. But it seems to be not enough. I want to remove local admin rights on my servers for the “domainadmin”-Group. Do you have any suggestions?
Not sure that the Domain and Forest functional level requirements are correct. Nothing on the Microsoft gMSA requirements suggest that any particular functional level requirement exists. What is true is that gMSA requires 2012 Schema extensions and at least one 2012 DC to operate. The Microsoft documentation even hints that down-level functional levels are supported because by virtue of saying at least on 2012 DC they are implying that down-level DC versions can co-exist and therefore the functional level cannot be 2012 in that situation.
Hi, why not a domain local group? (And inside the computers)
New-ADGroup grMunSQL1 -path ‘OU=Groups,OU=Munich,OU=DE,dc=woshub,DC=com’ -GroupScope Global -PassThru –Verbose
Add-AdGroupMember -Identity grMunSQL1 -Members mun-sql01$, mun-sql02$, mun-sql03$